Shoporama Templates
Below is information as to how you develop Shoporama themes
Navigation
Overview
In general, a Shoporama theme is a series of HTML files located in a folder on our ftp server. The template language in the individual files is Smarty, as mentioned below.
In the individual templates, there is access to a range of objects and methods. You can read more about them in our Template API.
Contact us at support@shoporama.dk if you have any questions.
Development environment
To make the development of Shoporama themes easier and faster, we have developed Hackorama - a local development environment that simulates Shoporama's production environment.
Hackorama makes it possible to develop and test your themes locally without having to deploy to production. This gives you faster feedback and a more efficient development process.
Functions
- Local API data retrieval with caching system
- Smarty 4 template engine with the same delimiters as Shoporama
- Wrapper classes that mimic Shoporama's "Safe*" classes
- Automatic image scaling and caching
- Simulated customer login and checkout flow
- Debug tools and logging
Get started
Follow these steps to get started with Hackorama:
# 1. Klon repository
git clone https://github.com/blinksbjerg/hackorama.git
cd hackorama

# 2. Konfigurer din API-nøgle i setup.php
# Rediger setup.php og indsæt din Shoporama API-nøgle

# 3. Start lokal PHP server
php -S localhost:8080

# 4. Åbn din browser
# Naviger til http://localhost:8080
Example: Testing product display
Here's an example of how you can test your product display in Hackorama:
# I din template fil (f.eks. product.html)
<div class="product-detail">
    <h1><{$product->getName()|escape}></h1>
    <div class="price">
        <{$product->getPrice()|currency}>
    </div>
    <div class="description">
        <{$product->getDescription()}>
    </div>
</div>

# Test i Hackorama ved at navigere til:
# http://localhost:8080/product?id=123
Tip: Hackorama includes the Alaska2 theme as an example. You can use this as a starting point for your own theme or as a reference for best practices.
Note: Hackorama is not a 1:1 copy of Shoporama's production environment. It supports the basic features needed for local theme development, but not all advanced features are implemented. This is designed to give you a fast and efficient development environment for the most common use cases.
Read more about Hackorama and see the full documentation on GitHub.
Smarty
The engine of our templating system is based on Smarty.
We have version 2.6 installed for backwards compatibility reasons, but we no longer maintain it and we recommend that everyone uses version 4.x. The version is set under settings for the shop.
Please note that this documentation only applies to version 4.x.
The difference between standard Smarty and ours is that we use <{ and }> as delimiters. I.e. the syntax is:
<h1>Velkommen til <{$webshop->getName()|escape}></h1>Tips
Check content
If you are unsure what a variable is or what a function returns, you can run it through var_dump. If you have an object, you will always be able to see what methods are available in our Template API.
You use var_dump in the following way:
<{$order|var_dump}>Check objects
In some cases, it is relevant to make sure that if you use a variable as an object, it is also an object. Otherwise the template will not work. We set some global variables such as $product, and$webshop and others. For those variables it is not necessary. They can be checked in one of the following ways:
<{* Typisk tilstrækkelig *}>
<{if $profile}>
	<{$profile->getName()}>
<{/if}>

<{* Lidt grundigere *}>
<{if is_object($profile)}>
	<{$profile->getName()}>
<{/if}>

<{* Meget grundig *}>
<{if is_a($profile, "SafeProfile")}>
	<{$profile->getName()}>
<{/if}>
Fejlfinding
If you want to see which variables are available on the page you are developing, you can activate Smarty's debug mode and view the variables in a new window. Insert the following code into your template:
<{debug}>
Dive deeper into Smarty4 here: Smarty 4 Documentation.
Available features and modifiers
In Shoporama, you have access to a selected set of Smarty modifiers and features that are approved for security reasons:
Modifiers
String manipulation
|strip_tags - Fjerner HTML tags|substr:start:length - Udtrækker del af streng|trim - Fjerner whitespace|ucfirst - Stort begyndelsesbogstavArrays og tal
|implode:"," - Samler array til streng|explode:"," - Deler streng til array|count - Tæller elementer|floor - Runder ned|strlen - Længde af strengDato og andet
|strtotime - Konverterer dato til timestamp|md5 - MD5 hashFunktioner i conditionals
Validering
isset($var) - Tjekker om variabel er satis_array($var) - Tjekker om det er et arrayis_object($var) - Tjekker om det er et objektintval($var) - Konverterer til heltalArrays og templates
in_array($needle, $haystack) - Søger i arraytemplate_exists('file.html') - Tjekker om template findesEksempel:
<{if in_array($product->getProductId(), $featured_ids) && isset($show_badge)}>
    Featured
<{/if}>
File structure
You get ftp access to your shop and in the root of your directory, put your theme. The name of the folder is the name of the theme.
You are generally free to name the files in /{name}/templates as you wish. However, there are a few exceptions:
/{navn}/templates/global.html
The parent page that contains the structure of the entire shop. The content itself is inserted where this template shows <{$contents}>, which is a special variable that comes from the index.html below. A very simpleglobal.html could look like this:
<!DOCTYPE html>
<html>
<head>
	<title><{$webshop->getName()|escape}></title>
</head>

<body>

	<nav>
		<!-- Din navigation -->
	</nav>

	<div>
		<{$contents}>
	</div>

</body>

</html>
/{navn}/templates/index.html
This template is used to display the content of whatever you're looking at. That could be a product, a landing page, or the cart, and so on. A suggestion for how it could look is the following:
<{if $inc}>

	<{include file=$inc}>

<{elseif $category}>

	<{include file="category.html"}>

<{elseif $landing_page}>

	<{include file="landing_page.html"}>

<{elseif $product}>

	<{include file="product.html"}>

<{elseif $page}>

	<{include file="page.html"}>

<{elseif $blog_post}>

	<{include file="blog_post.html"}>

<{/if}>
/{navn}/templates/printed_invoice.html
Used from admin if you want to print a delivery note. The content of the order will always be in the $order variable.
/{navn}/templates/mails
If you want to send your customers an email some time after they have made a purchase.
$products
$order
Email that can be automatically sent if the customer has entered their email address but has not checked out.
$basket_url
$basket
Email that can be sent if an item is back in stock and the customer has signed up.
$product
Email to dropshipping supplier.
$products
$order
The invoice for the order.
$order
Email if the order is credited.
$order
Email sent when the order is shipped.
$order
Email sent when the order is ready for pickup in store.
$order
Email sent when the order is picked up from the store.
$order
If the customer has completed an order, but has not completed the payment.
$payment_url
$order
Email that can be sent to the customer if you want reviews.
$order
Email with link to reset password. To get the URL, use $customer->getTokenUrl().
$customer
Welcome email if the customer creates an account in the shop.
$customer
Email sent to the customer if the points expire.
$customer
$points_to_expire
$points_expire_date
Email sent to the customer when they create a return via the return center.
$order_return
Email sent to the customer with return label (PDF or QR code). If the store owner has enabled GLS QR code return labels, the QR code can be displayed inline in the email with $order->getGlsReturnQr() which returns the path to the QR code image (or null).
$order
$order->getGlsReturnQr()
Email sent to the customer when a return is approved as a voucher instead of a refund. Contains the gift card code, amount and expiration date. Only sent if the store owner has enabled "Offer voucher" in the return center and the customer has selected it.
$order_return
$voucher->getCode()
$voucher->getPriceDiscount()
$voucher->getExpires()
Confirmation sent to the customer when a return is approved and the amount is refunded to the card (regular refund, or the profit from a cheaper exchange where the customer chose money back).
$order_return
$amount
Email sent to the customer when they create an exchange via the return center, confirming that the exchange request has been received. Falls back to return_received.html if the theme does not have it.
$order_return
Sent upon approval of an exchange that is more expensive than the returned item. Includes a payment link for the difference.
$order_return
$order
$payment_url
Sent upon approval of a cheaper exchange where the customer has chosen to receive the excess amount as a voucher. Contains the gift card code. Falls back to return_voucher.html if the theme does not have it.
$order_return
$voucher->getCode()
$voucher->getPriceDiscount()
Receipt sent to the customer when they cancel a purchase via the digital withdrawal function (durable medium, legal requirement). Can be found in the theme next to withdrawal.html.
$order
$reason
$withdrawal_time
Receipt sent to the customer when an order's status changes to "Cancelled". Cancellation emails are disabled by default and must be enabled for each webshop under Settings → Emails (this setting controls both the customer receipt and the store notification, so that bulk/auto-cancellations do not spam). Additionally, the customer email is only sent if the template exists in the theme.
$order
$reason
$cancellation_time
General information about the structure of mail templates
By default, all mail templates are divided into two parts. One part for the subject and the other part for the content. The way the template is divided is by checking if the variable $subject is set. If it is, the template should return the subject. Otherwise, it should return the content. Example:
<{if $subject}>

	Emnet på mailen

<{else}>

	Indholdet af mailen

<{/if}>
With the exception of the two emails invoice.html andinvoice_dropshipping.html where the subject is controlled via adminadmin and not via the template.
Images, stylesheets, etc. in the theme
You are allowed to place your images, stylesheets, etc. wherever you want, but we recommend that you use a structure like
/{name}/images and /{name}/css. When referring to the files, use the variable
$theme_url which contains the URL to the theme. Note that it can change, so you cannot always
manually enter the URL into your theme. But the variable will always work. If you want to link to the image
/{name}/images/img.gif, you should therefore write

Extensions
Shoporama contains various data types such as products and categories. These data types include predefined fields such as title, description, and price. It is possible to expand the most common data types with custom fields. Extensions should be placed in the theme in the file /{name}/extensions/{datatype}.json, where the possible data types are product, landing_page, category, static_page, and blog_post.
The json-file must contain an array of groups. Each group contains a row of fields. The format is as this:
name
string
Group field name
description
string
Longer description
fields
array
Array of fields
Field properties:
title
The title of the field
description
Longer description if relevant.
id
ID to fetch value with
type
One of the following types:
options
Values whose type is either list or multi. The format is
"options": {
	"foo": "Foo",
	"bar": "Bar",
	"baz": "Baz"
}
placeholder
Optional placeholder
default
Default value
searchable
Optional bool. Only for product extensions. Text fields(text, string, longtext, richtext, wysiwyg, list, multi) are automatically indexed in the product search, so for example author name or product group can be found. Set "searchable": false to keep a field out of the search. Fields without the flag will be included (backward compatible).
repeater
Used to create repeating groups of fields that the customer can add/remove dynamically. Repeater items can be dragged and dropped to change the order. Requires a fields array that defines the sub-fields.
Extra properties:
field_title- Name of individual item (e.g. "Feature", "Slide", "Point")fields- Array of sub-fields (supports: text, richtext, longtext, number, image)
Below is an example of json in the file extensions/product.json:
[
	{
		"name": "Billeder",
		"description": "Her kan du tilføje billeder",
		"fields": [
			{
				"title": "Et enkelt billede",
				"id": "my-image",
				"type": "image"
			},
			{
				"title": "En serie af billeder",
				"id": "my-images",
				"type": "images"
			}
		]
	},
	{
		"name": "Indstillinger",
		"description": "Herunder kan du indstille diverse",
		"fields": [
			{
				"title": "my-setting",
				"description": "Vælg flere ..",
				"id": "tags",
				"type": "multi",
				"options": {
					"foo": "Foo",
					"bar": "Bar",
					"baz": "Baz"
				}
			}
		]
	},
	{
		"name": "Features",
		"description": "Produktfeatures med ikoner",
		"fields": [
			{
				"title": "Features",
				"id": "features",
				"type": "repeater",
				"field_title": "Feature",
				"description": "Tilføj features for produktet",
				"fields": [
					{
						"id": "title",
						"type": "text",
						"title": "Overskrift",
						"placeholder": "Fx: Vandtæt"
					},
					{
						"id": "description",
						"type": "longtext",
						"title": "Beskrivelse"
					},
					{
						"id": "icon",
						"type": "image",
						"title": "Ikon"
					}
				]
			}
		]
	}
]
Will produce this interface:
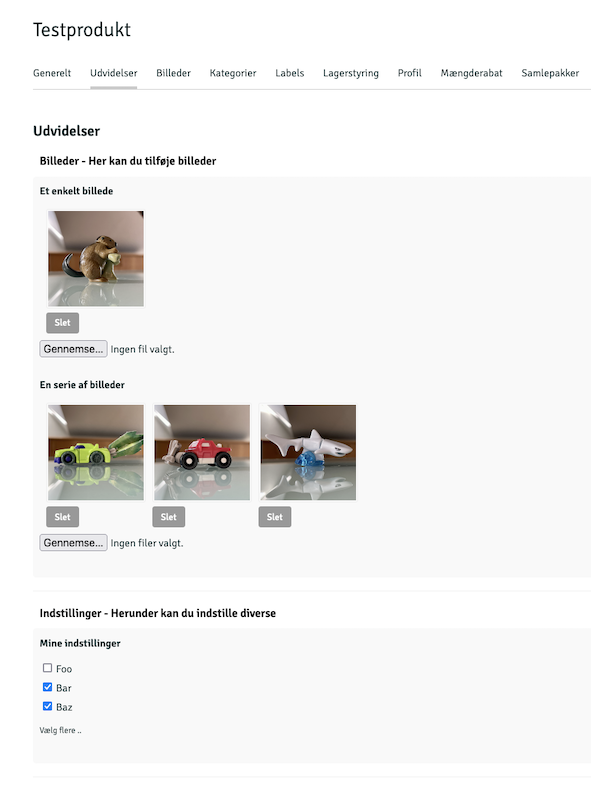
For data types that support extensions, the values must be retrieved via the getExtensionValue('ID') method, where ID is the ID from the json file. Depending on the data type of the field, the content can be returned as a text, array, or object:
Materiale: <{$product->getExtensionValue('materiale')}>
Or:
<{if $img = $product->getExtensionValue('img')}>
	<{$img->getSrc(50, 50, 'fit')}>
<{/if}>
Or if you want to loop images:
<{foreach $product->getExtensionValue('my-images') as $image}>
	<img src="<{$image->getSrc(50, 50, 'box')}>">
<{/foreach}>
For repeater fields you can loop through items. Image fields in repeaters are returned as Image objects:
<{foreach $product->getExtensionValue('features') as $feature}>
	<div class="feature">
		<{if $feature.icon}>
			<img src="<{$feature.icon->getSrc(64, 64, 'box')}>" alt="">
		<{/if}>
		<h3><{$feature.title|escape}></h3>
		<div><{$feature.description|escape|nl2br}></div>
	</div>
<{/foreach}>
For date and datetime fields, the value can be used directly or formatted with Smarty's date_format:
<{* Date felt - vis kun dato *}>
Lanceringsdato: <{$product->getExtensionValue('publishdate')|date_format:'%d/%m/%Y'}>

<{* Datetime felt - vis dato og tid *}>
Publiceringsdato: <{$product->getExtensionValue('publishdatetime')|date_format:'%d/%m/%Y kl. %H:%M'}>

<{* Tjek om produktet skal vises baseret på dato *}>
<{if $launch_date = $product->getExtensionValue('publishdate')}>
	<{if $launch_date|strtotime <= $smarty.now}>
		<!-- Produktet er lanceret -->
	<{/if}>
<{/if}>

<{* Sammenlign datoer *}>
<{if $product->getExtensionValue('publishdatetime')|strtotime > $smarty.now}>
	Kommer snart: <{$product->getExtensionValue('publishdatetime')|date_format:'%d. %B %Y'}>
<{/if}>
Global variables
$webshop
General object that contains the webshop, but also contains some functions for extracting various data from the webshop. Read more about the Webshop object. Example of how $webshop is used to pull a list of categories:
<{foreach $webshop->getCategories() as $category}>
	<{$category->getName()|escape}>
<{/foreach}>
$webshop->getNewsletters()
Extract the shop's publicly shared newsletters and build an archive. Each item is a SafeNewsletterCampaign object with methods such as getTitle(), getDate(), getExcerpt(), getImage(), getUrl(), and getContent(). Use $webshop->getLatestNewsletter() to link to the latest newsletter. The store must have “Show public newsletter archive” enabled under Newsletter.
<{if $webshop->hasNewsletters()}>
	<{foreach $webshop->getNewsletters(12) as $nl}>
		<a href="<{$nl->getUrl()}>">
			<{if $nl->getImage()}><img src="<{$nl->getImage()|escape}>" alt=""><{/if}>
			<time><{$nl->getDate()|date_format:"%d. %B %Y"}></time>
			<h3><{$nl->getTitle()|escape}></h3>
			<p><{$nl->getExcerpt()|escape}></p>
		</a>
	<{/foreach}>
<{/if}>
$product
Product object if you see a product page
$category
Category-object if a category is shown
$landing_page
Dynamic category-object if a dynamic category is shown
$page
Object for static page.
$blog_post
Blog post object if you are looking at a blog post
$inc
The name of the special - non-dynamic, page being executed. The values for this can be return.html,
order-return.html,
return-exchange.html,
return_received.html,
return_label.html,
return_voucher.html,
also.html,
search.html,
basket.html,
address.html,
shipping.html,
approve.html,
payment.html,
thanks.html,
order.html,
product_review.html,
subscription.html,
blog.html,
user-sign-up.html,
user-sign-in.html,
user-sign-out.html,
user-edit.html,
user-reset-password.html,
user-profile.html,
user-orders.html,
user-points.html,
user-subscriptions.html,
user-change-card.html,
404.html,
410.html.
Since we validate the content, you can use the code below to control the display in an include file:
<{if $inc}>
	<{include file=$inc}>
<{/if}>
$shipping
Selected shipping method
$pager_array
Pager if the current page contains page scrolling. The contents of the array are the elementsmax,current,total,url, andfirst_url.
$pager
Pager object
$current_url
Absolute URL for the current page
$top_url
Relative URL to the current page.
$get
An array with all GET variables. Among other things, the system sets:
$get.payment_cancelled— set when payment is canceled/fails$get.not_found— set when an order is not found (returns)$get.wrong_voucher— set when an invalid discount code is used
$post
An array with all POST variables.
$cookie
An array with all COOKIE variables.
$user_id
The ID of the shop owner who is logged into admin. This variable is set if you follow a link to the shop from admin.
$customer
Customer object if the customer is logged in to the shop.
$remote_addr
The IP address of the customer viewing the page.
$admin_url
URL to Shoporama admin
$selected_payment_gateway
The ID of the selected payment gateway.
$join_mailinglist
An indicator indicating whether the customer has marked that they want to sign up for the newsletter.
$basket_url
URL to the basket and its contents.
$products_matches
IDs of products that have matched a discount or promotion
$campaign_ids
IDs of campaigns if the products in the cart match a campaign.
$campaigns
If there are active campaigns.
$campaign_discount
The discount from the active campaigns.
$campaign_matches
An array of products that match a campaign. If there are no products, the variable is null.
$unpaid_order
If the customer has an unpaid order.
$unpaid_recurring_order
Unpaid subscription.
$basket
The content of the cart as an array, where the individual elements are the products in the cart, with the values:
.id
unique id on the line
.product_id
The ID of the product
.in_stock
true/false if the product is in stock
.product
the product
.attributes
the product's attributes
.own_id
the item number
.amount
the quantity in the cart
.comment
evt. kommentar - optional comment
.bundle
array of the product if the product is a bundle
Example of how the above is used:
<{foreach $basket as $row}>
	<{if $image = $row.product->getImage()}>
		<img src="<{$image->getSrc(50, 50, 'box')|escape}>">
	<{/if}>

	<{$row.amount}> x <{$row.product->getName()|escape}>

	i alt

	<{$row.product->getRealPrice($row.amount, $row.attributes)|number_format:2:",":"."}>
	<{$webshop->getCurrency()}>

<{/foreach}>
Check the Template API to see which methods are available on the different objects.
$subscriptions
Basket subscriptions. Works in the same way as $basket
$price
The subtotal of the cart's contents. That is, without shipping.
$shipping_price
The shipping cost of the cart.
$total_price
Total price of the content in the cart.
$vat
The VAT on the contents of the cart.
$deposits
The deposit for each deposit type (array containing name, units, unit_amount, and total). Display the rows between the subtotal and the total—the amount is already included in $total_price. See also $deposit_total. On order pages, use $order->getDepositLines() and $order->getDepositTotal(), and for each product, use $product->getDepositTotal($amount, $attributes) to display a “+ deposit” hint next to the price.
On product pages: $product->hasDeposit() indicates whether the product has a deposit; $product->getDepositCount($attributes) returns the number of deposit units per sales unit (taking variant overrides into account); and $product->getDepositType() returns the deposit type (or null) along with getName(), getAmount() (including tax), getAmountExVat($vat_pct), and getVatShare($vat_pct). On the return status page, $order_return->getDepositRefunds() returns the deposit lines in the return. The lines from ` getDepositLines() ` are standard order line objects (`getName()`, `getAmount()`, `getPrice($quantity)`) and are filtered from ` $order->getOrderProducts()`, so existing themes will still display correct totals without any changes.
$product->getPricePerUnit()
Unit price for a "kr/each" hint below the price (e.g., 4.11 kr/each). The store fills in $product->getUnitAmount() (number of base units in the package, e.g., 24 or 0.5) and $product->getUnitLabel() (the unit as free text: pcs, L, kg, etc.) for each product. getPricePerUnit() returns the customer-facing price divided by the unit (taking into account promotions, VAT display, customer group, and vouchers)—or null if the product has no unit price. For B2B themes that display prices excluding VAT, use getPricePerUnitExVat().
The built-in themes automatically display the line on product cards and product pages via components/price.html with the include parameter unit_price=true. The calculation is based on the displayed price, so the unit price always follows the main price. It is not displayed for products with variant prices (hasAttributePrice()), as it would otherwise be ambiguous.
$basket_weight
The total weight of the curve (for e.g. shipping).
$total_amount
Total number of products in the curve.
$voucher
The discount code if there is one.
$voucher_discount
The discount from the discount code.
$shipping_country
The selected delivery country.
$nofollow
Indicates whether nofollow is set on the page.
$meta_title
The title of the page.
$meta_description
Description of the page.
$canonical
URL of the page's canonical.
$session_order
Array with the billing address. Contains the fieldsname, company_name, vat_number, address, address2, zipcode,city, email, phone, ean_number, comments
$session_del
Array with the delivery address. Contains the fields:name, company_name, address,address2, zipcode, city
$session_extra
Array of extra fields on the order. If a field is POSTed withextra[test]=123, $session_extra.test will be 123 and will be stored on the order.
$use_points
Number of points the customer has entered that they want to use on the order.
$point_discount
How many DKK (or other currency) the used points (from $use_points) correspond to.
$earns
How many points the customer earns by completing the order.
Template functions
The following are the Shoporama-specific features that can be used in templates:
Template language support
It is possible to build language support into your templates. Not classic language support, where you can select the text in multiple languages, but language support where it is possible to change the text in admin. It works by wrapping the text in a <{t}> block. After the template has been rendered in the browser, the text can then be edited in admin. Example:
<{t}>Din kurv<{/t}>
Note that if you change the text in your template files, the new text will appear in admin as a new text. There are no IDs or names other than the content, which makes the text unique.
You can set the section attribute on the block to divide your texts into more manageable parts. As well as hint if you want to give a hint in admin when the text is edited:
<{t section="basket" hint="Bruger i overskriften"}>Din kurv<{/t}>
If you have variable content that you want to send with without the value being in admin, you can use the syntax below:
<{t amount=$total_amount price=$total_price|number_format:2:",":"." hint="Til kurven"}>
    Du har {amount} ting til {price} kroner i kurven.
<{/t}>
If it fits better in your structure, you can also use t as a modifier on your variables/functions:
<{$title = "Min titel her"}>
<{$title|t}>
The above will display the following in admin:
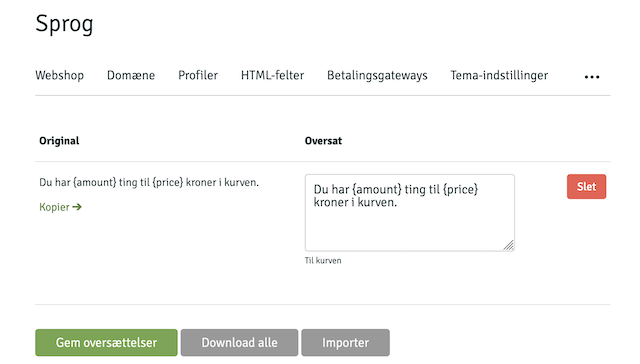
Arguments
Section for partitioning in admin
Hint used in admin as help text
Template caching
If a template contains a lot of heavy calls that don't need to be updated live - such as variants on products, menus, or category overviews, Shoporama includes a caching function that can make the shop a lot faster. The functions used are cache and get_cache respectively, which first mark the part to be cached and later retrieve the cached data. Example:
<{get_cache name="my_cache" ttl=3600 assign="c"}>

<{if $c}>

	Fra cache: <{$c}>

<{else}>

	Live:

	<{cache name="my_cache"}>
		<{$smarty.now}>
	<{/cache}>

<{/if}>
The cache function wraps the content and assigns it the name specified in name. When the content is to be extracted, get_cache is used, which takes the arguments name, as used earlier, and ttl, which specifies in seconds how old the content can be. If the argument is omitted, the default is one hour.
Arguments
Used to specify the name of the cached item. It is possible to use dynamic names from variables.
Cache content retrieval
Function that returns the cached content from the cache function.
Arguments
The name of the cached item used in cache.
Time To Live. Number of seconds the cache is allowed to remain valid for.
The name of the variable to which the content should be assigned.
Theme settings
It is possible to add some general settings to themes by adding a
theme_settings.json in the root of the theme, and it will result in something similar to the following:
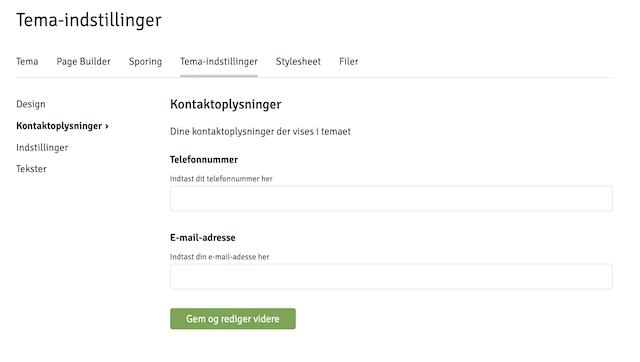
The structure is as follows:
info
The name of the theme
string
features
Array of features the theme contains. Only used for viewing in admin. Only useful if the theme is general and multiple users can select it. For example ["Feature A", "Feature B", "Feature C"]
array
demo
URL to possible demo page
string
split_blocks
If set to true, the page designer divides the blocks into two zones: above and below the main content of the page. The merchant can drag blocks between the two zones in the admin. In the theme templates, $page_blocks_top and $page_blocks_bottom are used to position the blocks correctly. Without this setting, all blocks are displayed in a single list. Recommended for themes where Page Designer blocks need to be placed both above and below the main content (product info, category list, etc.).
boolean
accordion
If set to true, the settings are displayed in an accordion layout instead of the classic card layout with sidebar. The accordion layout includes a search function that makes it easy to find specific settings and remembers which sections are open via localStorage. Recommended for themes with many settings.
boolean
smarty_version
Specifies which Smarty version your theme is built for. If this field is set, the theme takes control: Shoporama automatically synchronizes the store’s Smarty version when the theme is changed, and the selection is locked in the store owner’s settings so that the theme and engine always match. Valid values are currently 2 and 4, and the value must correspond to the version folder where the theme is located (e.g., 4 for a theme in user_templates/4/). An invalid or unsupported value is ignored, and the shop owner’s manual selection is retained. If the field is omitted, the behavior remains unchanged.
integer
settings
Array of editable fields
array
.path
ID of fields included in the variable as the first element when retrieving the value. If path is set to design, the values will be in $settings.design.{field name}
string
.name
Name displayed in admin
string
.description
Description shown in admin
string
.fields
The individual fields that can be edited by the user
array
.path
The ID for when to retrieve the value. If path is set to color and the parent field was design, the field can be retrieved via $settings.design.color
string
.name
Name displayed in admin
string
.description
Description shown in admin
string
.default
Default value. If the field is empty, this value will be used.
string
.type
The type of the field. The valid types are: image, color, string, text, bool, wysiwyg, and list. text is a multi-line textarea without rich text editor.
string
.values
Values if type is set to list. Formater er følgende:
[
	{
		"name": "cheese",
		"value": "Ost"
	},
	{
		"name": "ham",
		"value": "Skinke"
	}
]
array
Example of file contents
{
	"info": "Mit tema",
	"smarty_version": 4,
	"split_blocks": true,
	"accordion": true,
	"settings": [
		{
			"path": "design",
			"name": "Design",
			"description": "Indstillinger for dit design",
			"fields": [
				{
					"path": "logo",
					"name": "Toplogo",
					"description": "Upload dit logo her",
					"type": "image"
				},
				{
					"path": "background_color",
					"name": "Baggrundsfarve",
					"description": "Baggrundsfarven på shoppen",
					"type": "color"
				},
				{
					"path": "size",
					"name": "Bredde",
					"description": "Bredden på siden",
					"type": "list",
					"values": [
						{
							"name": "Afgrænset",
							"value": "boxed"
						},
						{
							"name": "Fuld bredde",
							"value": "fullwidth"
						}
					]
				}
			]
		},
		{
			"path": "contact",
			"name": "Kontaktoplysninger",
			"description": "Dine kontaktoplysninger der vises i temaet",
			"fields": [
				{
					"path": "mail",
					"name": "E-mail-adresse",
					"description": "Indtast din e-mail-adresse her",
					"type": "string"
				}
			]
		},
	]
}
Color schemes
If your theme uses color fields in theme_settings.json, you can offer predefined color schemes by adding a color_scheme.json file in the theme root. When the file is found, an additional menu item "Color schemes" appears under Design in the admin, where the store owner can select a color scheme with one click.
Color schemes only save the color fields defined in the file - all other theme settings remain untouched.
groups
Array of groups that control how the color fields are visually organized in the admin. Each group has a label (display text) and a fields array with field references in the format element.name - similar to path in theme_settings.json.
array
schemes
Array of color schemes. Each scheme has:
id— Unique ID (used internally to remember selected schema)name— Name displayed in admindescription— Short descriptioncolors— Object with color values. The keys use theelement.name notation, e.g."theme.primary": "#111827". A scheme does not need to contain all color fields - only the specified colors are updated.
array
Example of color_scheme.json
{
	"groups": [
		{
			"label": "Grundfarver",
			"fields": ["theme.primary", "theme.action", "theme.background"]
		},
		{
			"label": "Sektioner",
			"fields": ["theme.header_bg", "theme.footer_bg"]
		}
	],
	"schemes": [
		{
			"id": "default",
			"name": "Standard",
			"description": "Det klassiske look.",
			"colors": {
				"theme.primary": "#111827",
				"theme.action": "#2563eb",
				"theme.background": "#ffffff",
				"theme.header_bg": "#ffffff",
				"theme.footer_bg": "#111827"
			}
		},
		{
			"id": "warm",
			"name": "Varm",
			"description": "Varme jordtoner.",
			"colors": {
				"theme.primary": "#292524",
				"theme.action": "#c2410c",
				"theme.background": "#fffbeb",
				"theme.header_bg": "#fef3c7",
				"theme.footer_bg": "#292524"
			}
		}
	]
}
Translations (long/)
All text in your templates is wrapped in <{t}>...<{/t}>. The first time a page is displayed, each string is detected and added to the store owner’s text list under Design → Texts, where it can be translated. The downside is that the strings only appear as pages are visited—and that the store owner must translate everything from scratch.
By placing a "lang" folder in the root directory of your theme, you can provide pre-translated strings that are automatically populated when the theme is activated. This way, the store owner has all the strings available from the start and doesn't have to translate them manually.
Folder Structure
{navn}/
  langs/
    da.json
    de.json
    no.json
    sv.json
There is no en.json file —the theme's default text is written in English directly within <{t}>, so English-language stores do not need translations.
JSON format
Each file is divided into sections (typically the filename where the text is used). Under each section, the key is the original <{t}> string, and the value is the translation. The section becomes the "Section" filter in the text list.
{
	"product.html": {
		"Add to cart": "Læg i kurv",
		"Sold out": "Udsolgt"
	},
	"basket.html": {
		"Checkout": "Gå til betaling"
	},
	"404.html": {
		"We could not find what you were looking for": "Vi kunne ikke finde det, du søgte"
	}
}
Important: The key must exactly match the <{t}> string (leading and trailing spaces are ignored). If it does not match character for character, the translation will not be used when displaying the text.
How Imports Work
- The import runs automatically when the theme is activated on a store.
- The file is selected based on the store's language: a Danish store gets
da.json, a German store getsde.json, and so on. Swedish is accepted as bothsv.jsonandse.json. - All entries are created in the text list, even if the translation is empty—so the store owner can see the entire list from the start.
- Only empty fields are filled in. If the store owner has already edited a text, their version is retained—the import never overwrites it.
Page designer
The page designer is a tool for building content via sections from JSON files. These sections can be placed on different pages in the webshop. Which pages they can be placed in is defined in the/{name}/components/sections.json file. The content of each section is defined in its own file, which is placed in /{name}/components/sections/{section}.json.
If you have done the above, the Design link at the top of the admin will automatically lead tothe Page Designer:
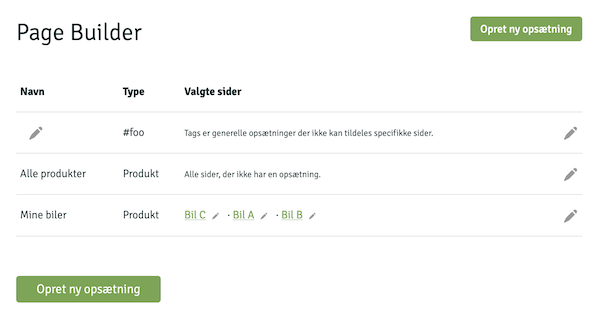
The structure in the construction of sections is as follows:
/{navn}/components/sections.json
File: sections.json
Contains a list of page types and an array of which sections are allowed. In addition to page types, you can also use custom tags.
{
	"Sidetype": ["sektionA", "sektionB"]
}
The following types of pages exist:
product
Product pages
category
Categories
landing_page
Dynamic categories
static_page
Pages
blog_post
Blog post
basket
The basket
address
Address page
shipping
Shipping page
approve
Approval page
thanks
The thank-you page, which the customer typically sees after the order is complete. Supports upselling after purchase (see below).
upsell-order
Endpoint for upselling after purchase. Receives the customer’s selection from the thank-you page, creates a new order with the same information as the one just completed, and redirects the customer directly to checkout.
search
Search result page
also
The upsell page, which can be used if you show an upsell page after the customer has added products to the cart
order
Order page, which displays the contents of the order via a link
#tags
Optional tags you create yourself
An example of a sections.json where the user can add the sectionsslider, photos, and quiz to landing pages, but only slider to product pages, and on #footer an about section can be added would look like this:
{
	"landing_page": ["slider", "photos", "quiz"],
	"product":      ["slider"],
	"#footer":      ["about"]
}
/{navn}/components/tags.json
File: tags.json
#footer that you drag out and display at the bottom of the shop, or an #xmas setup that you only use in December. The format for tags.json is:
{
	"tag1": "Beskrivelse ...",
	"tag2": "Beskrivelse ...",
	"tag3": "Beskrivelse ..."
}
The individual tags automatically appear in the admin when the user creates a new configuration.
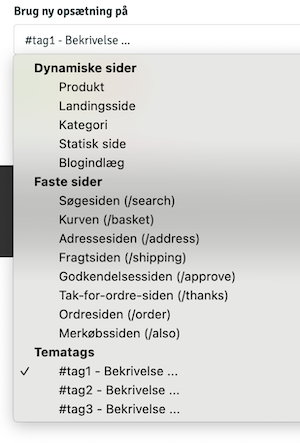
To extract the content of tags in the theme, thegetBlocks() function is used as follows:
<{if $blocks = $webshop->getBlocks("#foo")}>
	<{foreach $blocks as $block=>$elements}>
		[...]
	<{/foreach}>
<{/if}>
/{navn}/components/sections
Library: sections
slider, the content should be located in/{name}/components/sections/slider.json. The structure of the files is as follows title
Field: title
The name displayed in admin
description
Field: description
Description shown in admin
preview_svg
Field: preview_svg
Optional. Inline SVG markup displayed as wireframe preview in admin when user selects section. Use currentColor with opacity for automatic dark/light mode compatibility. ViewBox is 0 0 0 200 80.
"preview_svg": "<rect x='0' y='0' width='200' height='80' rx='4' fill='currentColor' opacity='0.08'/><rect x='55' y='30' width='90' height='8' rx='2' fill='currentColor' opacity='0.25'/>"
fields
Field: fields
An array of fields
Properties for array elements:
.id
The ID of the field. Used when the content is looped through in the theme.
string.type
Content type. Valid types are:list,text,integer,image,images,video,bool,richtext,longtext,repeater,product,category, andlanding_page
.options
Only used for fields of type list and it contains a series of options such as
[...]
"options": {
	"hat": "Hat",
	"glasses": "Briller",
	"beard": "Skæg"
},
[...]
.title
The title of the field
string.description
Description of the field
string.max
Maximum number of fields that can be added
int.required
If the field is required
bool.placeholder
Placeholder for admin
string.default
Optional default value for the field
string.fields
Only used if the type is repeater and can contain the same fields as sections. A simplified example of a slider repeater could be:
[...]
"type": "repeater",
"fields": [
	{
		"id": "headline",
		"type": "text",
		"title": "Overskrift"
	},
	{
		"id": "img",
		"type": "image",
		"title": "Billedet"
	}
]
[...]
.field_title
Only used if the type is repeater and contains the name of the individual elements in the repeater
Views
There are different strategies for extracting data. As a starting point, there will be a $page_blocks on the pages that match a setup. It can be looped through, or the content can be extracted using $webshop->getBlocks('#foo'). Alternatively, the content can be accessed through the name of the section.
As a starting point, we would recommend that you place the display of each section in separate files, such as /{name}/templates/sections/{section}.html. Then it is easy to loop through $page_blocks and include the correct display as follows:
<{if $page_blocks}>

	<{foreach $page_blocks as $section}>
		<{$type = $section._type}>

		<{if $webshop->templateExists("sections/$type.html")}>

			<{include file="sections/$type.html"}>

		<{/if}>

	<{/foreach}>

<{/if}>
Note that the row type is in the variable _type
Below section calls images – hence content is in /{navn}/components/sections/images.json.
{
	"title": "Overskrift og billeder",
	"fields": [
		{
			"id": "headline",
			"type": "text",
			"title": "Overskrift"
		},
		{
			"id": "images",
			"type": "images",
			"title": "Billeder"
		}
	]
}
It will produce the following interface in admin

To extract content through the above method may /{navn}/templates/sections/images.html contain the following:
<h1><{$section.headline|escape}></h1>

<{foreach $section.images as $image}>
	<img src="<{$image->getSrc(150, 150, 'box')}>">
<{/foreach}>
Regarding data type, it is important to be aware of what each field contains. It can be either a string, array, or object. Therefore, one should do something similar:
[...]
<{foreach $section as $name=>$val}>
	<{if is_array($val)}>
		Repeater or array of images
	<{elseif is_object($val)}>
		An image
	<{else}>
		Text, number or such
	<{/if}>
<{/foreach}>
[...]
The video field type allows the customer to upload or select a background video directly in the page designer (e.g. for a hero section). The video is saved raw and unscaled in the shop's public files and the field returns a string with the URL of the video. Supported formats are mp4 and webm. Use an image field in the same section as items that are displayed while the video loads. Recommend the customer a short, compressed loop (preferably under 5 MB).
<{if $section.video}>
	<video class="w-full h-full object-cover" autoplay muted loop playsinline<{if $section.image}> poster="<{$section.image->getSrc(1600, 900, 'fit', 'webp')}>"<{/if}>>
		<source src="<{$section.video|escape}>">
	</video>
<{elseif $section.image}>
	... show background image ...
<{/if}>
If you use the types product, category, or landing_page, the selected ID will be returned in the theme, and you have to extract the object yourself using the methods $webshop->getProductById(id), $webshop->getCategory(id), or $webshop->getLandingPage(id). For example:
[...]
<{if $product = $webshop->getProductById($section.product_id)}>
	<{$product->getName()|escape}>
<{/if}>
[...]
Please note that it is always possible to use var_dump to examine what the variable contains. That way you can loop through it correctly.
Views
Based on the previously mentioned structure, the individual views are reviewed below. To understand the individual objects and which methods are available, we recommend looking in our. Template API.
Download our Alaska theme to see examples of the different views.
Products
The display of products can be located in product.html, but it is optional. It is always index.html that
executes the individual displays. However, we recommend using this structure. To know if a product view is being executed, it checks
if $product is present.
Add to cart
Products are added to the cart by making a POST call to any page - typically just the page already being displayed, with the product_id, attributes[{attribute_id}]={attribute_value_id}, and amount arguments. The attribute should only be added if the products have variants.
A simple example of how to add products to basket may be:
<form action="" method="post">
	<input type="hidden" name="product_id" value="<{$product->getProductId()}>"/>
	<input type="number" name="amount" value="1" min="1"/>
	<input type="submit" value="Læg i kurv">
</form>
With variants
<form action="" method="post">
	<input type="hidden" name="product_id" value="<{$product->getProductId()}>"/>

	<{foreach $product->getProfile()->getAttributeList() as $attribute}>
		<{if $attribute->getIsVariant() && $attribute->getDataType() == "valuelist"}>
			<select name="attributes[<{$attribute->getAttributeId()}>]">
				<{foreach $attribute->getValues() as $value}>
					<option value="<{$value->getAttributeValueId()}>">
						<{$attribute->getName()|escape}>: <{$value->getVal()|escape}>
					</option>
				<{/foreach}>
			</select>
		<{/if}>
	<{/foreach}>

	<input type="number" name="amount" value="1" min="1"/>
	<input type="submit" value="Læg i kurv">
</form>
The above can of course be made more complicated if you wish to display stock availability, bundled packages, etc.
Dynamic categories
Landing pages contain a $landingpage and $products which is an array of
products to be displayed on the page.
If a pager is needed it will be included this way
<{if $pager}>
	<{$pager->render()}>
<{/if}>
Categories
Categories contain a $category and $products which is an array of
products to be displayed on the page.
If a pager is needed it will be included this way
<{if $pager}>
	<{$pager->render()}>
<{/if}>
Pages
Static pages will contain a $page.
Blog
The blog can be divided into two pages: blog.html and blog_post.html, where the first one can retrieve a list of blog posts through:
<{$blog_posts = $webshop->getBlogPosts()}>
Viewing the individual blog posts is through the variable $blog_post
If the list of blogposts is from a category there will be a $category available at the category.
Product reviews
In the product_review.html file, there is access to $order, which represents the order. You can only review products that you have purchased. Based on the order, you can retrieve the products using $order->getOrderProducts(). To save the product reviews, you need to make a POST call to the same page with the following content:
<{if $order}>
	<{if $get.voted}>
		Tak!
	<{else}>
		<form action="" method="post">
			<{foreach $order->getOrderProducts() as $product}>
				<{$product->getName()|escape}>
				Stjerner:
				<input type="number" min="1" max="5" name="rating[<{$product->getProductId()}>]">
				Anmeldelse
				<textarea name="description[<{$product->getProductId()}>]"></textarea>
			<{/foreach}>
			<input type="submit" value="Skriv anmeldelse"/>
		</form>
	<{/if}>
<{/if}>
$get.voted is set to true when the customer has written a review.
To link to the review page from your order use $order->getReviewUrl().
Search
The search function works by making a GET request to /search where the argument
?search= should be your search keyword. E.g.:
<form action="/search">
	<input type="text" name="search" value="<{$get.search|escape}>"/>
	<input type="submit" value="Søg"/>
</form>
The search is done in both products, categories, blog posts, and landing pages. To display the result, you need to look at the four variables
$products, $categories, $blog_posts, $pages, and $landing_pages.
If searching in static pages is to be enabled, it must be activated in the admin.
Wishlist
If your customers can log in to your shop, you can provide them with the option to create wishlists. They can create as many wishlists as they want, and a wishlist has a name, a description, and a number of products. The wishlist itself has a public address so your customers can share a link.
The wishlist uses the following templates:
wishlist.html
/wishlist
The page with the public wish list.
$wishlist that contains the wish list. See methods here.
user-wishlists.html
/user-wishlists
The page with the user's wishlists. Requires login.
$customer->getWishlists() to extract wishlists.
user-wishlist.html
/user-wishlist
The page used to edit the wishlist and products.
$wishlist that contains the wish list. See methods here.
To create a wishlist, a POST request with the field name and optionally
description needs to be sent from user-wishlists.html. For example,
<form action="" method="post">
    Navn
    <input type="text" name="name">

    Beskrivelse
    <textarea name="description"></textarea>

    <input type="submit" value="Opret">
</form>
Note that you can advantageously use the methods $wishlist->getRemoteUrl() and $wishlist->getEditUrl() to create links for displaying and editing the wishlists.
In the file user-wishlist.html, where the wishlist is edited, the name and description should be sent as name, description, and status which can be either active or closed.
The products themselves, along with their quantity and optional comment, should be sent as an array in the following format:
wishlist_product[{id}][name] = 'navn'
wishlist_product[{id}][comments] = 'kommentar'
wishlist_product[{id}][remove] = '1' // kun hvis produktet skal fjernes
Example code:
<{foreach $wishlist->getWishlistProducts() as $wp}>
    <{* Fordi der er forskel på produkter og ønskelisteprodukter }*>
    <{$product = $wp->getProduct()}>

    <input type="checkbox" name="wishlist_product[<{$wp->getWishlistProductId()}>][remove]" value="1">

    <a href="<{$product->getUrl()|escape}>"><{$product->getName()|escape}></a>

    <{if $variant = $wp->getVariantValue()}>
        <{$wp->getVariantName()|escape}>: <{$variant|escape}>
    <{/if}>

    <input type="number" name="wishlist_product[<{$wp->getWishlistProductId()}>][amount]" value="<{$wp->getAmount()}>">

    <textarea name="wishlist_product[<{$wp->getWishlistProductId()}>][comments]"><{$wp->getComments()|escape}></textarea>

<{/foreach}>
If a variable edit is sent, the page will return to the same editing page again. Otherwise, it will be redirected to the overview of wish lists. To delete the wish list, a variable named remove must be sent. Example:
<input type="submit" name="remove" value="Slet" onclick="return confirm('Er du sikker?');">
To add products to a wishlist from the shop, a POST request can be made from any page with the fields wishlist_id, product_id, and an optional attribute_value_id if the product has variants.
Example:
<{if $product && $customer}>

    <{if $wishlists = $customer->getWishlists()}>

        <form action="" method="post">
            <input type="hidden" name="product_id" value="<{$product->getProductId()}>"/>

            <label>Vælg ønskeliste:</label>
            <select name="wishlist_id">
                <{foreach $wishlists as $wishlist}>
                    <option value="<{$wishlist->getWishlistId()}>">
                        <{$wishlist->getName()|escape}>
                    </option>
                <{/foreach}>
            </select>

            <{if $variant = $product->getVariant()}>
                <label>Vælg variant:</label>

                <select name="attribute_value_id">
                    <{foreach $variant->getValues() as $value}>
                        <option value="<{$value->getAttributeValueId()}>">
                            <{$variant->getName()|escape}>: <{$value->getVal()|escape}>
                        </option>
                    <{/foreach}>
                </select>
            <{/if}>

            <input type="submit" value="Tilføj til ønskeliste">
        </form>

    <{/if}>

<{/if}>
Return center
The returns center allows your customers to create returns themselves. It needs to be activated in the shop settings. Once a customer has created a return, it needs to be approved in the admin, and a credit note will be issued.
The return center uses the following templates:
return.html
Template: return.html
/return
The page where the return is created
Relevant variables:
$order containing the order the customer wants to return. See methods here.
$offer_store_credit is set (1) if the store owner offers vouchers instead of refunds. In this case, show a field <input type="checkbox" name="return_as_credit" value="1"> where the customer can select a voucher for the entire return. $credit_free_label is set (1) if voucher also provides free return label - use it for an appropriate text for the selection.
$offer_exchange is set (1) if the store owner offers exchanges. In this case, display a button <button type="submit" name="exchange" value="1" formnovalidate> that redirects the customer to the exchange wizard at /return-exchange (template return-exchange.html). Use the same return[$line] checkboxes to select items as for a regular return.
The return-exchange.html wizard gets $order, $return_value (for live calculation) and $exchange_lines (array per unit with line, order_product_id, name, product_id, attribute_name and variants with attribute_value_id/name/cnt/effective_price). It records confirm=1, op[$line], exchange_product[$line] and exchange_attr[$line][$attribute_id] (+ optional refund_surplus). Search via /ajax_search?include_variants=1&term=.... Write the interactivity in pure JavaScript (Alpine cannot be assumed loaded) and gate stock count on $settings.product.show_stock_count. See Montana for reference.
order-return.html
Template: order-return.html
/order-return
The page where the return is subsequently displayed
Relevant variables:
$order_return with the return. See methods here.
$order_return->getOrder()->getGlsReturnQr() returns the path to the GLS return QR code image (or null if there is no QR code).
If the return is an exchange($order_return->getExchange() = 1), then show the exchange statement instead of the regular refund: getExchangeReturnValue() (return value), getExchangeTotal() (the new items), getExchangeDifference() (positive = customer pays, negative = customer gets return), getRefundSurplus(), and getOrderReturnExchanges() (the requested new items, each with getProduct()/getAttributeLabels()/getUnitPrice()).
return_received.html
Template: return_received.html
Email sent to the customer when they create a return
Relevant variables:
$order_return with the return. See methods here.
There are two ways for your customer to access the return page. One is by entering the order number and email
address associated with their order. The other is by following a direct link. The direct link can be retrieved from
the order using the $order->getReturnUrl() function. For example,
<{if $webshop->useReturnCenter() && !$order->getIsCreditNote()}>
	<a href="<{$order->getReturnUrl()|escape}>">Retuner varer</a>
<{/if}>
As seen in the example, it is a good idea to check that the order is not a credit note and if the webshop has activated the return center. The example can be used anywhere there is an $order, such as the customer's order overview or in emails.
If you do not use login or in any other way want the customer to be able to search for their order, you need to implement a search with order number and email address on return.html. The fields webshop_order_id and email should be POSTed to /return. If the order is found, the customer will be redirected to the return process. If not, $get.not_found will be set, and you can display an error message in the theme. A minimal form can look like the following:
<{if $get.not_found}>
    <p>Der blev ikke fundet nogen ordre.</p>
<{/if}>

<h1>Returcenter</h1>

<form method="post" action="">
    <input type="number" name="webshop_order_id" placeholder="Ordrenummer">
    <input type="email" name="email" placeholder="E-mail-adresse">

    <input type="submit" value="Søg">
</form>
Creation of return
In the file return.html, a list of order lines must be extracted, and the customer can choose which products to return and why. Unlike regular order views, the return process should include one line per order line.
<form action="" method="post">
    <{$line = 0}>

    <!-- Looper ordrelinjerne igennem -->
    <{foreach $order->getOrderProducts() as $product}>

        <!-- getReturned() returnerer antallet der tidligere er returneret -->
        <{$returned = $product->getReturned()}>

        <!-- Løkke for hver antal -->
        <{section name="i" loop=$product->getAmount()}>
            <{$line = $line+1}>

            <!-- Viser ikke flere end det er muligt at returnere -->
            <{if $line - $returned > 0}>

                <{$product->getName()|escape}>

                <{if $attributes = $product->getAttributes()}>
                    <{foreach $attributes as $attribute}>
                        <{$attribute.name}>: <{$attribute.val}>
                    <{/foreach}>
                <{/if}>

                <!-- Check hvilken pris der skal vises -->
                <{if $webshop->getUseCalculatedUnitPrice()}>
                    <{$webshop->getCurrency()}> <{$product->getCalculatedUnitPrice()|number_format:2:",":"."}>
                <{else}>
                    <{$webshop->getCurrency()}> <{$product->getUnitPrice()|number_format:2:",":"."}>
                <{/if}>

                <!-- Checkbox og en grund -->
                <input type="checkbox" name="return[<{$line}>]" value="<{$product->getOrderProductId()}>">Vælg
                <input type="text" name="reason[<{$line}>]" placeholder="Evt. årsag til returnering"/>

            <{/if}>
        <{/section}>

     <{/foreach}>
</form>
It is possible in admin to specify a fixed delivery method and price. If this is done, the delivery method is retrieved via
$webshop->getReturnShipping($country_id), and if the price is fixed, it is retrieved via
$webshop->getReturnShippingPrice($country_id). For example:
<{if $return_shipping = $webshop->getReturnShipping($order->getDelCountryId())}>
    Varer skal returneres via <{$return_shipping->getName()|escape}>.

    <{if $price = $webshop->getReturnShippingPrice($order->getDelCountryId())}>
        Prisen er <{$price|number_format:2:",":"."}>
    <{else}>
        Prisen er <{$return_shipping->getCost()|number_format:2:",":"."}>
    <{/if}>
<{else}>
    <!-- Vis en liste over shoppens almindelige leveringsmetoder her -->
<{/if}>
The selected delivery method, if optional, should be sent as shipping_id.
Display of return
Once the return is created, it will appear in order-return.html, which contains an $order_returnwith the relevant methods.
Digital undo
The digital withdrawal function lives on /withdrawal and allows the customer to exercise theirright of withdrawal online (legal requirement in the Consumer Contracts Act). It is a legal declaration of intent ("I cancel order #1234") and is separate from the return center that handles the actual return of the goods. The function works for all shops, but only themes that have a withdrawal.htmlcan display it - if the file is missing, a regular 404 is returned.
The store can disable this feature in the theme settings using the boolean field
checkout.disable_withdrawal. If it is disabled, all “Cancel Purchase” links are hidden
($order->isWithinWithdrawalPeriod() returns false), and the entire
/withdrawal route returns a 404 error.
Flow and variables
The entire two-step flow is in one file, withdrawal.html. The controller sets the variable$step, which you branch on:
lookup— the customer has arrived without a token and needs to find their order (webshop_order_id+emailfields)start— the order is displayed along with an optional reason and a "Cancel purchase" button (POSTwithdraw=1)confirm— confirmation step with a "Confirm undo" button (POSTconfirm=1)receipt— Receipt after the withdrawal has been registeredexpired— The order is outside the cancellation period (or has been canceled/credited) and cannot be canceled. This step appears both when the customer opens an old link and when a POST attempt is rejected—so that an outdated or tampered token URL cannot register a cancellation after the deadline
In the " start," " confirm," " receipt," and "expired " steps, you have access to
$order (a SafeOrder). In the lookup
step, you can display an error using $get.not_found. A completed reason is stored in $reason.
<{if $step == "receipt"}>
    <h1>Din fortrydelse er registreret</h1>
    <p>Ordre #<{$order->getWebshopOrderId()}></p>

<{elseif $step == "confirm"}>
    <form method="post">
        <input type="hidden" name="reason" value="<{$reason|escape}>">
        <button type="submit" name="confirm" value="1">Bekræft fortrydelse</button>
    </form>

<{elseif $step == "start"}>
    <form method="post">
        <textarea name="reason"><{$reason|escape}></textarea>
        <button type="submit" name="withdraw" value="1">Fortryd købet</button>
    </form>

<{elseif $step == "expired"}>
    <h1>Fortrydelsesfristen er udløbet</h1>
    <p>Ordre #<{$order->getWebshopOrderId()}></p>

<{else}>
    <!-- lookup: kunden finder sin ordre uden token -->
    <form method="post">
        <input type="text" name="webshop_order_id" required>
        <input type="email" name="email" required>
        <button type="submit">Fortsæt</button>
    </form>
<{/if}>
Link to undo
Use $order->getWithdrawalUrl() to create a token link to a specific order (e.g. inorder.html or in "my account"). The link works without login. If you want a general link (e.g. in the footer), just point to /withdrawal - the customer will land on the lookup step.
<a href="<{$order->getWithdrawalUrl()|escape}>">Fortryd købet</a>

<!-- eller et generelt link, fx i footeren -->
<a href="/withdrawal">Fortryd købet</a>
Digital content
If the order has digital content that the customer has already downloaded, the right of withdrawal on those items may have expired. You can display an informative note on the confirm step with$order->hasDownloadedDigitalContent() (returns true/false) - it does not block the cancelation, but informs the customer.
Receipt email
When the customer confirms, a receipt is sent via the mails/withdrawal_received.htmlmail template (persistent medium, legal requirement). It has access to $order (SafeOrder), $reason and$withdrawal_time. If the template is missing, no receipt is sent - so remember it in the theme next to withdrawal.html itself.
/also
also.html is our page for upselling. As a starting point, there is access to $product,
and based on that, suggestions can be made to the customer. It may be relevant to use $product->getRelatedProducts(),
$product->getAlsoBought(), or $webshop->getPopularProducts().
404
Only used to show 404 pages
410
Only used to show 410 pages
Captcha
An automatic captcha is inserted when you try to sign up for a newsletter or write comments. This is to prevent spam. It is possible to design the page itself in captcha.html, and it must contain at least:
<form action="" method="post">
	<{$form}>

	<{if $error}>Fejl i koden<{/if}>

	<img src="<{$imgstr}>">

	Skriv indholdet at ovenstående felt:
	<input type="text" name="c">

	<input type="submit" value="OK">
</form>
Login
It is possible to allow customers to log in to the shop. If the person is logged in, there will be a $customer that contains information about the user. All pages that edit, log in, etc. should submit via POST to the same page.
/user-edit.html
Uset to edit customer data. It is possible to add fields to the customer. View more under this table.
company
vat_number
name
email
phone
address
zipcode
city
country_id
pass1
pass2
/user-orders.html
Customer's previous orders
$my_orders
/user-points.html
Customer's point
$my_points
/user-profile.html
Showing customer data
$customer
/user-reset-password.html
Used to reset password
email
password
/user-sign-in.html
Login page. Use redir if the customer shall be redirectet to a certain URL after login.
email
password
redir
/user-sign-up.html
A form used to sign up.
name
email
phone
address
zipcode
city
company
vat_number
country_id
Custom fields for customers
In admin it is possible to define custom fields for users. These fields are edited this way:
<{foreach $webshop->getCustomerFields() as $field}>
	<{if $field->getType() == "list"}>
		<{$field->getName()|escape}>
		<select name="field[<{$field->getCustomerFieldId()}>]">
			<{foreach $field->getValues() as $value}>
				<option <{if $field->getVal() == $value}>selected="selected"<{/if}> value="<{$value|escape}>">
					<{$value|escape}>
				</option>
			<{/foreach}>
		</select>
	<{elseif $field->getType() == "string"}>
		<{$field->getName()|escape}>
		<input type="text" name="field[<{$field->getCustomerFieldId()}>]" value="<{$field->getVal()|escape}>">
	<{/if}>
<{/foreach}>
Loyalty programme
The loyalty program allows your customers to earn and use points when they place orders. The setup is managed under Customers > Loyalty Program.
You can use the following methods to check if the shop has enabled the loyalty program and if the customer is logged in and has earned points they can use:
<{if $webshop->hasLoyaltyProgram() && $customer && $customer->getActivePoints()}>
	[Visning af point m.m.]
<{/if}>
To display the number of points the customer has earned, as well as how many they can use on the current order, you can use the following code example:
Du har optjent <{$customer->getActivePoints()|number_format:0:",":"."}> point.

<{if $points = $customer->getPointsAvailable()}>
	Du kan bruge <{$points|number_format:0:",":"."}> point på denne ordre.
<{else}>
	Du har ingen optjente point du kan bruge på denne ordre.
<{/if}>
The field you POST to the cart, indicating how many points the customer wants to use, should be named use_points, and can appear as follows:
<input type="number" name="use_points" value="<{$use_points}>" min="0" max="<{$customer->getPointsAvailable()}>"/>
You can use $earns to see how much the customer earns on the order:
Du optjener <{$earns|number_format:0:",":"."}> point på denne ordre.
You can use the example below to describe your loyalty program:
Du optjener <{$webshop->getLoyaltyProgramBasePoints()|number_format:0:",":"."}> point hver
gang du køber for 1 <{$webshop->getCurrency()}>. Når du betaler med point svarer
<{$webshop->getLoyaltyProgramBaseCost()|number_format:0:",":"."}> point til 1 <{$webshop->getCurrency()}>.
If you want to create a points overview page, you can use user-points.html, where you can loop through $my_pointsand present the content. Take a look at the SafePoint class to see what methods are available.
Tip: You can style your order overview by using the following CSS classes: points_used, points_earned, and has_profile.
Check-out
The check-out flow is simply a series of HTML pages, each containing a form that POSTs some data to itself. If the next field is set, Shoporama will proceed to the next page in the flow. Typically, the "Next" button will have name="next". It is always possible to link to previous pages in the flow. When the customer enters their information, it is stored in two arrays: $session_order and $session_del. For example, $session_order.name.
basket.html
File name: basket.html
Shows basket content. Simpel example of how to use $basket
<{foreach $basket as $line}>
	<{$line.amount}> x <{$line.product->getName()}>

	<{foreach $line.attributes as $a}>
		<{$a.name|escape}>: <{$a.value|escape}>
	<{/foreach}>
<{/foreach}>
To change the quantity, it should be POST'ed in the following way.
[...]
<input name="amount[<{$line.id}>]" value="<{$line.amount}>" />
[...]
To add a discount code, you need to POST a voucher with the discount code. If the discount code is invalid, $get.wrong_voucher will be present in the template.
The delivery country can be changed by POSTing a del_country_id with the ID of the delivery country.
If the customer is redirected back to the cart from a later step in the checkout process, $get.check_fail is set. The built-in themes only display a neutral message when check_fail == "1" (the cart could not be validated). Keep any message generic, such as “Something went wrong, please try again,” and never reveal to the customer why a purchase was stopped: some rejections are intentionally silent for fraud protection (e.g., blacklist). Therefore, do not distinguish between the individual values of ` check_fail ` in customer-facing text.
Relevant variables/parameters in the form:
$basket
$voucher
$voucher_discount
$campaign_ids
$campaign_discount
$price
$shipping_price
$total_price
$vat
address.html
File name: address.html
The page where the delivery information is entered.
If mailinglist is set to 1, the customer is subscribed to the newsletter.
If create_profile is set to 1, a profile is created for the customer so they can log in later.
Relevant variables/parameters in the form:
order_country_id
order_name
order_company_name
vat_number
ean_number
order_address
order_zipcode
order_city
email
phone
comments
del_name
del_company_name
del_address
del_zipcode
del_city
del_country_id
mailinglist
create_profile
shipping.html
File name: shipping.html
Used to select the delivery method.
The individual shipping methods can be extracted via $webshop->getShippings().
To save the shipping method, a shipping_id must be POSTed with the ID of that shipping method. If the shipping method has a delivery shop associated with it, they are extracted via $shipping->getDeliveryShops(). You can select the delivery shop in the following way:
[...]
<{if $shipping->getModule()}>
	<select name="shop">
		<{foreach $shipping->getDeliveryShops() as $shop}>
			<option value="<{$shop.number}>">
				<{$shop.name|escape}>
				<{$shop.street|escape}>
				<{$shop.zip|escape}>
				<{$shop.city|escape}>
			</option>
		<{/foreach}>
	</select>
<{/if}>
[...]
Relevant variables/parameters in the form:
shipping_id
shop
approve.html
File name: approve.html
The authorization page. Used to display the order.
If the shop contains multiple payment gateways, these can be selected on this page. They are retrieved via $webshop->getPaymentGateways() and submitted via payment_gateway_id to switch.
Relevant variables/parameters in the form:
$basket
$shipping
payment_gateway_id
thanks.html
File name: thanks.html
Thank you page. Used to display the completed order.
Relevant variables/parameters in the form:
$order
Upselling
Post-purchase upsells display suggested products on the thank-you page (thanks.html) after the customer has completed their purchase. The customer can add one or more products with a single click, and a new order is created with the same address, shipping, and payment method as the purchase just completed. The products and settings are managed by the store owner in the admin panel under Products → Post-Purchase Upsells.
This feature is already built into the Montana, Delaware, and DelawareDK themes. If you’re using your own theme, you can add it yourself. The backend handles all the work (product selection, order creation, payment, inventory, legal matters)—your theme simply needs to display the products and send the customer’s selections to the /upsell-order endpoint. Below is the contract and a complete example.
Variables on the Thank You Page
When upselling is active and the order has been confirmed, Shoporama assigns these variables to thanks.html (they are only set when there is something to display):
$upsell_products— array of SafeProduct. Already filtered on the server side (excludes recently purchased products and bundle packs, respects "Simple products only," and fills in with best-sellers).$upsell_order_id— the webshop_order_id of the order that was just placed (included as a hidden field).$upsell_chk— security token (MD5 hash of the email address) that verifies ownership of the order.$upsell_order_time— Order time (Unix). Use this to anchor a countdown so that it isn't reset when the page is reloaded.$upsell_free_shipping— 1 if there is free shipping on the backorder, otherwise 0.$settings.checkout_upsell.*— the theme settings (see below).
Theme Settings (theme_settings.json)
Add a checkout_upsell group to your theme's theme_settings.json file so that the store owner can control the heading, intro, and countdown. Use only supported field types (string, textarea, bool — NOT number):
{
  "path": "checkout_upsell",
  "name": "Checkout: Mersalg",
  "fields": [
    { "path": "title",            "name": "Overskrift",                       "type": "string" },
    { "path": "intro",            "name": "Intro-tekst",                      "type": "textarea" },
    { "path": "enable_countdown", "name": "Vis nedtælling",                   "type": "bool" },
    { "path": "countdown_minutes","name": "Nedtælling (minutter)",            "type": "string" },
    { "path": "countdown_text",   "name": "Nedtællingstekst ({time})",        "type": "string" }
  ]
}
Endpoint: POST /upsell-order
The entire section is a single <form method="post" action="/upsell-order"> (no nested forms). The fields:
order_id+chk— hidden fields with $upsell_order_id and $upsell_chk (verifies ownership).terms— Required checkbox (acceptance of terms and conditions). Required on the server side.buy_single— one product_id (purchase of one product). The button's name/value.product_ids[]— multiple product_ids (multi-select via checkboxes + a "Buy Selected" button with name="buy_selected").attributes[product_id][attribute_id]— Selected attribute value ID for variant products (from a drop-down menu for each variant attribute).
The backend creates the order and automatically redirects the customer to the payment page. You do NOT need to handle the address, shipping, price, or payment yourself.
Example: minimal partial
A complete, working starting point. Include it in thanks.html using <{include file="partials/checkout.upsell.html"}>. Simple products get a "Buy and Pay" button; variant products get a variant selector (bundles are already filtered on the server side). The button text must indicate a payment obligation (legal requirements).
<{* Vises kun når butiksejeren har aktiveret mersalg i admin — backend sætter $upsell_products derefter *}>
<{if $upsell_products && $upsell_order_id}>
  <section data-upsell-order-time="<{$upsell_order_time}>"
    <{if $settings.checkout_upsell.enable_countdown && $settings.checkout_upsell.countdown_minutes}>data-upsell-countdown="<{$settings.checkout_upsell.countdown_minutes}>"<{/if}>>

    <h2><{if $settings.checkout_upsell.title}><{$settings.checkout_upsell.title|escape}><{else}><{t}>Glemte du noget?<{/t}><{/if}></h2>
    <{if $settings.checkout_upsell.intro || $upsell_free_shipping}>
      <p><{if $settings.checkout_upsell.intro}><{$settings.checkout_upsell.intro|escape}> <{/if}><{if $upsell_free_shipping}><{t}>Fri fragt på det, du tilføjer her.<{/t}><{/if}></p>
    <{/if}>

    <form method="post" action="/upsell-order" data-upsell-form>
      <input type="hidden" name="order_id" value="<{$upsell_order_id}>">
      <input type="hidden" name="chk" value="<{$upsell_chk}>">

      <{foreach from=$upsell_products item=p}>
        <div data-upsell-item>
          <{include file="components/product-card.html" product=$p show_add_to_cart="false"}>

          <{if $p->hasVariants()}>
            <{$prof = $p->getProfile()}>
            <{if $prof}><{foreach from=$prof->getAttributeList() item=attr}>
              <{if $attr->getIsVariant() && $attr->getDataType() == "valuelist"}>
                <select name="attributes[<{$p->getProductId()}>][<{$attr->getAttributeId()}>]" data-upsell-variant>
                  <option value=""><{t}>Vælg<{/t}> <{$attr->getName()|escape}></option>
                  <{foreach from=$attr->getValues() item=val}>
                    <option value="<{$val->getAttributeValueId()}>"><{$val->getVal()|escape}></option>
                  <{/foreach}>
                </select>
              <{/if}>
            <{/foreach}><{/if}>
          <{/if}>

          <button type="submit" name="buy_single" value="<{$p->getProductId()}>" data-upsell-buy><{t}>Køb og betal<{/t}></button>

          <label><input type="checkbox" name="product_ids[]" value="<{$p->getProductId()}>" data-upsell-checkbox> <{t}>Vælg til samlet køb<{/t}></label>
          <label><input type="checkbox" name="terms" value="1" required> <{t}>Accepter handelsbetingelser<{/t}></label>
        </div>
      <{/foreach}>

      <button type="submit" name="buy_selected" value="1" data-upsell-multi><{t}>Køb og betal valgte<{/t}></button>
    </form>
  </section>
<{/if}>
Important Notes
- Variants and Bundles: A product can only be ordered with a single click if it is a simple product. Check
$p->hasVariants()and display a variant selector (a dropdown menu for each variant attribute) for variant products. Bundles have already been removed from$upsell_productson the server side, so you don’t need to handle them. - Terms and Conditions: The "Terms" field is required (card acquirer requirement). The button text must indicate a payment obligation, e.g., "Buy and Pay" — not just "Add."
- Countdown: Link it to
$upsell_order_time(order time + minutes), not to "now," so it doesn't reset when the page reloads. This is purely visual—the backend actually determines whether the order can be created. - Product Card: Include
components/product-card.htmlwithshow_add_to_cart="false"so that the card's own "Add to Cart" button does not render a form inside the upsell form. - JS (optional, recommended): Enable the "Buy" button only after a variant has been selected and the terms have been accepted, and prevent accidental double-clicks on the buttons when submitting. See the Montana/Delaware themes for a ready-made example.
B2B
A theme can run in B2B mode: prices are displayed excluding VAT (with an optional VAT toggle), the store may require a login, and customers can be offered quick reordering and company management. Shoporama Core knows nothing about B2B —the theme activates and manages everything itself, so you’re free to build your own B2B theme without hard-coded theme name detection. The built-in MontanaB2B is the reference implementation.
The pricing logic itself (customer groups, fixed group prices, volume discounts, brand access, VIES-validated reverse charge) is managed by the store owner in the admin panel and via the backend. Your theme simply needs to call getRealPrice() as usual—it automatically returns the correct price for the logged-in customer. The rest of this section covers the theme primitives that make a theme B2B-ready.
Enable B2B mode ($b2b)
Set $b2b to true at the top of index.html (the theme's entry template). The variable is available in all templates and controls the display of prices excluding VAT and the B2B UI. A B2C theme does not set it—in that case, it is falsy, and everything behaves as usual.
<{* index.html — dette tema er kodet som B2B *}>
<{$b2b = true}>
Login barrier (soft gate)
If you want to require a login to view the store, display the login template instead of the content when the customer is not logged in—except on the auth pages (login/create/reset/token), so they can access the site. Do this in index.html. Login is handled at /user-sign-in, so have the login form submit to that URL (not to the current page); Shoporama will then redirect the customer back via the referrer.
<{$auth_page = ($inc == 'user-sign-in.html' || $inc == 'user-sign-up.html' || $inc == 'user-reset-password.html' || $inc == 'user-token.html')}>

<{if !$customer && !$auth_page}>
    <{include file="user-sign-in.html"}>
<{elseif $inc}>
    <{include file=$inc}>
<{elseif $product}>
    <{include file="product.html" product=$product}>
    <{* ... øvrige content-grene (kategori, forside, side ...) *}>
<{/if}>
Assets, AJAX requests, and payment callbacks never reach index.html (they are handled earlier in Shoporama), so the login wall does not affect them. A guest only sees the login template—the content templates and their headers are never rendered for a guest.
Custom storefront routes (storefront_routes)
If your theme offers additional pages such as quick order or company administration, declare their routes in theme_settings.json using `grandefront_routes`. Shoporama will then make those routes valid for your theme. This covers template routes (e.g., user-order → user-order.html), plain JSON endpoints without a template (e.g., user-order-search), and redirect routes (e.g., user-company-login-as).
{
  "info": "Mit B2B-tema",
  "storefront_routes": [
    "user-order",
    "user-order-search",
    "user-company",
    "user-company-login-as",
    "user-company-switch-back"
  ]
}
Declare only the routes that your theme actually uses. Routes that a theme does not declare are invalid (404)—so two themes cannot conflict over the same route name.
Prices exclude VAT + VAT varies
getRealPrice() ALWAYS returns the price including tax (the order calculations remain unchanged)—the "excluding tax" display is purely cosmetic. Calculate a tax factor and divide the displayed price by it:
<{$b2b_factor = 1}>
<{if $b2b}><{$b2b_factor = 1 + ($product->getProductVat() / 100)}><{/if}>

<{$price = $product->getRealPrice() / $b2b_factor}>  <{* pris ekskl. moms til visning *}>
An optional VAT toggle lets the customer switch between exclusive and inclusive prices without reloading the page. Enable it with a boolean theme setting ($settings.product.enable_vat_toggle) and display both values for each amount in a .vat-num element(format the numbers with number_format as usual). The built-in JavaScript in MontanaB2B’s `partials/assets.html` toggles the display on all `.vat-num` elements, switches between `.vat-suffix-excl` and `.vat-suffix-incl`, and stores the selection in `localStorage ` (`vatMode`, default: excl.):
<{$vt_on = ($b2b && $settings.product.enable_vat_toggle)}>

<span class="vat-num"<{if $vt_on}> data-excl="<{$price}>" data-incl="<{$price*$b2b_factor}>"<{/if}>><{$price}></span>

<{* Suffiks der følger skifteren *}>
<span class="vat-suffix-excl"><{t}>ekskl. moms<{/t}></span>
<span class="vat-suffix-incl" style="display:none"><{t}>inkl. moms<{/t}></span>

<{* Skifte-knapper et centralt sted, fx i headeren *}>
<div data-vat-toggle>
  <button data-vat-mode="excl"><{t}>Ekskl. moms<{/t}></button>
  <button data-vat-mode="incl"><{t}>Inkl. moms<{/t}></button>
</div>
ALWAYS calculate both the price excluding and including tax from getRealPrice() using the VAT factor (as above) so that they are consistent—even for group prices. DO NOT use getRealPriceExVat() for display; it does not support group prices and would display an incorrect "excl." price for group customers.
Group Rates
Customer-specific prices (fixed group prices, volume discounts, brand discounts) are automatically applied by getRealPrice() for the logged-in customer—your theme does not need to do anything special. Prices respect the customer group’s brand access: a product from a brand that the group is not allowed to purchase will display the regular price and cannot be added to the cart. Simply display getRealPrice() as you normally would.
Reorder CSV in order email
If your theme has a quick order page (user-order in storefront_routes), Shoporama automatically attaches a reorder CSV (product code;quantity) to the order confirmation email for registered customers. Display a note about this in your mails/order_sent.html file —only when a CSV is actually attached—using the $has_reorder_csv variable. If you want to disable the attachment, set the following in theme_settings.json:
{
  "order_mail_reorder_csv": false
}
Ajax
Shoporama has two built-in ajax calls. One can extract products in various ways (filtering), and the other is a general and simple search that searches in products, categories, and landing pages.
Filtering
The filtering is located in the file /ajax which is located at the root of all shops.
atags
A list of tags on the attribute values, attribute values are settings on the attributes on the products' profiles. the values on atags must be separated by commas, but allow groupings separated by pipe as a logical OR.
ajax?atags=female,black|white
product_ids
List of product IDs separated by pipe.
ajax?product_ids=1|2|3|4
price_range
Returns products that are within a price range. The amounts should be separated by a pipe.
ajax?price_range=100|200
categories
A pipe-separated list of categories the products should be in. If the argument exclude=1 is set, a list of products that do not have the categories is returned.
ajax?categories=5|9|2
ajax?categories=5|9|2&exclude=1
sort
Sort order. The values popular, weight, name, price, created can be set. Whether the sort order should be ascending or descending is specified by setting sort_order to either asc (ascending) or desc (descending ).
ajax?sort=price&sort_order=desc
attribute_values
A list of IDs of the attribute values that the products should have. The list is separated by pipe. If the argument exclude=1 is set, a list of products that do not match is returned.
ajax?attribute_values=9|8|12
suppliers
Pipe-separated list of supplier IDs.
ajax?suppliers=8|2
landing_pages
Girl-separated list of IDs for landing pages the products should appear on.
ajax?landing_pages=5|24
extension.{id}
If the theme uses extended fields, products can be extracted based on them. Absolute searches are made, so the fields that make the most sense to use are bool, multi, number, and list. Pipe-separated values can be used if the products need to match just one of the values.
ajax?extension.foo=1&extension.tags=foo|bar
attribute_tags_in_stock
List of tags for attribute values that should be in stock. The list can be piped separated.
ajax?attribute_tags_in_stock=foo|bar
attribute_tags
List of tags to be placed on the products. The list can be pipe-separated.
ajax?attribute_tags=foo|bar
attribute_tag
Same as attribute_tags however just an single tag
ajax?attribute_tag=foo
force_categories
A pipe-separated list of categori IDs that must be set on all products.
ajax?force_categories=5|9|2
limit
Maximum amount of products to be returned
ajax?limit=10
offset
Starting position in relation to where in the list of products you wish to retrieve from.
ajax?offset=100&limit=10
meta
Pipe-separated list of extra fields you wish to see on the products in the result. If you set meta=_all, all will be returned.
ajax?meta=foo|bar
ajax?meta=_all
only_in_stock_variants
Set to 1 or 0 depending on whether each product in the result should only include variants that are in stock. Default is 0.
ajax?only_in_stock_variants=1
include_meta
Set to 1 or 0 depending on whether you want an extra meta field in the result that contains descriptions of the products in the result. This is information about which attributes, categories, and brands are present. Default is 0.
ajax?include_meta=1
include_pagination
Set to 1 or 0 depending on whether you want an extra pagination field in the result containing paging information. The fields in the array are offset, limit, count, total. Default setting is 0.
ajax?include_pagination=1
pretty
Set to 1 or 0 depending on whether the json response should be formatted nicely or not.
ajax?pretty=1
The response from /ajax is an array in the following format:
[
    {
        "product_id": 139735,
        "own_id": "skunumme",
        "name": "Produktnavn",
        "supplier_id": 0,
        "supplier_name": "",
        "category_ids": [
            3661,
            2113,
            2106,
            1973
        ],
        "category_names": [
            "Bob",
            "Forside",
            "Ged",
            "Giraf"
        ],
        "description": "<p>...</p>",
        "list_description": "",
        "profile_name": "Default m. variant",
        "allow_negative_stock": 1,
        "brand_name": "TESTBRAND",
        "sale_price": 0,
        "real_price": 80,
        "price": 80,
        "price_dk": "80,00",
        "approx_shipping": 0,
        "delivery_time": "",
        "delivery_time_not_in_stock": "",
        "url": "https://example.com/produkt",
        "stock": 0,
        "attr_stock": null,
        "variant_stock": [
            {
                "attribute_id": 2740,
                "attribute_value_id": 16287,
                "name": "S",
                "weight": 10,
                "cnt": 4
            },
            {
                "attribute_id": 2740,
                "attribute_value_id": 16289,
                "name": "L",
                "weight": 30,
                "cnt": 9
            }
        ],
        "stock_string_da": "Nej",
        "avg_rating": null,
        "thumbnail": "https://example.com/cache/1/9/6/9/bob-fit-200x200x90.png",
        "meta_values": [
            null
        ],
        "online_since": 1651685711,
        "has_campaigns": true,
		"campaign_info": [
            {
                "name": "Bob",
                "price_model": "cheapest_free",
                "min_product_count": 4,
                "price": 0,
                "percent": 0,
                "created": "2023-02-01 14:55:47",
                "expires": null
            }
        ]
    }
]
For speed reasons, we cache the response from the ajax file, but in a test environment, you can add rebuild=1 as an argument to rebuild the page. We recommend not doing this in a production environment as it can significantly slow down the page.
Search
The page /ajax_search contains a general search for products, categories, and landing pages. It can, for example, be used for autocomplete in your search field. It takes the following arguments:
term
Keyword
ajax_search?term=ostemad
limit
Maximum results
ajax_search?term=ostemad&limit=25
include
A comma-separated list of data types you want to search. The values can be products, categories, blog_posts, pages, and landing_pages.
ajax_search?term=ostemad&include=products,categories
pretty
Set to 1 or 0 depending on whether the JSON response should be formatted nicely or not.
ajax_search?term=ostemad&pretty=1
sort
Sort the product results by one of the theme's extended fields (defined in extensions/product.json). Prefix with - for descending order. The value of the sorted field is included in each product object so it can be displayed in e.g. an autocomplete dropdown. Fields not defined by the theme are ignored - so unknown field names cannot be used to probe data.
ajax_search?term=harry&sort=-release_date
Result is an array in this format:
[
    {
        "name": "Produkt et",
        "supplier": "",
        "description": "<p>...</p>",
        "price": 80,
        "sale_price": null,
        "normal_price": 80,
        "currency": "DKK",
        "price_dk": "80,00",
        "url": "https://example.com/produkt-et",
        "stock": 0,
        "stock_string_da": "Nej",
        "review_avg": 0,
        "thumbnail": "https://example.com/cache/1/9/8/4/box-100x100x90.png",
        "type": "product",
        "variants": [],
        "categories": [
            {
                "category_id": 12,
                "parent_id": null,
                "name": "Frokost",
                "url": "https://example.com/frokost"
            }
        ]
    },
    {
        "name": "Produkt to",
        "supplier": "",
        "description": "<p>...</p>",
        "price": 80,
        "sale_price": null,
        "normal_price": 80,
        "currency": "DKK",
        "price_dk": "80,00",
        "url": "https://example.com/produkt-to",
        "stock": 0,
        "stock_string_da": "Nej",
        "review_avg": 0,
        "thumbnail": "https://example.com/cache/1/9/6/9/bob-box-100x100x90.png",
        "type": "product",
        "variants": [],
        "categories": [
            {
                "category_id": 12,
                "parent_id": null,
                "name": "Frokost",
                "url": "https://example.com/frokost"
            },
            {
                "category_id": 17,
                "parent_id": 12,
                "name": "Smørrebrød",
                "url": "https://example.com/smoerrebroed"
            }
        ]
    }
]
Tracking
There are two generations of tracking in Shoporama, and it’s important to understand the difference as a theme developer.
Built-in tracking (the theme should do nothing)
Shoporama's built-in tracking module (Webshop → Tracking in the admin panel) is injected server-side, bypassing the theme. As a theme developer, you do not need to add partials, scripts, or dataLayer code to support it. The module automatically sends e-commerce events (view_item, view_item_list, search, add_to_cart, view_cart, the begin_checkout steps, and purchase) to the ad platforms the store has enabled, and the product ID in all events automatically matches the store’s Google Shopping feed, so catalog matching on Meta and Google works without the theme’s involvement.
Custom dataLayer in the theme (older pattern)
Stores with their own Google Tag Manager setup can send events from the theme via a data layer partial (typically partials/datalayer.html), conditional on the store’s old tracking flag ($webshop->getEnableTracking()). If you use this pattern, there are two pitfalls:
1. Never create product IDs manually. Use getTrackingId() on the product so that the ID always matches the store's feed (numeric product ID, variants in the format productID:variantID, or SKU for stores with country/language feeds):
<{* Produkt uden variant *}>
'item_id': '<{$product->getTrackingId()}>'

<{* Produkt med valgt variant *}>
'item_id': '<{$product->getTrackingId(null, $attribute_value_id)}>'
Older data layer partials construct variant IDs in reverse order (variant value:product ID) on product views. This does not match either the feed or purchase events, and it breaks catalog matching. Switch to using ` getTrackingId()` instead of constructing the ID yourself.
2. Protect the conversion code from being fired twice. The receipt page can be reloaded, so the conversion snippets on the thank-you page must be conditionally displayed based on the order's tracking flag:
<{if $order && !$order->getTrackingCalled()}>
    <!-- konverterings-scripts/pixels her -->
    <{$order->setTrackingCalled()}>
<{/if}>
See the complete guide to GTM setup, triggers, and custom events in Implement tracking in a Shoporama theme.