Menus and navigation
Learn how to create and edit menus in your online store. This guide covers menu item types, hierarchy, placements, drag-and-drop sorting, and how to manage top, dropdown, mega, and footer menus in the Montana theme.
With Shoporama’s menu builder, you can set up the navigation in your online store exactly the way you want it. You can create multiple menus, place them in different locations on the page, and organize them into a hierarchy with parent and child menus.
Overview of Your Menus
Under Content → Menus, you’ll find an overview of all the menus you’ve created. For each menu, you’ll see the name, tag, selected placement (top, bottom, left side, or right side), and how many menu items the menu contains. Click on a menu to edit it.
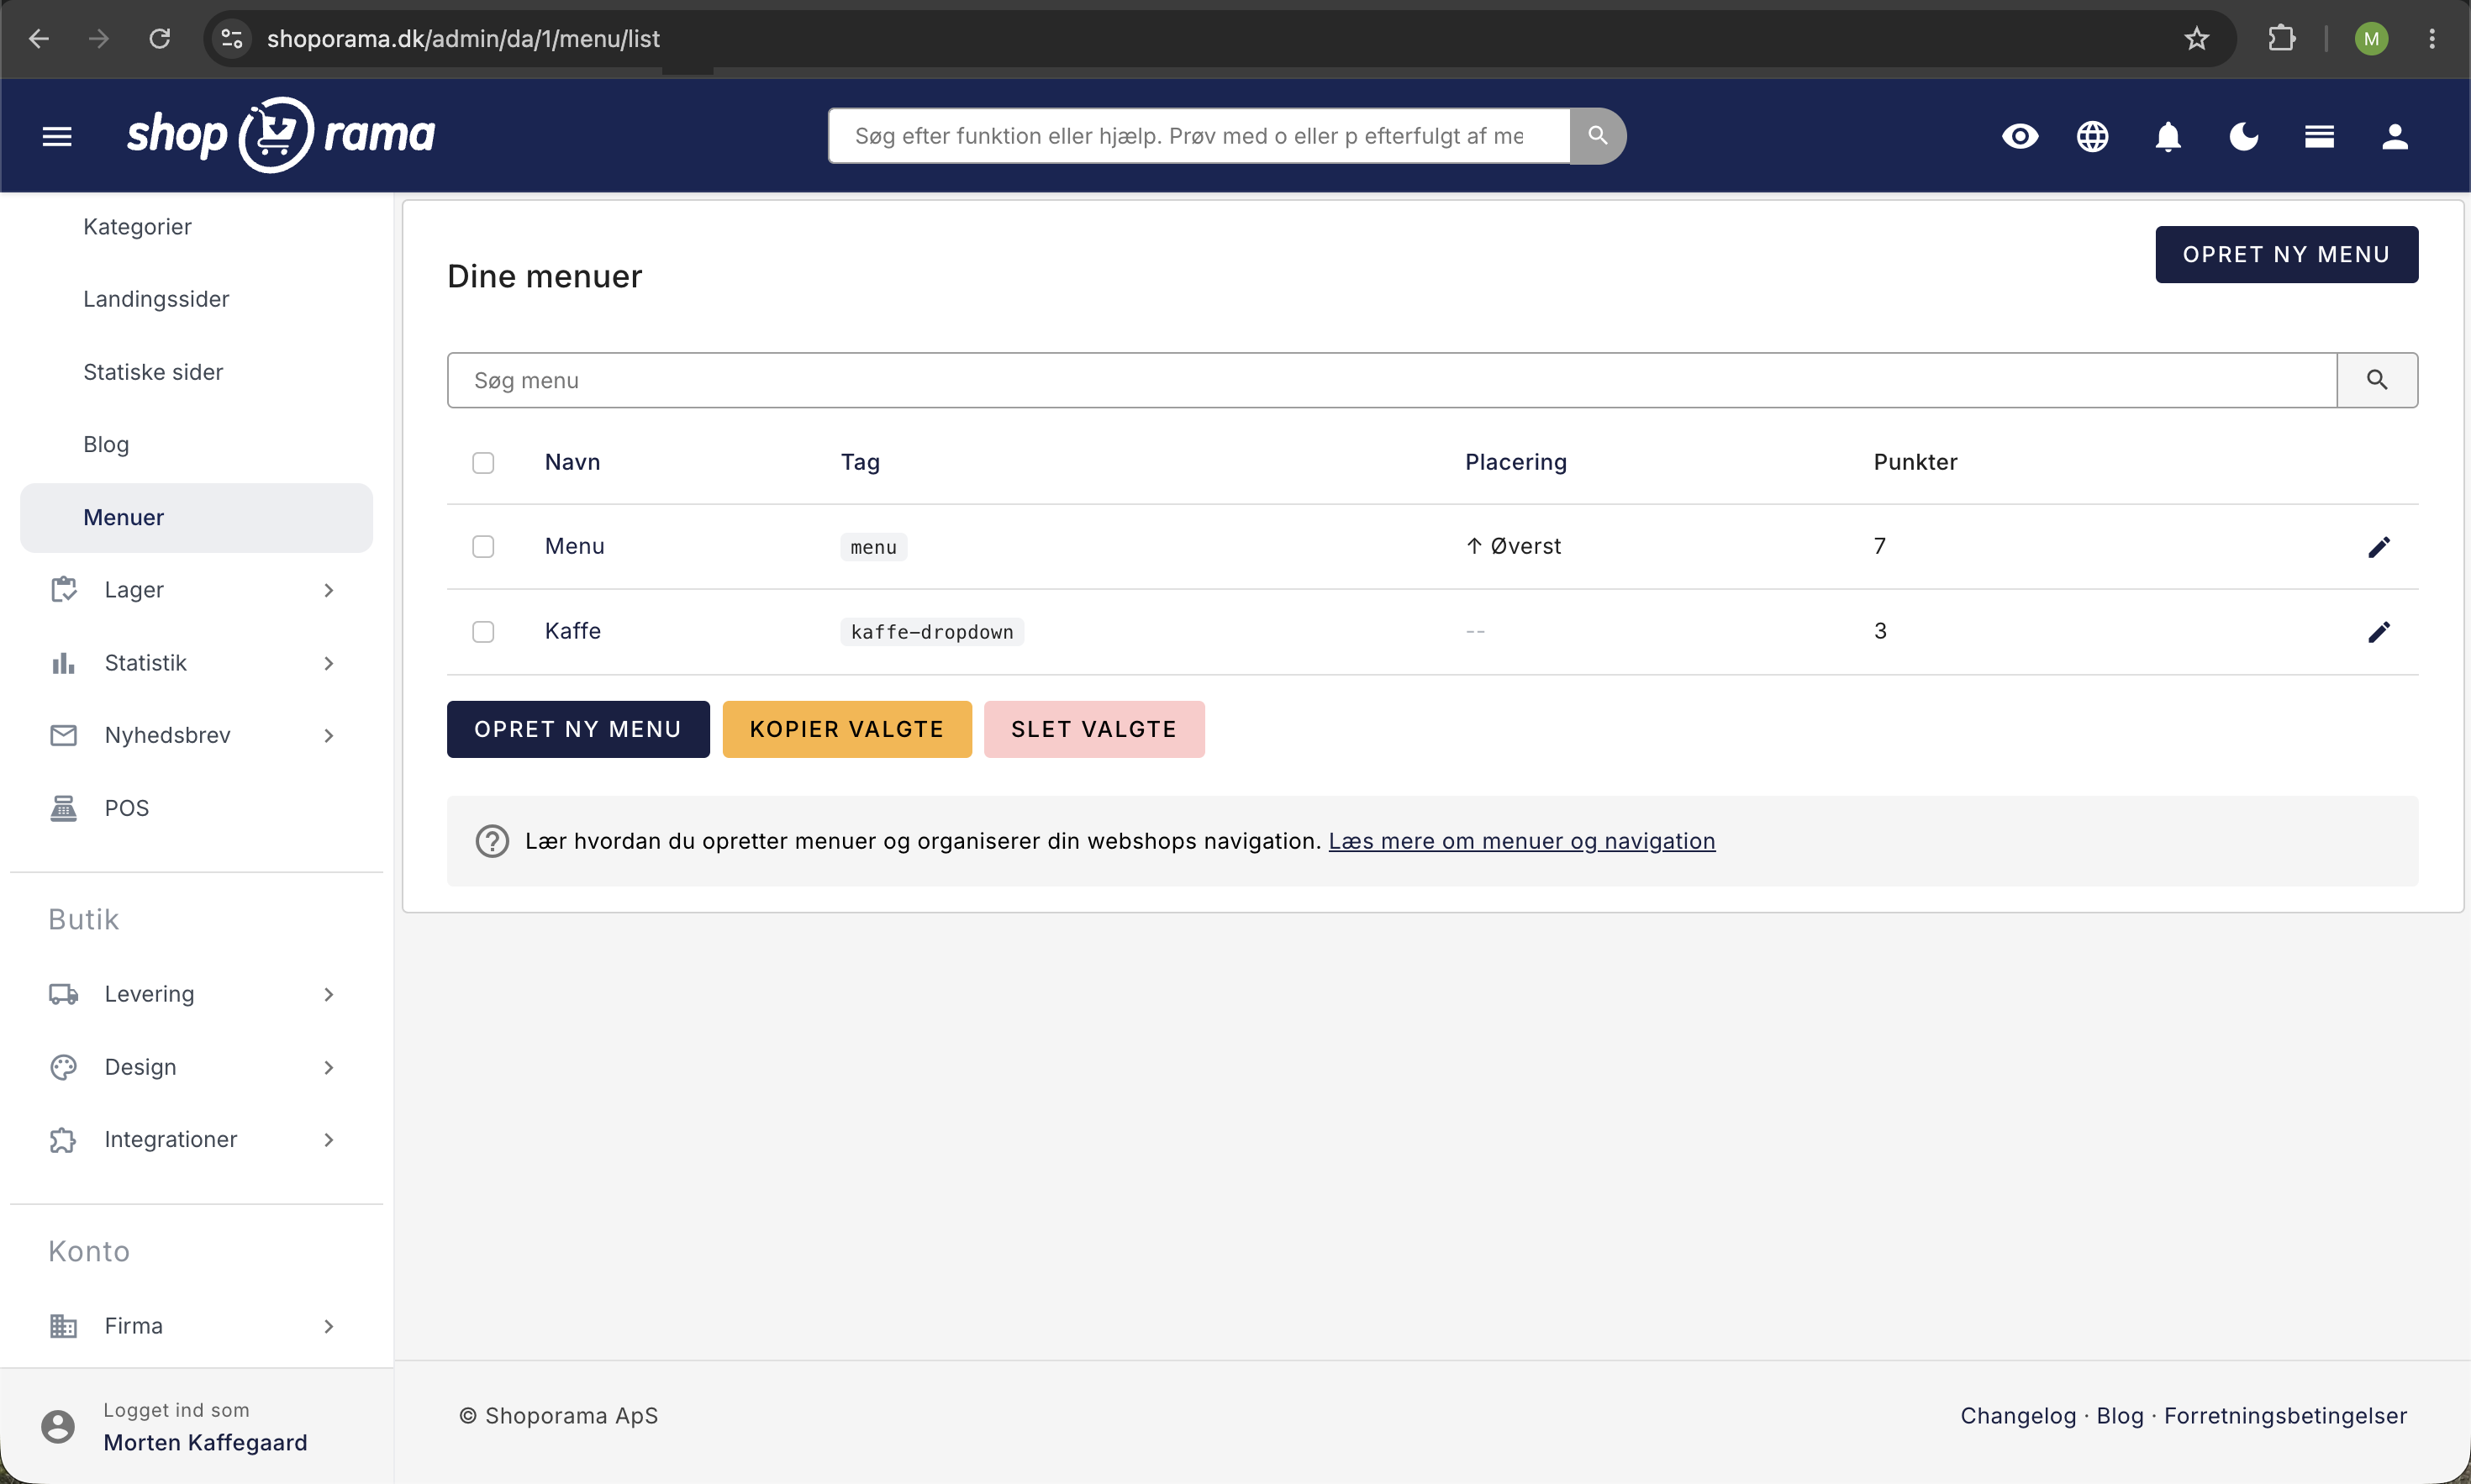
Create a new menu
Click Create New Menu and give the menu a name. After you click Create, the edit view opens, where you can add menu items and further configure the menu.
Menu Settings
At the top of the page, you can configure the menu itself:
- Name: the name of the menu. Some themes display this on the front page. In Montana, the name of a footer menu becomes the heading above the column in the footer.
- Tag: A short label that the theme uses to retrieve the menu and display it in the correct location. If your theme specifies which tags it uses, they’ll appear as suggestions below the field, and you can click on a suggestion to insert it. Delaware, DelawareDK, Montana, and MontanaB2B currently support this. In Montana, the suggestions are `footer_menu_1 ` and ` footer_menu_2`.
- Menu placement: Choose whether the menu should be at the top, bottom, right, or left. If your theme specifies which placements it uses for menus, we’ll only show those options. In Montana, you can therefore only select “Top.” A position that has already been selected will always remain in the list, even if the theme doesn’t use it, so you can see it and remove it again.
Never remove “Top” without setting it to another location
Montana finds your main menu at the “Top” position. If there is no menu at that position, the entire navigation will disappear from the store—both the menu bar on desktop and the menu behind the hamburger icon on mobile. No error message will appear, and categories won’t be displayed instead. If you’re building a new main menu, set “Top” for the new one first, then open your homepage in another window and verify that the menu is there before making any changes to the old one.
If your theme uses specific CSS classes for menu items, they’re listed with an explanation in the settings so you can see what makes sense to enter in the “Class” field for each individual item. In Montana, these are `megamenu ` and `show_image`. If your theme hasn’t provided any information, the field will still be there, just without any suggestions. Enter only a class that your theme actually recognizes, because in some themes, an unknown class can cause the menu item to not display at all.
At the bottom of the page are two save buttons: “Save” closes the menu and returns you to the overview, while “Save and Continue Editing” keeps you on the page. Remember that Shoporama saves the URLs of the pages you’ve added to the menu. If you later change the URL of a category or page, you’ll need to save the menu again before the menu item points to the correct location.
Under “Advanced,” you’ll find the field “This menu item is a submenu of.” This is not the field that creates your dropdowns. It simply groups the menus in the overview so you can see what belongs together, and it fills in automatically when you add a submenu to an item. If the field already has a value, the section is open so you can see it. You should normally leave it alone.
How to Manage Menus in Montana
Each theme determines where it displays the individual menus. Some menus are determined by the theme based on their location, others based on their tag. If it doesn’t match what the theme expects, the menu won’t be displayed at all. Below are the rules for the default theme, Montana. The same rules apply to MontanaB2B.
Top menu (the horizontal navigation bar)
The top menu is controlled solely by the “Position” setting. Set the “Position” to “Top” for the menu that is to serve as the main navigation. The tag has no effect on the top menu, and the field may be left blank.
- If no menu has the “Top” position, Montana will not display any navigation at all—neither the horizontal bar on the computer nor the list in the mobile menu. The theme does not automatically fall back to displaying your categories.
- If multiple menus have the “Top” position, only one will be displayed, and you cannot control which one. Therefore, set only one menu to “Top.”
- The same menu is used for both the horizontal bar on the computer and the mobile menu. Do not create two separate menus.
Dropdown Under a Menu Item
If you want a dropdown under an item in the top menu, do the following:
- Create a new menu with the links you want to include in the dropdown. It doesn’t need to have a specific placement or a specific tag.
- Go back to your top menu, select “Add Menu Item ” from the drop-down list at the bottom, and click “Add.”
- Select the new menu in the “Value” column, enter the text you want to appear in the top menu in the “Title” column, and click “Save.”
An empty submenu disappears completely
If the menu you’re pointing to doesn’t have any menu items yet, Montana won’t even display the top-level item. Therefore, add the items to the submenu first, and then attach it to the top menu.
Multi-column mega menu
Montana can also display a wide menu in multiple columns. This requires three levels of menus and an HTML class:
- Create one menu per column. In each column menu, the first menu item is the column’s header, and the rest become links under the header.
- Create a master menu and add a menu item of the “Menu Item” type for each column. Point each of them to one of the column menus.
- Add the master menu to your top menu as a “Menu Item,” and enter “megamenu” in the “Optional HTML Class” field on that line.
The column header is displayed only if the column’s first menu item is a category, a product, or a landing page. If you use the “Link” or “Static Page” type as the first item, the header disappears completely from the column. If you want an image above the header, enter “show_image” in the HTML Class field for the column’s first menu item.
Footer Menus
The footer in Montana is made up of fixed columns. The first displays your company information, and on the far right is the newsletter sign-up form, if you’ve enabled it in the theme settings. The two columns in the middle are menus, and the theme retrieves them based on the tag:
- Give the first footer menu the tag “footer_menu_1.”
- Give any second column the tag footer_menu_2.
The menu’s name becomes the heading above the column. If you name the menu “Customer Service,” “Customer Service” will appear above the links in the footer.
Is your footer menu not showing up?
This is by far the most common reason: the footer menu in Montana is only displayed when the menu’s tag is footer_menu_1 (or footer_menu_2 for the second column). It’s not enough to set the position to “Bottom.” Enter the tag exactly as shown, without any spaces at the beginning, and be sure to include both the underscores and the number at the end. Open the menu, correct the tag, and click Save.
Things That Aren’t Menus
Two elements in Montana look like menus but are created elsewhere:
- The narrow row of icons at the top (e.g., “Free Shipping” or “Express Shipping”) is not a menu. It’s set up under Design → Theme Settings → USPs, where you can specify up to four short messages, each with its own icon and link.
- The locations “Bottom,” “Left Side, ” and “Right Side” are not used by Montana. If you place a menu on one of these without also giving it the correct tag, it won’t be displayed anywhere.
Add Menu Items
At the bottom of the edit view, select the type of menu item you want to add, and then click Add. The following types are available:
- Category — a link to a product category in your online store.
- Product — a direct link to a specific product.
- Landing page — a link to one of your landing pages.
- Static page — a link to a static page (e.g., “About Us” or “Terms and Conditions”).
- Blog Post — a link to a specific blog post.
- Link — a custom URL you specify, such as an external link or a specific page on your online store.
- Menu item — insert another menu as a menu item so you can create dropdowns and sub-navigation.
For each menu item, you can specify:
- Title — the text that appears in the menu. If you leave the field blank, Shoporama automatically fills it in with the object’s own name (e.g., the category name or product name) when you save.
- Optional HTML Class — an optional CSS class that is added to the menu item if your theme supports it. In Montana, it is used for megamenu and show_image. Otherwise, leave the field blank.
- Value — the category, product, page, or URL that the menu item should link to.
Sorting and Moving
Grab the small handle to the left of a menu item and drag it to where you want it to be. The order is saved automatically right away, so you don’t need to click Save afterward. This applies only to the placement. Title, Points To, and Class are saved only when you click Save.
Because the submenu items are expanded on the same page, you can drag more than just the order. That’s the difference between five minutes and half a morning when the season changes:
- Into a dropdown: Drag the item between the indented items where the submenu appears.
- Out of a dropdown: Drag the item back up to the outer list.
- From one dropdown to another: Drag the item directly from one branch over to the other.
- An entire dropdown at once: if you drag an item that’s itself a submenu, all its contents follow.
There’s one thing it can’t do: it can’t turn a regular link into a dropdown. Only the right-pointing arrow can do that. The arrows also work on tablets and phones, where it can be difficult to tap the handle.
If you want to move the item to a completely different menu that isn’t expanded on the page—for example, from the top menu down to a footer menu—use the button with the folder icon next to the arrows instead. Shoporama will then ask which menu the item should be moved to.
If the move isn’t possible, the item will jump back to its original spot, and you’ll get a message explaining why. This typically happens if you drag a dropdown into itself or into one of its own sub-dropdowns, or if the branch becomes deeper than your theme can display. Your data remains unchanged. However, please note that if you drag an item into a branch labeled “More levels available here,” it will end up at the bottom of something you can’t see on the page. Open the submenu itself to continue working with it.
Hierarchy and Submenus
If the top menu has grown to twelve items in a single long row, group them into dropdowns directly within the item list. You don’t need to first create a menu elsewhere and then import it afterward.
- Make sure the items that are to go into the dropdown are positioned directly below the item they belong to. If “Sneakers” and “Boots” are to be under “Shoes,” drag them up right below “Shoes.”
- Click the right-pointing arrow next to “Sneakers.” The item moves under the item directly above it, and Shoporama automatically creates the submenu. It’s named after the item it was created under—in this case, “Shoes.”
- Click the same arrow next to “Boots.” It will land in the same submenu, under “Shoes.”
The left arrow moves the item back out again, one level at a time, and places it right after the dropdown it came from. If you click the right arrow on the top-level item in a branch, you’ll see the message “There is no menu item to move under.” There must be an item above it to indent under.
The items remain visible on the page at all times, indented under the item they belong to, so you can see the entire structure in one place. The page displays three levels at a time. If there’s more below that, it says “More levels available here,” and then you click your way into the submenu itself to work with those items.
Why are there suddenly two items?
If “Shoes” pointed to a category before you moved anything under it, Shoporama moves that link down to become the first item in the submenu. This is because an item that opens a dropdown can’t link anywhere itself, so without that move, the link to the “Shoes” category would be gone. That’s why “Shoes” now appears twice: once as the item that opens the dropdown, and once as the first item in the dropdown. An explanation also appears on the screen when this happens. If you don’t want the extra item, just delete it. If “Shoes” wasn’t already linked to anything, nothing happens, and the dropdown starts empty.
Add a submenu
Below the list of items is the Add Submenu button. Use this when you want to start with an empty dropdown instead of indenting existing items. Give the submenu a name, click Create Submenu, and it will appear at the bottom of the menu you have open. If you want it to be further down in the hierarchy, you can drag or move it into place afterward.
In the same box, under “Or use a menu you already have,” you can link one of your other menus instead. This is handy for a customer service dropdown that needs to be the same in multiple places: if it ’s used in two places next to the item, a correction will apply to all of them. You can’t nest a menu under its own submenu; Shoporama will reject this with a message.
If you want to add new items directly to a dropdown, use the “Place in ” dropdown list next to “Add Item.” This determines which branch the new item will be placed in. Select the main menu itself to place the item at the bottom of the main menu, or select one of the submenus to place it directly in the dropdown.
How many levels can you use?
That’s determined by your theme. Montana and MontanaB2B report this to Shoporama, and the admin will alert you if you try to go deeper than the theme can display, and will flag items that are already too deep. Montana displays three levels in a mega menu: the item in the top menu, the columns, and the items within the columns. A standard dropdown displays two levels: the item in the top menu and a single list of links below it. The admin only blocks at the fourth level, so a third level can appear without a warning and still only be visible in a mega menu. If you use a different theme, you won’t receive any warnings or be blocked, so you’ll have to keep an eye on it yourself.
An empty dropdown is invisible
If a standard dropdown has no items, Montana displays neither the dropdown nor the menu item that would open it. Instead, there’s a gap in the menu where “Accessories” used to be. An empty mega-menu behaves differently: the menu item remains, and the customer sees an empty field. Always add at least one item to the submenu, and open your homepage in a new tab to check before proceeding. Also, keep in mind that Montana locates the entire top menu at the “Top” position. See the section on menu settings further down.
Changing the URL of menu items
Shoporama saves the URLs of the pages you add to your menus for performance reasons. This means that if you later change the URL of a category, a product, or a page, you must open the relevant menu and save it again for the URL in the menu to be updated.
Delete a menu or a menu item
To delete a menu item, click the red trash can button to the right of the item. The deletion takes effect immediately, and you do not need to save afterward. Categories, products, and pages are never deleted along with the menu item. A menu consists only of shortcuts.
If the item is a dropdown, it depends on the type of submenu attached to it:
- A submenu thatShoporama itself created because you indented an item, and which isn’t used anywhere else: it’s deleted along with the item. Otherwise, it would remain as a menu that no one can find. If it contains subitems, we’ll ask you first and note how many subitems will be removed. If it’s empty, there’s nothing to decide, so we won’t ask.
- A submenu to which you’ve assigned a tag or a location yourself: only the link is removed. The menu itself remains, and you’ll find it in the menu overview.
- A submenu used in multiple places: here, too, only the link on this page is removed. We don’t touch the other places where it’s used.
The number in the confirmation refers to the submenu’s own items. If there are additional automatically generated dropdowns below it, those are also removed and aren’t included in the count. If you’ve created multiple levels, review the branch before deleting the top-level item.
To delete the entire menu, use the “Delete Entire Menu” button at the bottom of the page. You’ll be asked to confirm, and the deletion cannot be undone. From the menu overview, you can check multiple menus and delete them all at once.
Frequently Asked Questions
I’ve created a menu, but nothing is happening on my online store. What did I do wrong?
This is almost always because the menu is missing the placement or tag that the theme expects. In Montana, the main menu must have the “Top” placement, and footer menus must be tagged with footer_menu_1 or footer_menu_2. Without this, the menu won’t be displayed, no matter how many items you’ve added to it.
What’s the difference between “name” and “tag”?
The name is what you call the menu yourself, and what customers sometimes see (e.g., the heading above a footer column). The tag is a technical label that the theme uses to find the correct menu. Think of the tag as a socket number: the theme looks for a specific number, and the menu must have exactly that number to be displayed.
Can I have multiple menus at the top?
No. Montana displays only one menu in the “Top” position. If you need multiple levels, create dropdowns instead by attaching submenus to the items in your top menu.
Do I have to add all my categories to the menu manually?
Yes. Montana does not display the categories automatically. This is a deliberate choice, so you can decide the order yourself and omit categories that shouldn’t clutter the navigation. On the other hand, you can limit the top menu to just the most important categories and leave the rest in the category menu on the category pages.
I’ve changed the name of a category. Do I need to update the menu?
The title in the menu isn’t updated automatically because it’s stored as separate text. The same applies to the URL if you’ve changed the category’s URL. Open the menu, edit the title, and click Save. The URL will then be updated at the same time.
Why did the header disappear from my mega menu column?
Because the first menu item in the column must be a category, a product, or a landing page. If the first item is a custom link or a static page, the header won’t be displayed. Replace the first item with a category, and the header will appear.
Can I link to something outside my online store?
Yes. Select the “Link” type and enter the full URL, such as to your Facebook page. You can also use the “Link” type for internal URLs that aren’t a category or a page, such as /blog.
Does it work the same way on mobile?
Yes. Montana uses the same top menu for the mobile menu behind the hamburger icon, including your dropdowns. So you don’t need to maintain two separate menus.
I’m using a theme other than Montana. Does the same apply?
The menu builder itself is the same for all themes, but each theme determines which positions and tags it reads. MontanaB2B follows the same rules as Montana. If you’re using a different or custom-built theme, contact us at support@shoporama.dk, and we’ll figure out which tags your theme expects.
I’ve renamed a category, but the menu item still has the old name
The title of a menu item is the item’s own text, and it doesn’t automatically update when you rename a category or a page. This is intentional, as most people prefer to use a shorter name for the menu item than the actual name on the page. Edit the text in the Title field and click Save. If you’d rather use the category’s current name, just delete the content in the Title field and save—Shoporama will fill it in automatically.
Where did the drop-down list of all my products go in the “Points to” column?
It has been converted into a search field. Type the first few letters of the name and select from the list that appears. If you had 3,000 products, they would all have to be loaded for every single row, which would make the page slow to open. The search field only searches within the type of the item, so you can’t convert a category item into a product item by searching. You select the type when you add the item. If the item is of the “Link” type, however, you can search for all types, and we’ll insert the address for you.
It says “shown above” next to one of my dropdowns
This means that the same submenu is already expanded further up on the page because you’re using it in two places within the same menu. We only expand it once so you don’t end up with two sets of fields for the same content and have to edit in two places at once. Edit the items where they’re expanded, and the change will take effect in both places.
Can I create a wide mega-menu like that in Montana?
Yes. Type “megamenu” in the Class field next to the item that opens the dropdown. Then, add two levels below it: each submenu under that item becomes a column, and the items in the column become its links. The column’s first item becomes the heading above the column and isn’t repeated in the list below, so make it a category, a product, or a landing page. If you want an image above the heading, type “show_image” in the “Class” field for that specific item. Don’t place regular links directly under the megamenu item, because they won’t be displayed. They must be placed inside a column.
One of my menu items is highlighted as if it doesn’t link anywhere
This means the category, product, or page that the item was pointing to has been deleted. We’ll leave the item as is with its old value instead of silently removing it, so you can see what happened. Search for the correct destination in “Points to” and click Save, or delete the item if it’s no longer needed.
Can I disable a menu item temporarily without deleting it?
There’s no on/off switch for individual menu items. Instead, create a menu—call it “Parking,” for example—and leave it without a tag or location so that no theme loads it. Then use the button with the folder icon next to the item to move it there when you want to remove it from the menu, and back again when you need it. The item, its title, and its link are preserved throughout the process.
Related articles
Categories in your webshop
Learn how to create and manage categories in your Shoporama online store. Guide to hierarchical structure, SEO settings, importing via CSV, sorting...
Pages
Learn how to create and edit static pages like About Us, Terms & Conditions and Contact in Shoporama.
What themes are there on Shoporama?
Complete overview of all free themes on Shoporama: Delaware, DelawareDK, California, Alaska 2, Washington, Montana, and the classic Smarty 2 themes...
Setting up the front page
Lær hvordan du sætter forsiden op i din Shoporama-webshop. Forsiden er en kategori, som du kan tilpasse med Sidedesigner i understøttede temaer.
Page designer
Lær hvordan du bruger Sidedesigner i Shoporama til at opbygge sidelayouts med blokke som hero-sektioner, produktlister, bannere og meget mere, helt...
Logo, Favicon, and Terms and Conditions
Here's how to upload your logo and favicon and enter your terms and conditions in Shoporama. See where the content appears in the store, at...
Related features
Anchor text
Anchor text is the clickable text in a link. Learn about the different types of anchor text, SEO best practices and how to use it in your online shop.
Full design freedom - your design, your rules
Design your online store freely with full access to HTML, CSS and templates. Use templates, Page Builder or build from scratch.
Categories, menu, and pages: give the store structure
Create categories and subcategories, build the menu with a dropdown and footer, edit the "About Us" and "Contact Us" pages, and learn when a...