Categories in your webshop
Learn how to create and manage categories in your Shoporama online store. Guide to hierarchical structure, SEO settings, importing via CSV, sorting and tips for good category structure.
Categories are the backbone of your online store’s navigation. They give your customers an overview of your product selection and help them quickly find what they’re looking for. A well-organized category structure improves both the user experience and your visibility in search engines.
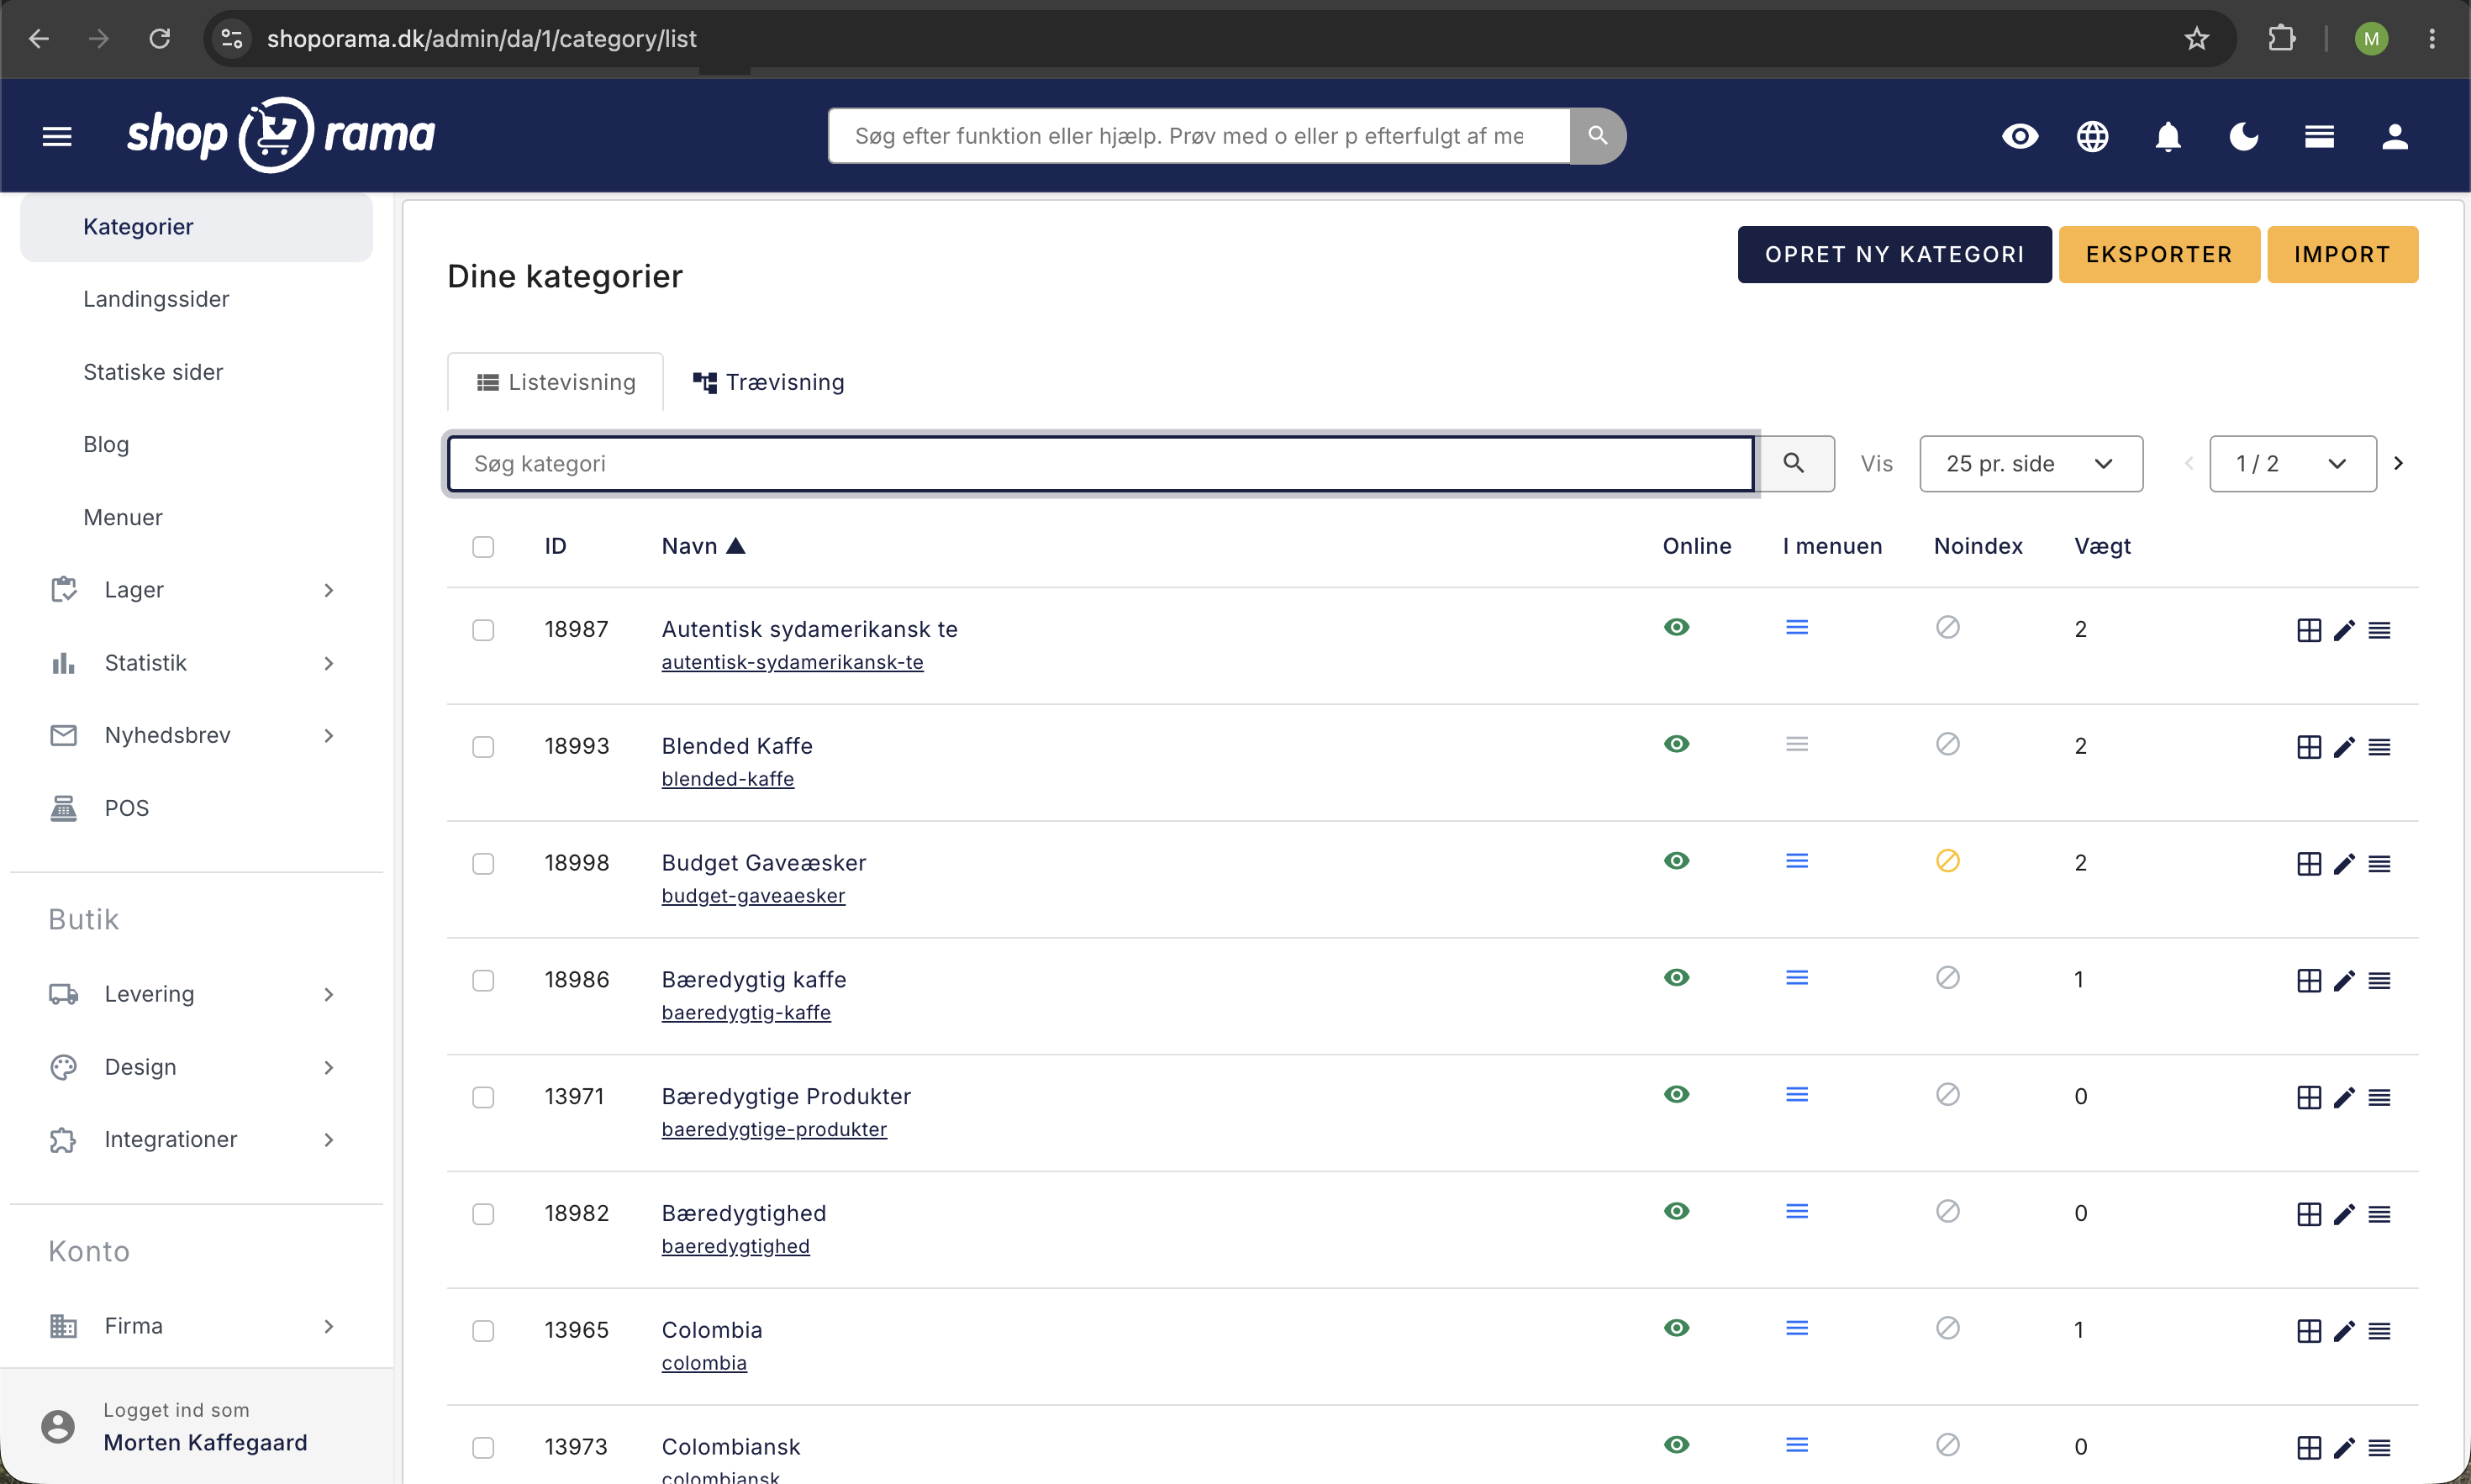
Create a New Category
- Go to Content → Categories in the left-hand menu in the admin panel.
- Click Create New Category.
- Enter a name for the category.
- If desired, select a parent category if the new category is to be a subcategory.
- Click Create.
The category is created with an automatically generated URL based on its name. You can always change the URL later.
Hierarchical Category Structure
Shoporama supports multi-level categories. You can create main categories and associate subcategories with them. This allows you to build a logical tree structure, for example:
- Clothing (main category)
- T-shirts
- Pants
- Jackets
- Shoes (main category)
- Sneakers
- Boots
You can change a category’s position in the hierarchy using the “Subcategory” field on the edit page. Note that a category cannot be set as a subcategory of itself or of one of its own subcategories.
List View and Tree View
At the top of the category page, you can switch between List View and Tree View. Shoporama remembers your selection for the next time you open the page.
List View
List view is a standard table displaying all your categories. It’s best when you have many categories and need to find a specific one.
- Click a column header to sort by ID, name, online, in the menu, noindex, or weight. Click again to reverse the order.
- The search field filters the list as you type.
- You can choose whether to display 10, 25, 50, or 100 categories per page.
- The checkbox in the upper-left corner of the table selects all categories on the current page at once.
Tree View
The tree view displays the entire hierarchy, allowing you to see which subcategories belong to which main categories. This is the view you should use when working with structure and order.
- Click the arrow next to a category to expand or collapse its subcategories.
- The shortcuts “Expand to Level 1,” “Expand to Level 2,” and “Expand to Level 3” expand the entire tree to that specific level. “Expand All” and “Collapse All” do the same for the entire tree at once.
- The search field hides everything except the categories that match and their parent categories, so you can see where they are located in the structure.
- The counter shows how many categories you have selected, and “Show Only Selected” hides the rest. This is a good final check before you copy or delete anything.
If you have more than 50 categories, the tree opens collapsed so you don’t get lost in rows. Your browser remembers which branches you had expanded, so you’ll land in the same place next time. The Home category is marked with the “Home” label and is always at the top.
Move a category to another parent category
If you just need to move a single category to another location in the structure, you don’t need to open the edit page. In the tree view, each category has a move icon on the far right labeled “Move to….”
- Switch to Tree View.
- Click the move icon next to the category you want to move.
- Select the new parent category in the “Move Category” window. If you have many categories, you can search for the name in the field at the top.
- If you want the category to be a top-level category instead, select Root Level (no parent) at the top of the list.
- Click Move. The page will refresh, and the category will appear in its new location.
The category’s own subcategories are included, so the entire branch moves as a single unit. The current parent category is highlighted in the list, and the category itself and its subcategories are hidden so you don’t accidentally move it into itself.
Three types of moves are not allowed, and you’ll see a message instead:
- The front page category cannot be moved under another category.
- A category cannot be its own parent.
- A category cannot be moved into its own subcategory, as this would create a circular structure.
The category’s address (URL) does not change when you move it. It is based on the category’s own URL field and not on the path through the hierarchy, so old links, ads, and bookmarks will still work after a reorganization.
Edit a Category
Click on a category in the list to edit it. Here you’ll find the following fields and settings:
- Name: The category’s name, which appears in the menu and on the page.
- Address: The SEO-friendly URL for the category. It’s automatically generated from the name but can be customized.
- Parent category: Select a parent category, or select “None” for a top-level category.
- Description A and B: Two text fields for category descriptions. Typically, Description A appears at the top and Description B at the bottom of the category page. Read more in The Difference Between Description A and B.
- In the menu, determines whether the category appears in the online store’s navigation.
- "Online" controls whether the category is available as a page in the store. A category that is not online cannot be accessed by customers.
Images for Categories
You can upload one or more images to each category. The images can be used for category banners, menu icons, or visual overviews. You upload images under the Images tab on the edit page.
The order of the images can be changed using drag-and-drop, and you can add a caption (alt text) to each image. You can also choose which image to use as the Open Graph image when the category is shared on social media.
SEO Settings
Under the “Search Engine Fields” tab, you’ll find a number of options for optimizing the category for Google and other search engines. For a complete overview, see SEO in Shoporama.
- Title (meta title): The title that appears in search results. Recommended length: 50–70 characters.
- Description (meta description): the text below the title in search results. Recommended length: under 160 characters.
- Canonical: Specify the category that is the “correct” version if you have the same content in multiple places.
- Open Graph: Title and description for social media (Facebook, LinkedIn, etc.).
- Primary keyword: the most important keyword for the category; used by the AI assistant to generate suggestions.
- Google Category: Associate a Google product category used in your Google Shopping feed.
- Noindex: Enable this to instruct search engines not to index this category. Learn more in Set noindex on a page, product, or category.
You can use dynamic variables in the meta title and meta description: [YEAR] (year), [MONTH] (month), [SEASON] (season), and [FREESHIPPING] (free shipping threshold).
Product Sorting
You can determine how products are sorted within a category. Under “Advanced,” you’ll find the “Sorting” field with the following options:
- Normal, standard sorting based on the order you set manually.
- In-Stock First: Products in stock are displayed before out-of-stock items.
- Alphabetical, sorts products by name from A to Z.
- Product Score: Sorts products by their score, which is based on factors such as sales, inventory status, reviews, and how new the product is.
- Newest, displays the most recently added products first. Suitable for categories with frequent updates or new arrivals lists.
- In-Stock Items and Image First: Items in stock with an image are displayed first, followed by items in stock without an image, then sold-out items with an image, and finally sold-out items without an image.
- Random: Displays products in random order.
You can also sort products manually using drag-and-drop via the “Product Order” link on the category page. See Sorting Products in Categories for a detailed guide.
Category Order
In the Tree View, each category has a small number field on the far right. The number represents the category’s weight—that is, its order—and lower numbers appear first. Adjust the numbers and click Save Order. In the list view, you can see the weight in the “Weight” column and sort by it, but you edit the number itself in the tree view.
Toggle "Online," "In Menu," and "noindex" on and off directly in the list
You don’t need to open a category to change the three most commonly used settings. In both the list view and the tree view, each category has three icons you can click:
- Online, shown as an eye. A green eye means the category is online. A gray, crossed-out eye means it’s been taken offline.
- In the menu, shown as a menu icon. Blue means the category is included in the online store’s navigation. Gray means it’s hidden in the menu.
- Noindex, shown as a “no entry” icon. Yellow means search engines are instructed not to index the category. Gray means it may be indexed.
The change is saved immediately, so you don’t need to click Save afterward. This makes it quick to go through the entire list, for example, when you need to clean up the menu before a campaign.
The three settings are independent of one another, and that’s precisely the point. A category can easily be online without appearing in the menu if you only link to it from a newsletter or an ad. And a category can be in the menu with “noindex” enabled if it’s useful to customers but doesn’t belong in search results.
Import Categories via CSV
If you have many categories, you can import them from a CSV file. Go to Categories → Import. You can import the following fields:
- Name, Description A and B, Meta Title, Meta Description
- URL (address), Image URLs, Tags
- Parent Category (by name or ID)
- Order, In the menu, Online, Noindex
- Google Category, Sorting, Additional Fields
The CSV file must have a header row, and you can select the separator and encoding during upload. Shoporama automatically matches the fields from the file to the correct columns. See Import Categories via CSV for a detailed guide.
You can also export all your categories as a CSV file via Categories → Export. This is useful for backup purposes or for editing many categories in a spreadsheet.
Advanced Settings
Under the Advanced tab, you’ll find additional settings:
- Tag: An internal tag for use in your templates, e.g., to style specific categories differently.
- Redirect to URL if no products are found: Specify an absolute URL to which the customer is automatically redirected if the category contains no products.
- Ignore in webshop search: Exclude the category from the shop’s internal search function.
- Extra Fields: Add additional key-value pairs to the category (e.g., for use in your theme).
- Optional words for internal store search: Add additional search terms so that the category also appears in search results for terms not included in its name.
Copy and delete categories
In the category list, you can select one or more categories and choose "Copy Selected " to create copies. You can also delete categories using " Delete Selected." If you’ve accidentally deleted a category, see " Restore a Deleted Category."
Delete multiple categories at once
If you’re cleaning up after a season or need to reorganize an old structure, you can delete multiple categories in a single step:
- Check the boxes next to the categories you want to remove. In the tree view, you can use “Show Selected Only” to review your selection first.
- Click " Delete Selected."
- A window will open showing the names of all the categories that will be deleted. Review the list.
- Click " Delete " to confirm, or " Cancel " if something looks wrong.
If you haven’t selected any categories, you’ll see the message “Select at least one category,” and nothing will happen.
What happens to products and subcategories?
- The products will not be deleted. They will simply lose their association with the deleted category. If a product was in only one category, you should move it to another; otherwise, customers will only be able to find it via search or a direct link.
- Subcategories are not deleted either. They move up and become main categories. If you want to remove the entire branch, you must therefore select both the main category and its subcategories.
- The deletion can be undone. The category disappears from the store and from the overview, but it is not gone forever. See Restore a Deleted Category.
Redirect URLs from Deleted Categories
A category you’ve had online typically has links from Google, newsletters, social media, and perhaps other websites. If you delete the category without taking further action, all those links will lead to an error page. That’s why Shoporama automatically redirects you to the “Set up redirects for deleted categories” step as soon as you’ve deleted one or more categories with a URL.
- For each deleted category, the name and the old URL are listed on the left.
- In the field on the right, select where the old URL should redirect visitors. You can search among your categories, pages, landing pages, blog posts, and products, and the homepage is at the top of the list.
- If you want it to point to a location not listed here, click “Or enter a different URL” and type the address yourself.
- Click " Save Redirects."
If you’ve deleted multiple categories at once, you’ll see the “Set all to top” field. Select a destination, click “Apply,” and all fields will be filled in with the same page. You can then edit the individual entries that need to go somewhere else. This saves a lot of time when you merge ten subcategories into one.
If you leave a field blank, no redirect will be created for that specific category. If you want to skip this entire step, click “Skip.”
Redirects are created as permanent 301 redirects. This type tells search engines that the page has been permanently moved, so some of the earned ranking carries over to the new page. You can always view, edit, and add redirects under Webshop → Redirects in the admin menu. Read more in The Complete Guide to Redirects.
The homepage category is not included in this step because it does not have a separate URL that can be redirected.
Tips for a Good Category Structure
- Keep it simple; avoid too many levels. 2–3 levels are usually enough.
- Think like the customer; use names your customers understand and search for.
- Avoid empty categories; a category with no products provides a poor user experience. Use “Redirect to URL if no more items” or set it to offline.
- Always fill in the meta title and meta description; this helps with visibility on Google.
- Use descriptions; category descriptions give Google more context and improve your SEO.
- Use landing pages for cross-category selections; if you need to display products across categories (e.g., “New Arrivals” or “Special Offers”), use landing pages instead.
Frequently Asked Questions
I accidentally deleted a category. Are my products gone too?
No. The products will remain in your store and will only lose their association with the category you deleted. You can still find them under Products, and you can move them to a different category. The category itself can also be restored; see Restore a Deleted Category.
I clicked “Skip” on the redirect page. Can I still set it up?
Yes. Go to Webshop → Redirects in the admin menu, and click Create New. The old URL is the address the category used to have, and you point it to where you want visitors to end up instead. See The Complete Guide to Redirects.
What’s the difference between taking a category offline and deleting it?
A category that you take offline retains all its content, products, and settings, but customers cannot visit the page. This is the right solution for something that will be brought back later, such as a seasonal category. If you delete the category, the link between the category and the products is removed, and the subcategories are promoted to main categories. Note that Shoporama only offers redirects when you delete a category. If you take a category permanently offline, you should set up a redirect yourself under Webshop → Redirects.
Can I remove a category from the menu without taking it offline?
Yes. Click the menu icon next to the category in the list so that it turns gray. The category will disappear from the navigation, but the page will still work, and you can link to it from campaigns, banners, and newsletters.
I need to completely reorganize my store. What’s the fastest way to do this?
Work in the tree view. Use the search bar to find the branches, the move icon to place them under the correct parent categories, and select the rest for deletion all at once. Use “Show Only Selected” as a final check before deleting, and then use “Set All to Redirect Page” so that all the deleted categories point to the new parent category. Remember that subcategories under a deleted category move up to the top level, so include the entire branch if you want to remove it.
Are redirects really worth the trouble?
Yes, and it takes less than a minute. A category page that’s been online for a while almost always gets traffic from search engines, old newsletters, social media posts, and ads. Without a redirect, that traffic ends up on an error page, and visitors you’ve already paid to attract disappear again. With a redirect, they land on a relevant page and can still make a purchase.
Does deleting a category affect my orders or my accounting?
No. A category is a navigation element—in other words, a way to display products. Your orders, invoices, customers, and inventory levels remain unaffected when you delete a category.
I can’t find the move icon next to my categories
The move icon is only available in tree view. Click the Tree View tab at the top of the category page, and it will appear on the far right of each row, along with the icons for editing and product order.
If you have any questions about category setup, feel free to contact us at support@shoporama.dk.