Logo, Favicon, and Terms and Conditions
Here's how to upload your logo and favicon and enter your terms and conditions in Shoporama. See where the content appears in the store, at checkout, and in the order confirmation.
There are three things that virtually all of your customers see, no matter which page they land on: your logo, the small icon in the browser tab, and your terms and conditions at checkout. In Shoporama, you can set up all three on the same page—and you’ll be done in ten minutes.
Where to find the page
Go to Store in the left-hand menu, expand Design, and select Logo & Terms. You can also press Cmd+K (Ctrl+K on Windows) and search for “logo” or “terms of service.”
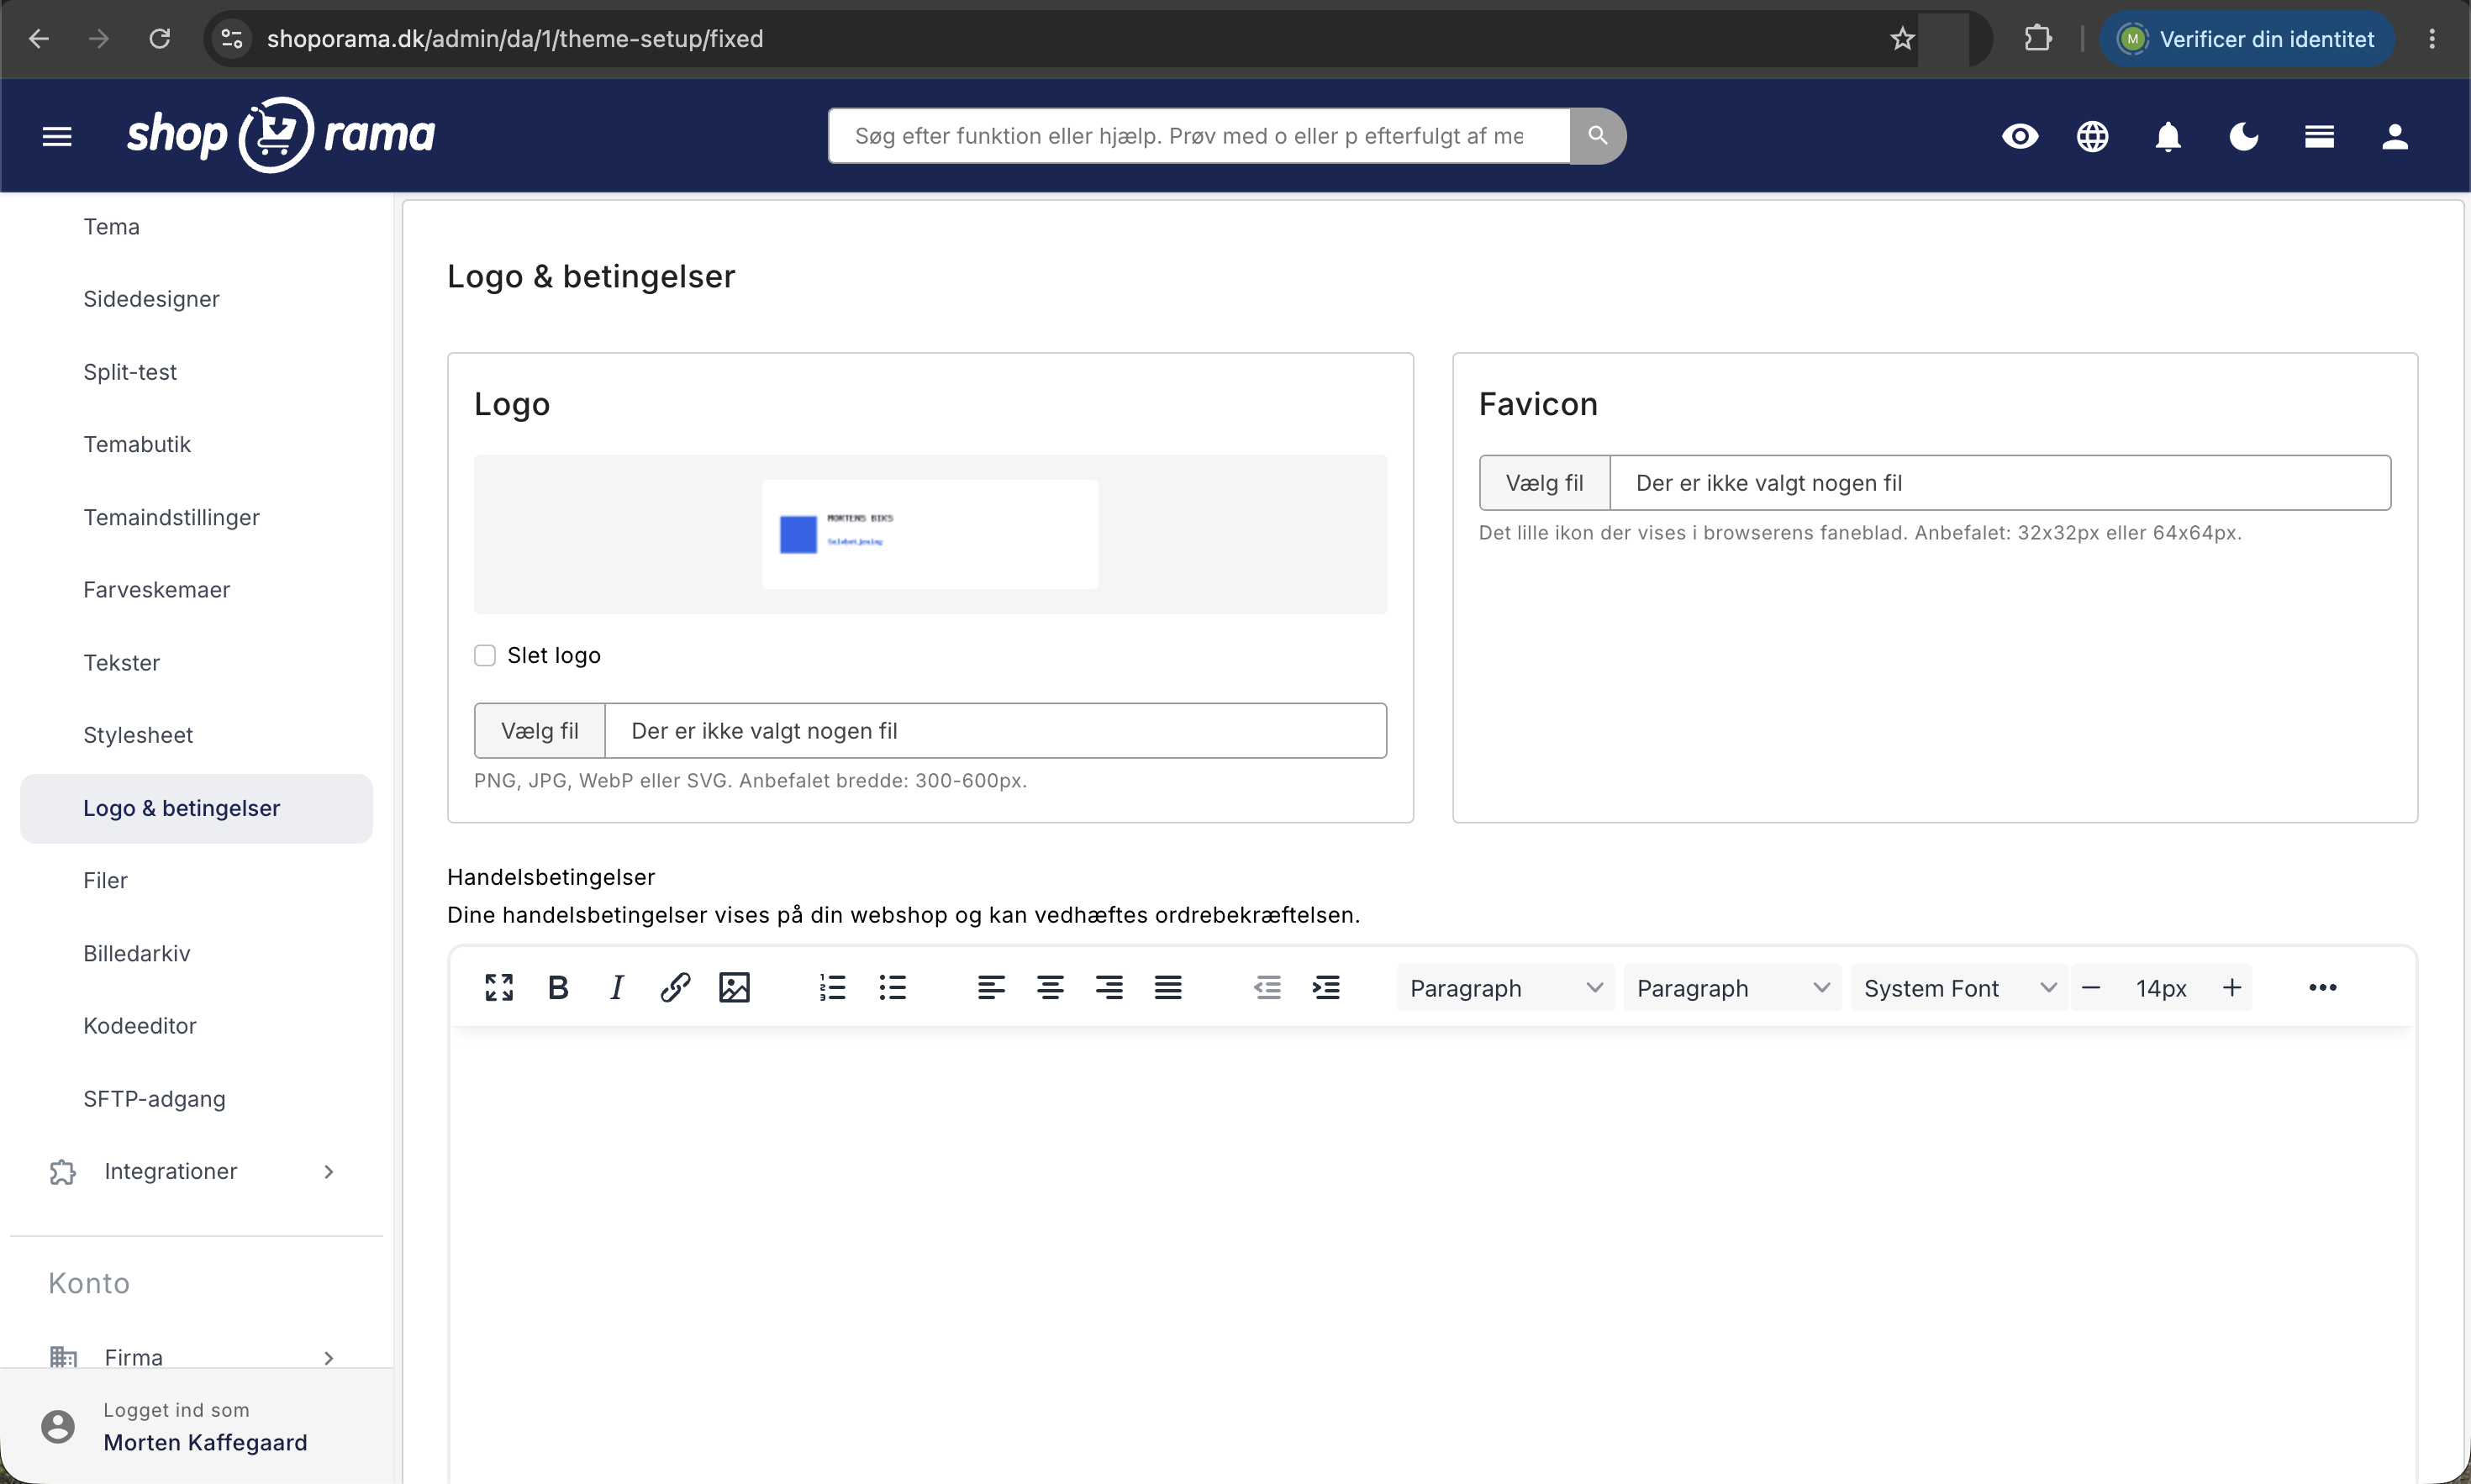
The page has three fields and one button. At the top, the Logo and Favicon are side by side; below them are the Terms of Service; and at the very bottom is Save. Everything is saved at the same time, so you can safely make changes to everything and click “Save” just once at the end. Cmd+S (Ctrl+S) also saves without requiring you to scroll down to the button.
Your Logo
The logo isn’t just used at the top of your online store. In Shoporama’s newer themes, it’s also used:
- In the header on every page of the store
- At the top of the checkout page, so the customer can see that it’s still your store when it’s time to pay
- In automated emails, including the order confirmation, “order shipped,” and abandoned cart reminder
- On printable documents, in themes that include a logo
- At the top of the newsletters you send from Shoporama
Exactly where the logo appears, however, depends on your theme. For example, Delaware themes retrieve the logo for emails from Theme Settings rather than from this page, and the oldest themes do not use this field at all. Therefore, check your own store after you’ve saved.
If you haven’t uploaded a logo, the themes will display the store’s name as plain text instead. Your store won’t break, but it will look less professional right when the customer is deciding whether to pay.
How to Upload the Logo
- Go to Store, Design, Logo & Terms.
- Click the file selector in the Logo section and select your file.
- Click Save at the bottom of the page.
- Open the store in a new tab and check that the logo looks correct on both desktop and mobile.
Below the field, you’ll see the help text : “PNG, JPG, WebP, or SVG. Recommended width: 300–600px.” If a logo is already there, you’ll see a preview and a checkbox labeled “Delete logo.” Check the box and click Save if you want to remove the logo completely. If you simply upload a new file, the old one will be replaced automatically, so you don’t need to delete it first. If you don’t have a logo yet, there’s also an “Upload Logo” shortcut on the dashboard.
Which file format should you choose?
We recommend PNG with a transparent background. This way, the logo blends naturally into the theme’s colors, whether the header is white, black, or your own brand color. JPG files cannot be transparent, so you risk ending up with a white square around the logo.
Although the file selector also allows SVG, you should not use it. Shoporama automatically scales the logo down to the size required by the theme, and this process works with PNG, JPG, GIF, and WebP. If you only have the logo as an SVG, export it as a PNG with a width of, for example, 1200 pixels. You control compression and output format elsewhere; see Image Quality and Image Format.
Favicon
A favicon is the tiny icon that the browser displays in the tab next to the page title. It’s also used in bookmarks, in the history, and on your phone’s home screen. The help text puts it simply: “The small icon that appears in the browser tab. Recommended: 32x32px or 64x64px."
The field accepts PNG, JPG, or WebP. Note that SVG is not listed here, unlike in the logo field. Just like with the logo, you’ll see a preview and a “Delete favicon” checkbox when a file is present. All of Shoporama’s newer themes use this field. The oldest themes, Alaska and Massachusetts, however, have their own favicon field under Theme Settings, and if you’re using one of those, that’s where you should upload the icon.
Keep the design square and simple. A full logo with a tagline will look blurry at 32 pixels, so it’s better to use just a letter or symbol. And remember: browsers store favicons for a very long time, so if you’re still seeing the old icon, try opening an incognito window before concluding that it didn’t work.
Terms and Conditions
The third field is a formatted text field. The page states: “Your terms and conditions will be displayed on your online store and can be attached to the order confirmation.” The editor lets you use bold, italics, lists, links, alignment, headings, and a full-screen button for long texts. You can insert images from your image library, work directly in HTML via the code view, and use the “Remove Formatting” button, which is worth its weight in gold when copying text from Word.
Where the text appears in your store
In themes that use this field, the text typically appears:
- At checkout, just above the required checkbox “I accept the terms and conditions”
- In the order confirmation, as a section at the bottom of the email
- On the product page as a collapsible section, in themes that support this feature. In Montana themes, this is disabled by default; see the section below
- In the footer of the newsletter sign-up form, where the customer can open the terms in a small pop-up window, in themes that support this feature
Terms and Conditions on the product page in Montana
Previously, Montana themes could display your entire terms and conditions text in a collapsible section at the bottom of each product page. This is now disabled by default. The reason is that the text is word-for-word the same on all product pages, and if you have short product descriptions, the legal text can easily end up taking up more space than the product’s own content. Google doesn’t penalize duplicate text, but the terms and conditions may end up appearing in search results instead of the product text, and they add a few kilobytes to every single page view without benefiting the customer.
If you want to restore this section, go to Store, Design, Theme Settings, and check the box for “Show Terms and Conditions on the product page ” under the “Product Page” group.
You won’t lose anything by leaving it turned off. The terms and conditions will still appear in the checkout with the required acceptance checkbox, they’ll be included in the order confirmation, and they can be accessed from the footer. Legally, the requirement is that the terms be easily accessible before the purchase, not that they appear in full on the product page.
In the Montana themes, you can also write [terms] in the middle of any formatted text, such as on a static page. The code will then be replaced by your terms and conditions when the page is displayed. This allows you to keep the terms in one place and reuse them on a “Terms and Conditions” page without having to maintain two separate texts. See Static Pages.
Important exception: The Delaware themes do not use this field. They have their own terms fields under Design and Theme Settings in theTerms of Service group, where General, Return Policy, Shipping Policy, Payment, Privacy Policy, and GDPR are filled out separately. Therefore, always check your own store after you’ve saved. If you’re unsure which theme you’re using, you can find it under Design and Theme, and get an overview in Which themes are available on Shoporama?
Why Terms of Service Are Not Optional
If you sell to consumers in Denmark, you have a duty to provide information. Both the Consumer Contracts Act and the E-Commerce Act require that the customer receive certain information clearly and unambiguously before the transaction is concluded, and that this information be confirmed afterward on a durable medium—typically the order confirmation via email. Failure to provide information about the right of withdrawal can, in practice, significantly extend the customer’s withdrawal period.
There is also a tangible business benefit. Easy-to-read terms and conditions eliminate uncertainty at checkout, and uncertainty is one of the most costly reasons for abandoned purchases. They save you support time because customers can find answers to questions about delivery times and returns on their own, and if an issue arises, you’re in a stronger position with terms the customer has actively accepted.
We are not lawyers, and this article does not constitute legal advice. If you want to be absolutely sure, have your terms and conditions reviewed by a lawyer, or use a template from a trade association or certification program. If you use the E-mark, you can read about how to set it up in the E-mark section of your online store.
What the terms and conditions should typically cover
Use the list below as a checklist, not as a finished text:
- Who you are. Company name, address, CVR number, phone number, and email
- Prices and sales tax. Whether prices include or exclude sales tax, and the currency used for transactions
- Payment. Which payment methods you accept, and when the amount is charged
- Shipping. Shipping options, delivery times, shipping rates, and which countries you ship to
- Right of withdrawal. Timeframe, procedure, who pays for return shipping, and any exceptions
- Complaints. What the customer should do in case of defects or missing items, and where the item should be sent
- Personal Data. What information you process and why, preferably with a link to your privacy policy
- Complaint procedures. Where customers can file a complaint if you cannot reach an agreement
The information must match what is listed in your account. You can update this under “Company Information”; see “How do I change my company information?”
Terms and Conditions as a PDF on the order confirmation
At the bottom of the page is a help box with further links. If you’d rather attach the terms and conditions as a PDF, upload the file under Account, Web Store, General, on the Orders tab, in the “Upload file to invoice.html” field. There’s space for two files, so you can attach both the terms and conditions and a standard cancellation form. See “Attach Terms and Conditions to the Order Confirmation.” These methods aren’t mutually exclusive, and many stores do both.
Once you’ve clicked Save
Take two minutes to check the result, rather than discovering an error three weeks from now:
- Open the homepage and make sure the logo displays correctly, even on a mobile screen.
- Look at the tab and check your favicon, preferably in an incognito window.
- Add an item to your cart and proceed to checkout. Can you see your terms and conditions, and does the checkbox work?
- Place a test order and read the order confirmation. Is the logo at the top, and are the terms and conditions included?
You can find the complete list of emails your customers receive—and thus where the logo appears—in “What emails does Shoporama send to my customers?”.
For those with a technical background
If you’re working directly in the theme files, the three fields are located on the webshop object. $webshop->getLogo() and $webshop->getFavicon() return an image object that you call getSrc(width, height, type) on, where type is typically fit or box. Both can be empty, so wrap them in an if statement with the store name as a fallback.
The terms and conditions are retrieved using $webshop->getTerms() and contain HTML, so they must be output without escaping. If you insert the text into JavaScript, it must be properly escaped first. Also note that getSrc() always returns a raster image in the store’s selected image format, which is why SVG isn’t a good choice for the logo. You can find a general overview in Variables in a Shoporama Theme.
Frequently Asked Questions
I’ve uploaded my logo, but nothing is happening. What should I do?
First, check that you remembered to click Save at the bottom of the page. The file selector does not save automatically. If you still don’t see the logo, reload the page in an incognito window, as the browser stores images in its cache. If that doesn’t help either, email support@shoporama.dk with the URL of your shop.
How big can the logo be?
It says “recommended width: 300–600px” next to the field, and Shoporama automatically scales it down to the size required by the theme. You’re welcome to upload a larger file—for example, 1200 pixels wide—if you want to ensure a sharp result on high-resolution screens.
Can I have different logos for light and dark backgrounds?
Not from here. There’s only room for one logo. If you want a white version for a dark footer, it must be added to the theme by whoever maintains your design. Therefore, choose a PNG with a transparent background that works with the background color your theme uses.
Can I have terms and conditions in multiple languages?
The field can only hold one text. If you run a multilingual store, the most robust solution is to have one page per language with the terms and conditions, or to ask your theme developer to retrieve the correct text for each language. Email support@shoporama.dk if you’d like help evaluating your setup.
Will the order be blocked if the customer doesn’t check the box for the terms and conditions?
The checkbox at checkout is marked as required, so the browser will stop the customer from proceeding when they click “Continue.” It works the same way as when a phone number is missing. Feel free to place a test order yourself to verify that the checkbox appears in your specific theme.
We’ve changed our return policy. Do I need to do anything other than edit the text?
Edit the text and click Save, and the change will take effect in the checkout and in new order confirmations immediately. If you’ve also attached the terms and conditions as a PDF, be sure to upload a new file; otherwise, you’ll continue to send out the old version. Feel free to save a dated copy for your own records.
Can I insert images or tables into the terms and conditions?
Images, yes—you can upload them from your image library using the image button. There isn’t a button for tables, but you can insert them via the code editor if you’re familiar with HTML. Keep in mind that wide tables rarely look good on mobile devices, and that the text is also used in emails.
We run multiple stores under the same account. Are the logo and terms and conditions shared?
No. The logo, favicon, and terms and conditions belong to each individual online store, not to the account. Switch to the store you want to edit and repeat the setup there. This is an advantage if your stores each have their own brand.
I can’t find my terms of service anywhere, even though the field is filled out.
In that case, you’re likely using a theme that doesn’t utilize that field. Delaware themes have their own terms fields under Design and Theme Settings in the Terms of Service group, and some themes don’t display terms automatically at all. Check which theme you’re using under Design and Theme, and email support@shoporama.dk if you’re unsure.
Related articles
Image quality and aspect ratio in Shoporama
Understand how Shoporama handles image quality and aspect ratio - and what you can do if your images don't look sharp enough.
Pages
Learn how to create, edit, set to offline, and delete static pages such as "About Us," "Terms and Conditions," and "Contact" in Shoporama.
What themes are there on Shoporama?
Complete overview of all free themes on Shoporama: Delaware, DelawareDK, California, Alaska 2, Washington, Montana, and the classic Smarty 2 themes...
E-label in your webshop, badge and compliance guide
Complete guide to setting up the e-label badge in Shoporama and fulfilling the e-label compliance checklist with responsibilities and FAQ.
How do I change company information
Guide to changing company name, address and other business information in Shoporama.
Attach terms and conditions to the order confirmation
Sådan vedhæfter du dine handelsbetingelser som PDF til ordrebekræftelsen i Shoporama.
What emails does Shoporama send to my customers?
Overview of automatic emails Shoporama sends to your customers - order confirmation, abandoned baskets, track-and-trace, product reviews, and more.
Variables in a Shoporama theme
Overview of global and page-specific Smarty variables available in Shoporama themes.
Attach file to the order confirmation
Guide to attaching a file (e.g. terms and conditions) to the order confirmation in Shoporama.
Related features
Favicon
A favicon is the small icon in the browser tab and search results. Learn about sizes, formats, design tips and how to set it up in your online shop.
Company Information, Logo, and Terms and Conditions
Here's how to fill in your company information and CVR number, upload your logo and favicon, and write the terms and conditions that will appear at...
Theme Settings in Delaware: Store and Products
An explanation of all fields in Delaware's store and product theme settings: colors, badges, value propositions, filters, categories, product...
Theme Settings in Montana: An Explanation of All Fields
All groups and fields in Montana's theme settings explained with screenshots: colors, top bar, USPs, product page, checkout, and integrations.