Import Customers via CSV
How to import customers into your online store using a CSV file: which columns Shoporama reads, how duplicates are handled via email, and what to watch out for along the way.
Are you switching to Shoporama from another platform, or do you just need to correct the phone numbers for 800 customers all at once? With the customer import feature, you can upload a CSV file that both creates new customers and updates the ones you already have—without having to open each profile one by one.
CSV is a common spreadsheet format that Excel, Numbers, and Google Sheets can all save. Here, you’ll find the exact column names, the file rules, what happens to existing customers, and the pitfalls you need to be aware of.
How to Find the Customer Import Feature
- Click Customers in the menu in your Shoporama admin panel.
- Select Registered Customers.
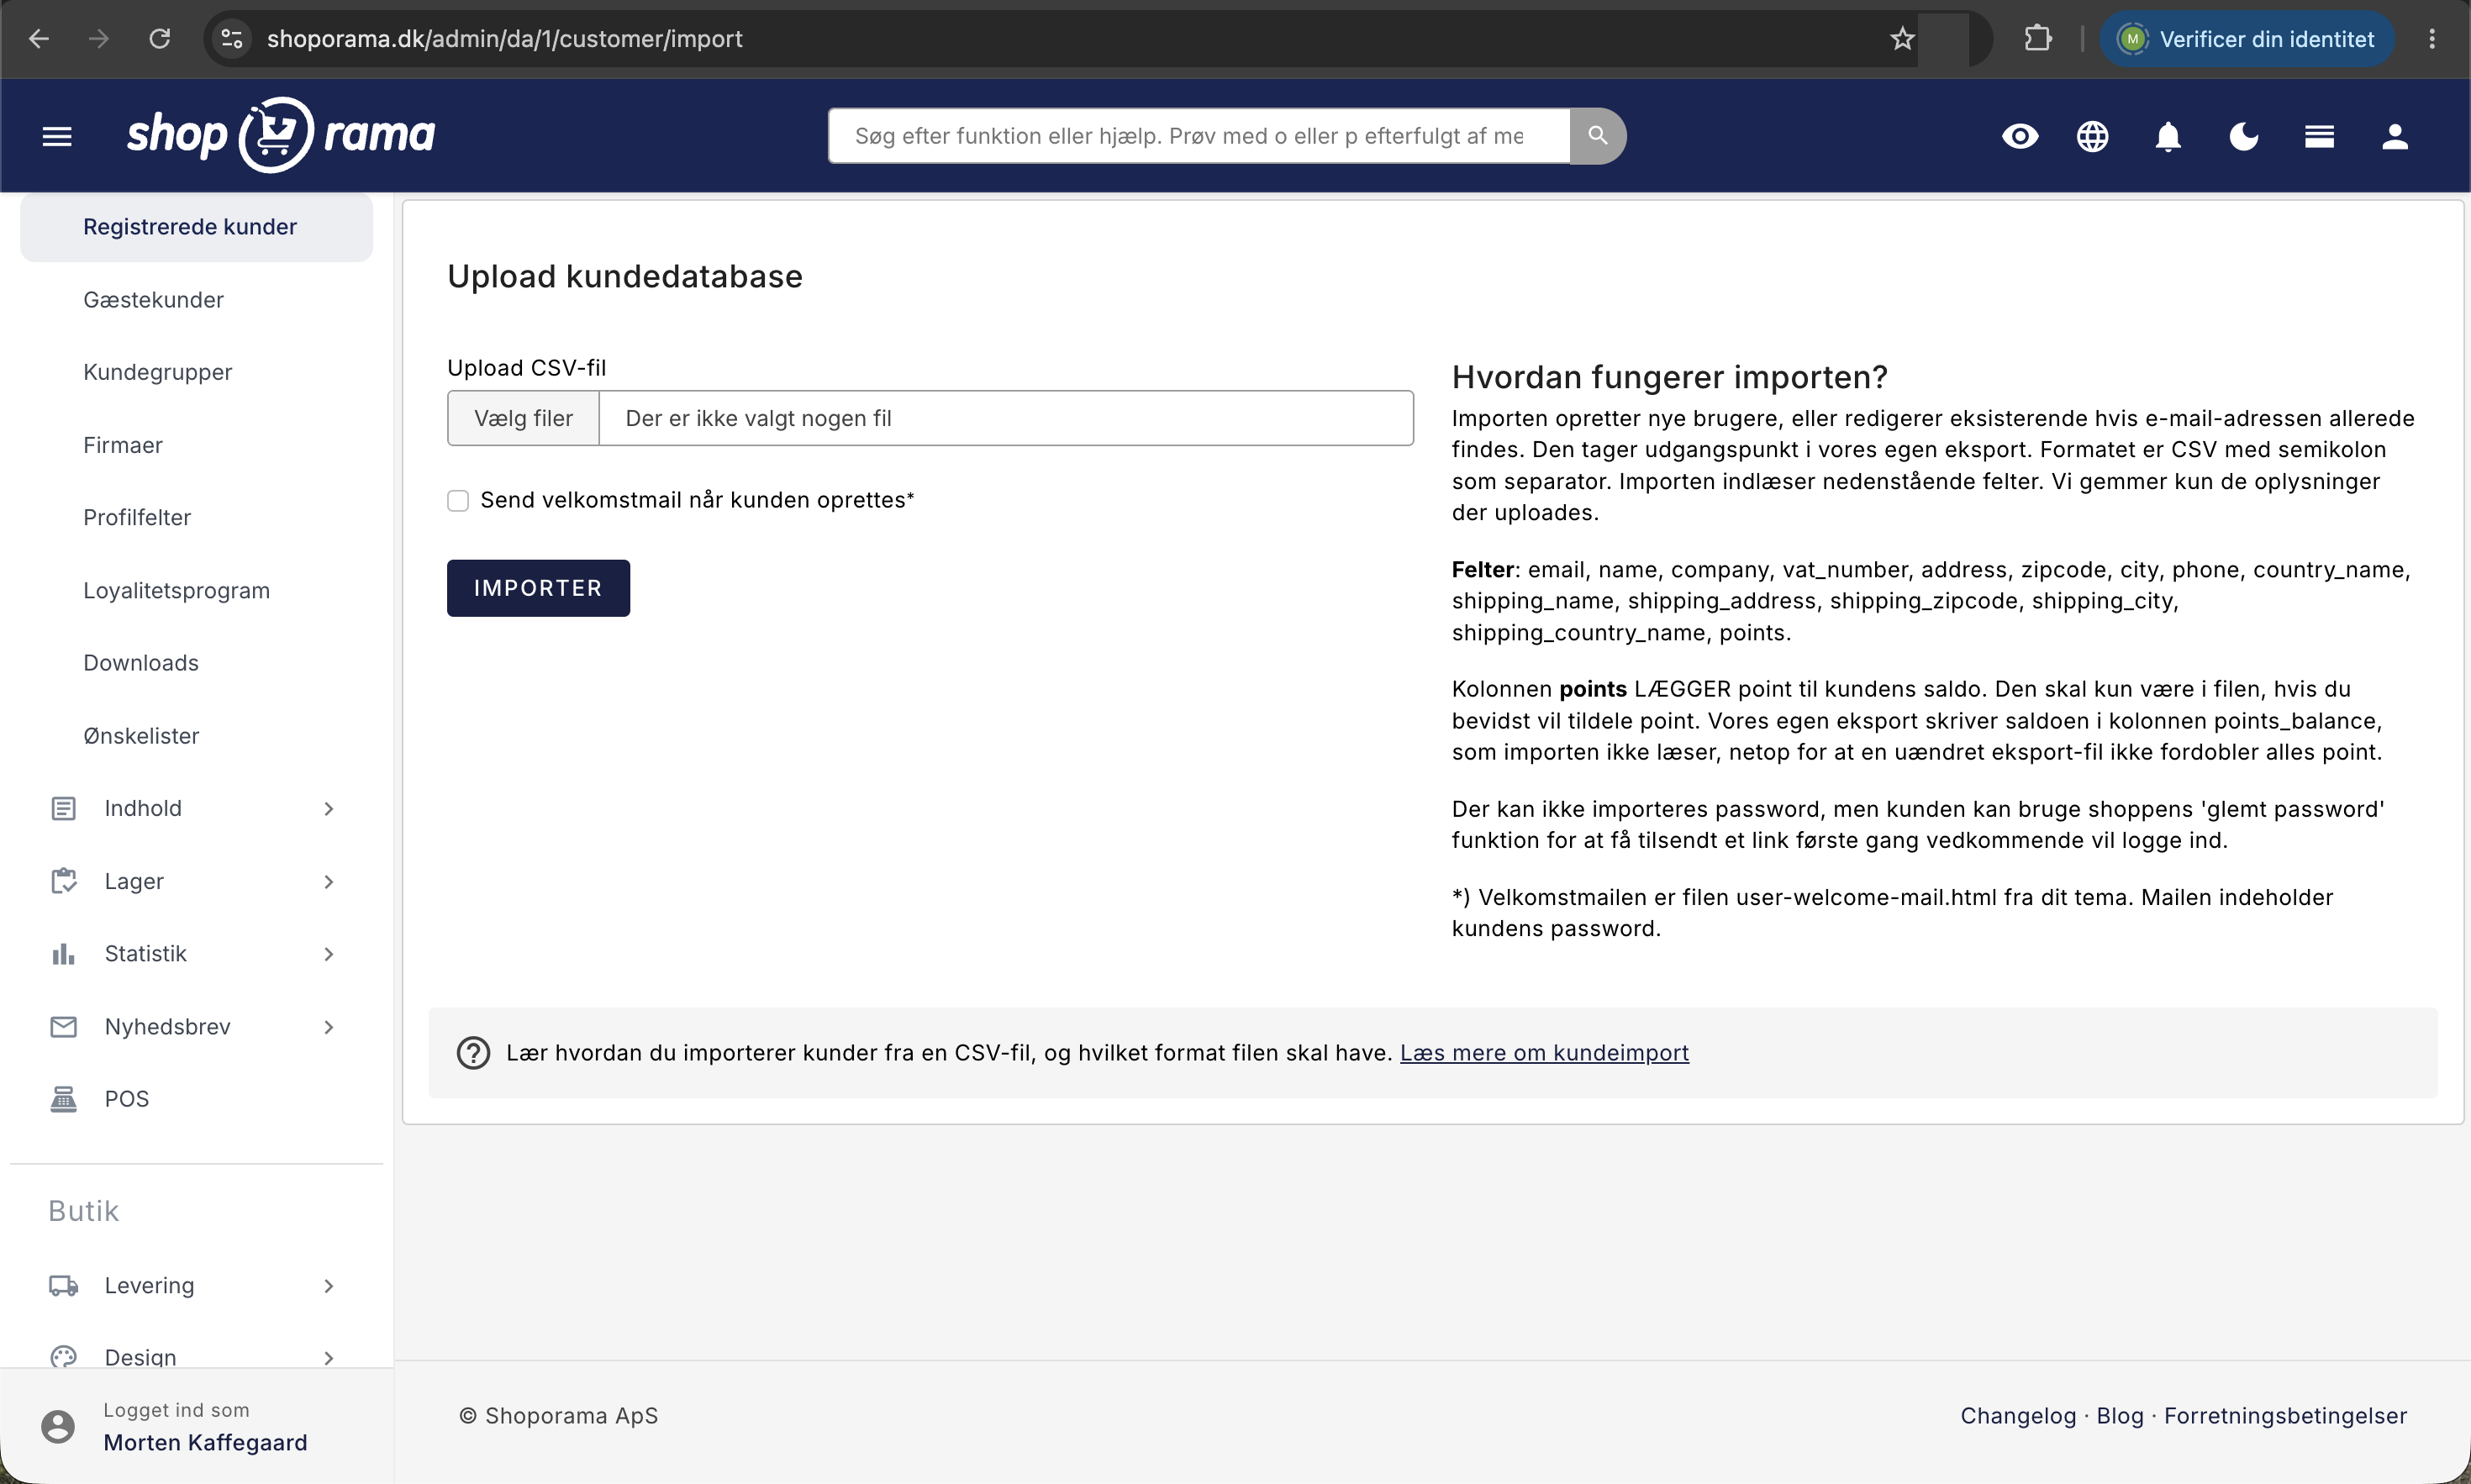
- Scroll down below the customer list and click the “Import Customers” button.
The page is called “Upload Customer Database.” On the customer list, the “Download All Customers ” button is right next to the import button, and it’s worth its weight in gold: it gives you a file in the format the import function expects. If you already have customers, the quickest way is therefore to download the export, edit it, and send it back. Just remove the “points” column first; see point 2 below.
Here’s what the file should look like
- Semicolon as the separator. Columns are separated by ;, not by commas or tabs. This is the standard in Danish Excel, so it usually works automatically.
- The first row contains the column names. If you omit the header row, your first customer’s data will be interpreted as column names and will not be created.
- Use the English field names. The column with email addresses must be named “email,” not “E-mail” or “Mail.” Upper- and lowercase letters, however, do not matter.
- The order is flexible. You decide which columns the file contains and in what order. Columns that Shoporama doesn’t recognize are skipped.
- Save as UTF-8. If you select "CSV UTF-8," you can be sure that æ, ø, and å will be displayed correctly.
- A semicolon within a value requires quotation marks. If a field itself contains a semicolon, the entire value must be enclosed in double quotation marks.
- One file at a time. The import process reads only one file per upload, so split a large dataset into multiple runs.
An example with the most commonly used columns:
email;name;company;vat_number;own_id;address;zipcode;city;phone;country_name
anna@eksempel.dk;Anna Hansen;;;K-1042;Vestergade 12;5000;Odense C;12345678;Denmark
bo@eksempel.dk;Bo Jensen;Bo Jensen ApS;DK12345678;K-1043;Havnegade 3;8000;Aarhus C;87654321;Denmark
The file doesn’t need to be that wide at all. If you only need to correct phone numbers, here’s a fully valid import:
email;phone
anna@eksempel.dk;12345678
bo@eksempel.dk;87654321
The columns Shoporama reads
Customer and billing address
- "email " is the only required column. Rows without an email address are skipped.
- "name " becomes " Name," and " phone " becomes " Phone."
- "company " becomes " Company Name," and " vat_number " becomes " CVR Number."
- "own_id " becomes " Your ID." This is where you enter your own customer number from your accounting department or your old system.
- "address," " zipcode," and "city " become "Address," " Zip Code," and " City."
- "country_name" is the country’s name, written exactly as it appears in your shop.
Shipping Address
If the customer has a delivery address different from the billing address, fill in `shipping_name`, `shipping_address`, `shipping_zipcode`, `shipping_city`, and `shipping_country_name`.
Points and Your Own Profile Fields
- "points " awards points to the customer. This column only works if your loyalty program is enabled. If it is not active, the column is ignored without an error message.
- If you’ve created custom fields under Customers> Profile Fields, they can also be imported. The column must have the same name as the field. Uppercase and lowercase letters don’t matter here, so if the field is named “Birthday,” both “Birthday” and “birthday” will work.
The import cannot handle the following
Passwords cannot be imported. The same applies to EAN numbers, customer groups, and links to a company account. These are added to the customer profile or via the relevant functions, such as customer groups and B2B prices. The import also does not subscribe anyone to the newsletter. You do that under Newsletter, Recipients, which has its own import function.
Step by step
- Get a fresh export using “Download All Customers.” This gives you both a template and a copy of the data as it appeared before the import.
- Set up the file in the spreadsheet with English field names in the header row and one email address per row.
- Save as a CSV file using UTF-8 encoding and semicolons as delimiters.
- Test with a small file first. Select three to five customers, run the import, and check if the result is as expected.
- Go to Customers, Registered Customers, Import Customers, and select the file under Upload CSV File.
- Decide whether to “Send a welcome email when the customer is created.” Only check this box if you want customers to receive a message immediately.
- Click Import, wait for the confirmation, and look up a few customers to check the results. Do not close the tab during the process.
What happens to customers who already exist?
The email address is the key. If the address already exists in your store, the existing customer will be updated. This means no duplicate entries are created, and order history, points, and other data are carried over. If the address isn’t found, the customer is created as a new entry. Customers not listed in the file remain unaffected, and the import never deletes anything.
Important detail: empty fields do not overwrite anything. If you include the “phone” column but leave it blank for a customer, the customer retains their current number. Therefore, you can safely create a file containing only the columns you want to change. The downside is that you cannot clear a field via the import. If an address needs to be deleted, this must be done in the customer profile.
The summary: how to read the numbers
- The green box shows how many users were imported. This number includes both newly created and updated customers.
- A yellow box indicates rows that were skipped because they were missing an email address. Empty lines at the bottom of the file are included in this count, so a small number isn’t necessarily a problem.
- The yellow box also shows rows with an invalid email address. This check applies only to new customers, so an existing customer with an incorrect address can still be updated.
If you receive a notification about invalid email addresses, correct the addresses and run the file again. It’s safe to run the same file twice, with one exception: points.
Five things to watch out for
1. Country names must be written exactly
If the name in ` country_name ` isn’t among the store’s countries, a new country will be created with the exact name contained in the file. If you enter “DK,” “danmark,” and “Danmark” in the same file, you’ll end up with three countries, and a new country has no shipping rates. Check your country names under Shipping, Countries, and copy them down. Read more about countries and currencies.
2. Points are added each time
The “Points” column creates a new, approved points entry with the note “Assigned via import.” It adds to the existing data rather than replacing it, so if you run the same file twice, the customer will receive the points twice. Be especially careful if you’re continuing to work with the file from “Download All Customers”: the export itself has a “Points” column showing the customer’s current balance, so if you upload it unchanged, each customer’s balance will be added on top of their existing balance. Delete that column before importing. If the error has already occurred, click the customer’s number in the “Active Points ” column on the customer list, select the entries, and use “Delete Selected.”
3. Only new customers receive a password
Passwords cannot be imported. Newly created customers are assigned a random password, and existing customers keep the one they have, so their login will continue to work no matter how many times you run a file through the system. If a new customer wants to log in, they must either have the welcome email with their password or use the store’s “forgot password” feature to have a link sent to them. The same applies to customers who were created during an order without having chosen a password.
4. The welcome email is sent only to new customers
If you check the box for “Send welcome email when customer is created,” newly created customers will receive an email with their password, while existing customers will not receive anything. The emails are sent the moment you click “Import,” so be sure to check first that the email looks correct. This is the user-welcome-mail.html file from your theme.
5. Large files may run out of time
The import runs while you wait, and very large files may hit the server’s limit for upload size or processing time. If it gets stuck, split the file into chunks of, say, 1,000 to 2,000 rows. Since the email is the key, you can safely run multiple files in a row.
How you can use this in practice
- Migrating from another platform. Transfer your entire database. Customers keep their email addresses as their login credentials, so you can build on the customer relationships you already have instead of starting from scratch.
- Bulk updates. New phone numbers, corrected addresses, or business registration numbers for business customers. A two-column file can handle in one minute what would otherwise take an afternoon of clicking.
- Customer numbers from accounting. Enter your own numbers in ` own_id` so your online store and accounting system are on the same page during reconciliation.
- Points for loyal customers. If you’re launching a loyalty program, you can give your loyal customers a starting balance so the program feels active from day one.
For the tech-savvy
- The file is read with a semicolon as the field separator and double quotation marks as text delimiters. The byte order mark is automatically removed, and the content is converted to UTF-8 based on the detected character set. Detection isn’t foolproof, so it’s best to save the file as UTF-8 yourself.
- Column names are converted to lowercase, and both names and values are trimmed of spaces. Unknown columns are ignored, which is why the export file’s ` id ` and `created ` columns simply pass through when you reload your own export.
- Only non-empty values are written to the customer record. This explains why empty cells do not overwrite existing data.
- New customers trigger the same `customer_created` webhook as a regular creation in the store, so be prepared for fluctuations in your integrations during large imports. See the article on webhooks in Shoporama.
Frequently Asked Questions
I use Excel. How do I save the file correctly?
Select “Save As” and one of the CSV UTF-8 formats. The menu option is often labeled “comma-separated,” but Danish Excel will still use a semicolon because the semicolon is the list separator in the Danish settings. Therefore, you typically don’t need to do anything else. If you want to be absolutely sure, open the file in a text editor afterward and check a line containing “æ,” “ø,” or “å.”
Can I just update a single field for several thousand customers?
Yes, and that’s the best way to do it. Create a file with the “email” column and the single column you want to change. Everything else in the customer profile remains unchanged, because empty and omitted fields do not overwrite anything.
What happens to customers who aren’t in the file?
Nothing. The import creates and updates records, but it never deletes them. If you need to remove customers, select them from the customer list and use “Delete Selected.”
Can I transfer our customer numbers from the accounting system?
Yes. Use the `own_id` column, and the number will be entered into the “Own ID” field on the customer profile. This makes it easier to reconcile the online store with the accounting system when a customer needs to be located across systems.
I got an “invalid email” error on some rows. What should I do?
Those rows weren’t created; the rest were. Correct the addresses in the spreadsheet and run the file again. You can easily re-upload the entire file; customers who have already been created will simply be updated. If you used the “Points” column, remove it first; otherwise, customers will receive points again.
Can I assign customers to a customer group via the import?
No, “Customer Group” is not one of the fields the import reads. You assign the group to each individual customer profile under “Customer Group,” or you can work with company accounts if you’re running a B2B business. The same applies to the EAN number and linking to a company account.
Will my imported customers be subscribed to the newsletter?
No. The customer import does not affect the newsletter. If you want to add people to the list, you do so under “Newsletter,” “Recipients,” where there is a separate import function. Remember that you must have a legal basis for sending marketing materials to them.
Can I create orders for the imported customers afterward?
Yes. From the customer list, you can create an order directly for a customer, so their name and address are pre-filled. This is handy for phone orders and B2B. See the guide on creating orders directly from the customer overview.
If you’re having trouble with the file or have questions about a specific dataset, please email support@shoporama.dk with a few sample rows, and we’ll take a look.
Related articles
Loyalty programme
Complete guide to the Shoporama loyalty program - setting up the points system, earning, redemption and customer communication.
Customer Groups and B2B Pricing: Offer Different Prices to Different Customers
Countries and currencies
Guide to setting up countries, VAT rates, VAT zones, shipping options and currency in your Shoporama online store.
Webhooks in Shoporama
Complete guide to webhooks in Shoporama. Get automatically notified on a URL when something happens in your online store. List of all events,...
Create orders directly from the customer overview
Create orders directly from your customer overview with customer details automatically populated.
Import products via CSV
Complete guide to importing products with a CSV file in Shoporama - including format, fields and tips.
Export customers who have purchased a specific product
Guide to export a list of customers who have purchased a specific product and send them an email.