Stock records and batch management
Get full traceability of all movements in your inventory. How stock records and batch management work in Shoporama, including FIFO picking, expiration dates and lot traceability.
Inventory entries and batch management give you full control and traceability over all movements in your warehouse. You can see exactly when items were received, how much they cost, when they were sold, and whether they belong to a specific shipment with its own batch number and expiration date. This is invaluable for accounting, auditing, and day-to-day operations—and absolutely essential if you sell perishable goods.
In this article, we’ll walk you through how inventory entries work in Shoporama, what batch management can do, how the two are connected, and how to get started. This article is intended for store owners who want to understand the system without having to delve into technical details.
What are inventory entries?
An inventory transaction is a record of a specific movement in your inventory. Every time an item is added to or removed from inventory, a transaction is automatically created with the quantity, cost price, selling price, date, any order association, and location. Think of it as a cash journal, but for your inventory.
These entries provide you with a complete history. You can always go back and see when a specific item was added to inventory, what you paid for it, and when it was sold. This is exactly the documentation you need when it’s time to close the books or when your accountant has questions.
When is an inventory entry created?
Shoporama automatically creates inventory entries in all situations where the inventory count changes:
- When a customer places an order, a negative entry is created that removes the item from inventory
- When a customer returns items, a positive entry is created that adds the item back to inventory
- When you manually adjust inventory, e.g., during a count or to account for shrinkage
- When you import inventory counts via a file
- When inventory is synchronized across multiple stores
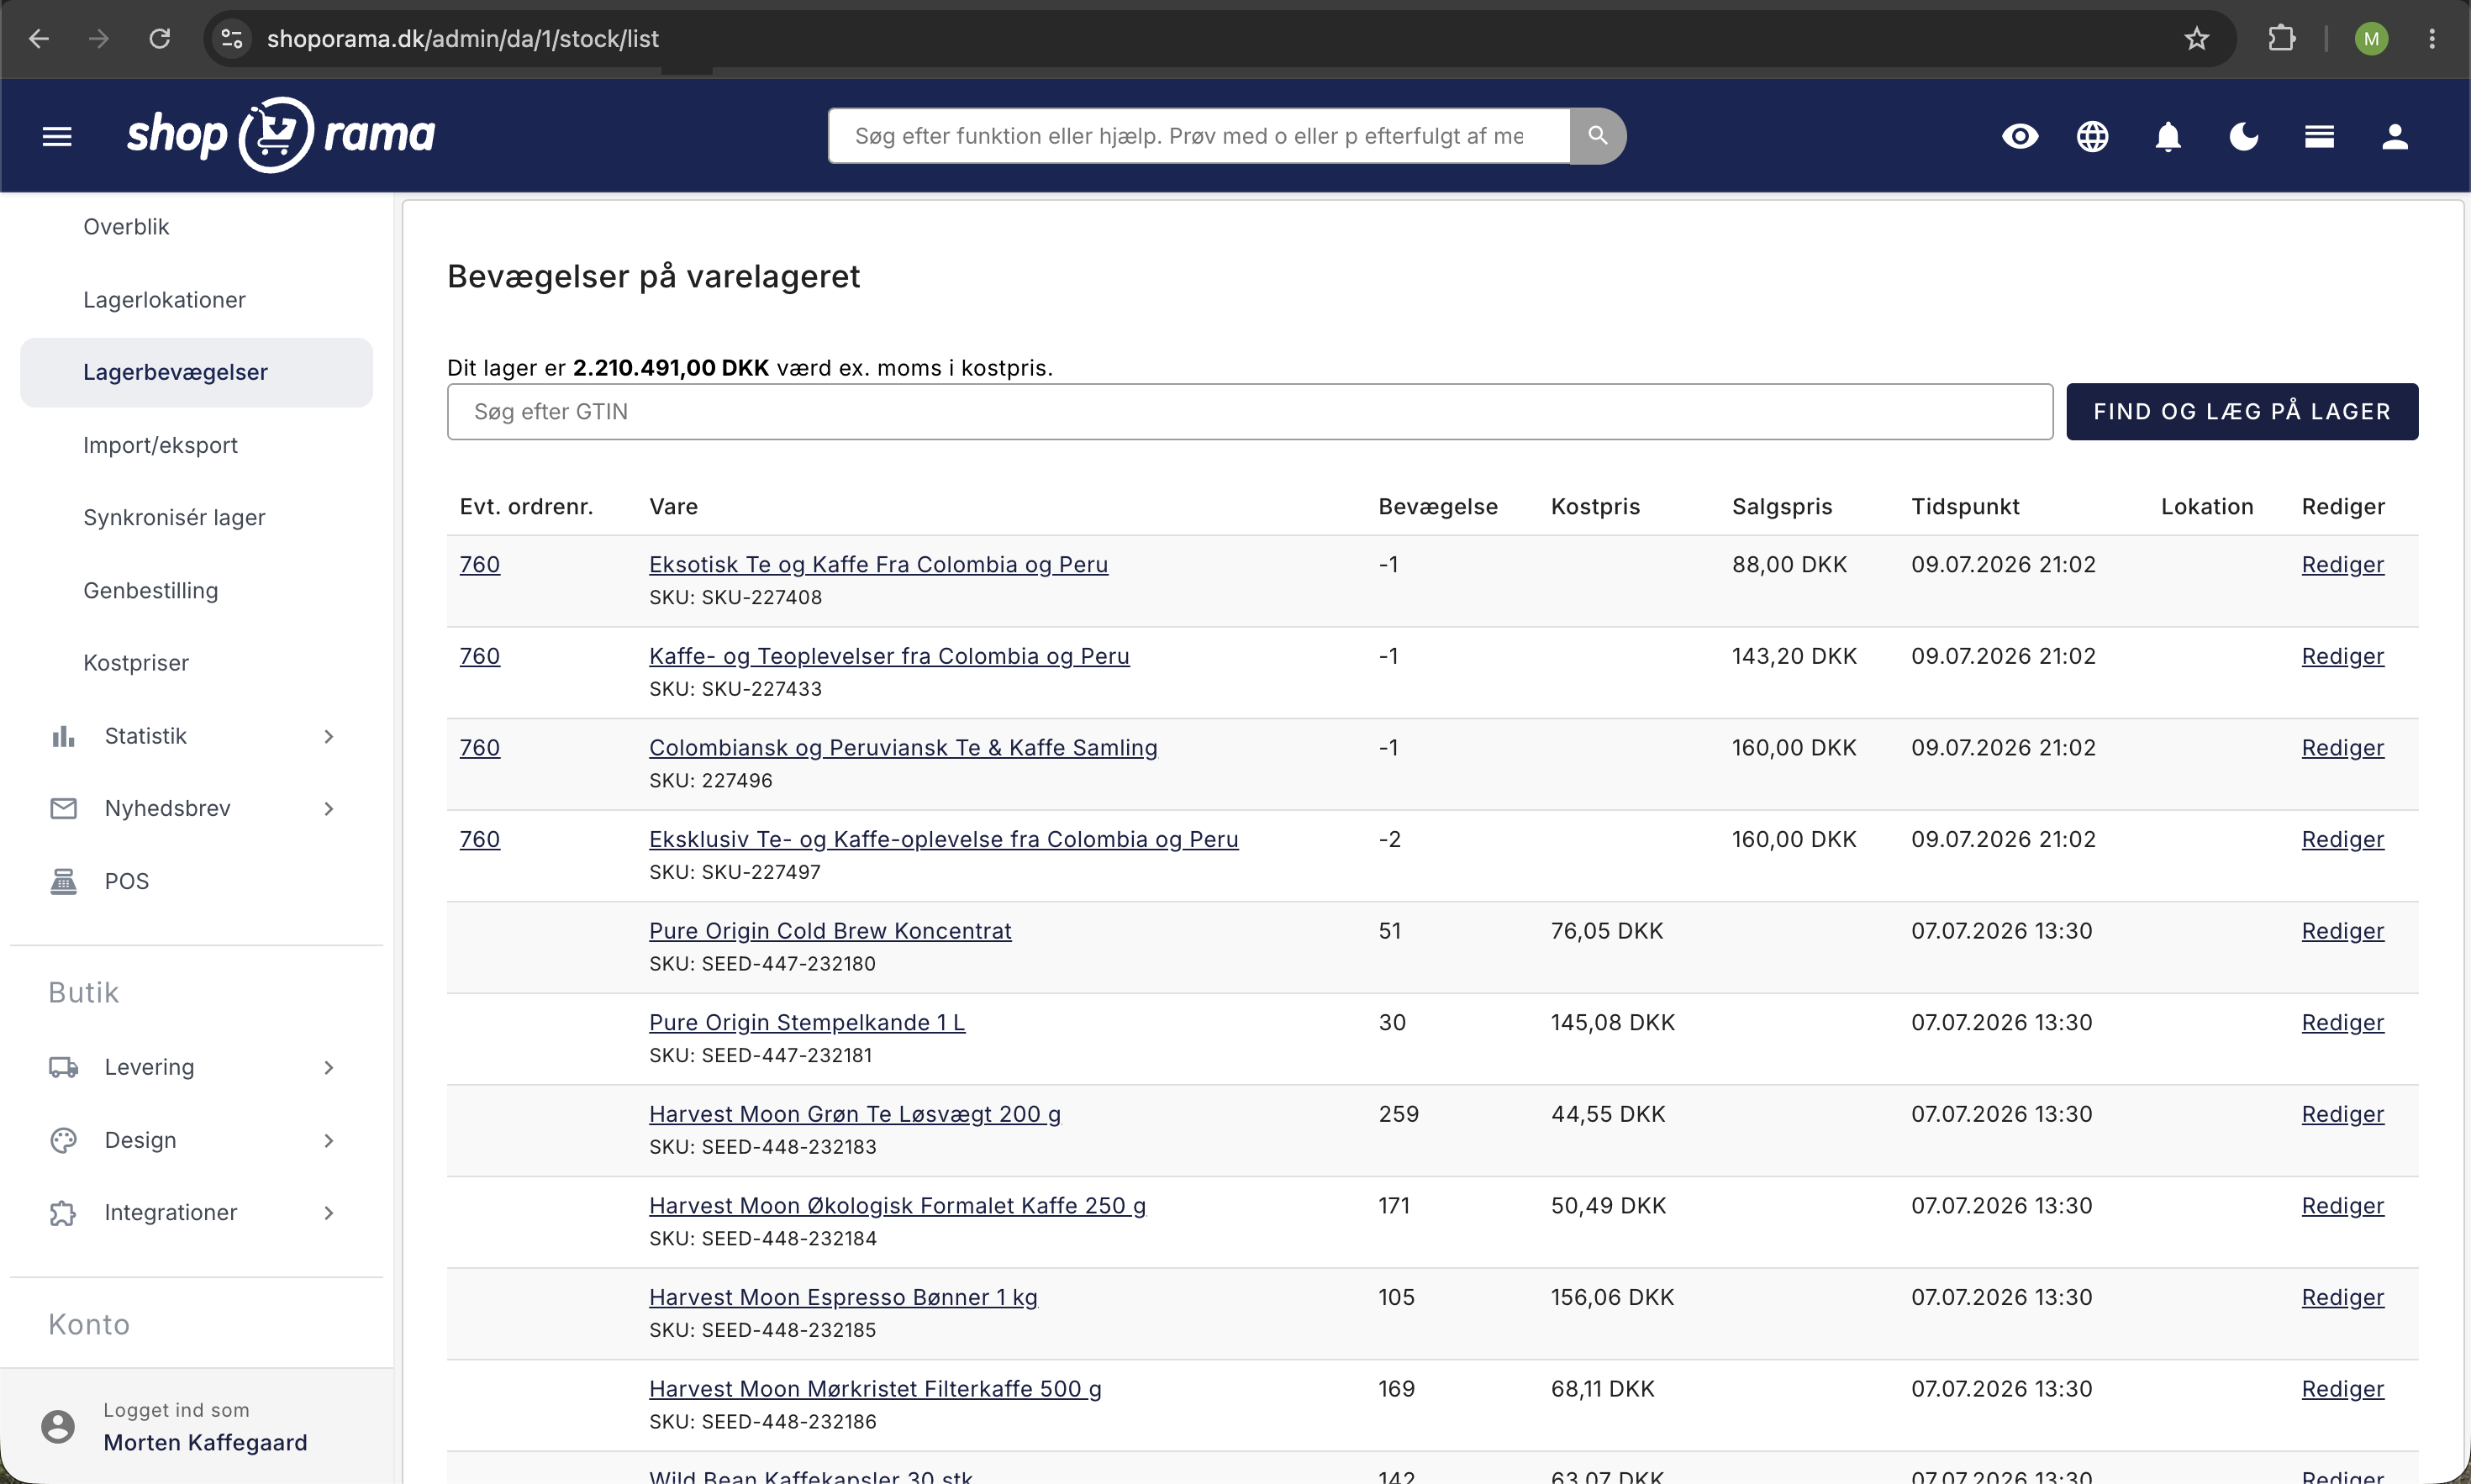
You can find the entries under Inventory → Inventory Movements in the admin panel. The list shows all movements across the entire inventory, with the most recent at the top, and from here you can open and edit each individual entry if something was recorded incorrectly.
Tip
These entries form the basis for calculating your inventory value. Shoporama uses a weighted average of the cost prices of the entries, so you always have an accurate picture of what your inventory is worth. Read more in the article on calculating inventory value.
Can I disable inventory entries?
Yes. At the bottom of the Inventory → Inventory Movements page, you’ll find the Inventory Entries Settings section with the checkbox “Use inventory management with entries.” If you uncheck the box and save, only the current quantity in stock will be updated, but no history of individual movements will be saved. Note that batch management is also disabled at the same time, since batches are based on the entries.
Important: We recommend disabling entries only if you have a very specific reason. Without entries, you lose traceability, and you cannot calculate inventory value correctly. For the vast majority of stores, entries are a major advantage.
Additions and Withdrawals: How to Interpret the Sign
All entries follow the same template, and the only thing that distinguishes the two types is the sign in the “Movement” column. A positive number indicates an addition—that is, items entering the inventory. A number preceded by a minus sign indicates a withdrawal—that is, items leaving the inventory.
Your current inventory count is simply the sum of all entries for the item. If you’ve received 50 units, sold 12, and received 2 returns, there are three entries: +50, -12, and +2, and the product shows 40 in stock. That’s why you should never “adjust the stock count” directly. You enter a new transaction, and the number updates automatically.
The other columns indicate where the transaction comes from and its value:
- The order number field is filled in when the transaction is associated with an order, such as a sale, a credit memo, or a cancellation. You can click directly to view the order. If the field is empty, the transaction was created in the warehouse outside the order system—typically a goods receipt or a stock count.
- Cost price is the price per unit at which the item was posted in that specific transaction. Your inventory value is calculated based on the cost prices in these transactions.
- The “Selling Price” field is filled in only for transactions resulting from a sale, and it is the price (excluding VAT) at which the item was actually sold. This allows you to see both what the item cost and what it brought in on the same line.
- "Date" is the moment the transaction was recorded. It is also the date the entry will retain, even if you edit it later.
- "Location " shows where the item is located, if you use warehouse locations.
- "Batch " is only displayed when batch management is enabled and links to the shipment to which the transaction belongs.
If the transaction originates from a warehouse synchronization between several of your stores, “From Shared Warehouse” appears next to the quantity; if it comes from an import file, “From Import” appears. This lets you know immediately that the entry was not created by an employee but was entered automatically.
What Triggers an Automatic Inventory Entry
You rarely need to create entries manually. The vast majority occur automatically when you use the store as usual. Here are the situations that trigger each of the two types.
Entries that add to inventory
- Goods Receipt. When you register a delivery under Inventory → Batches → Goods Receipt, the batch and the corresponding inventory increase are created in a single workflow.
- Add to inventory for an individual product. The Add to Inventory button on the product’s inventory page creates an inventory receipt with the quantity and purchase price you enter.
- Quick inventory receipt using a barcode. If you scan the item’s GTIN in the search field at the top of the inventory transactions, you’ll be taken directly to a receipt entry for the correct item. If the variant has its own barcode, the correct variant is already selected, so you only need to enter the quantity. If you scan the product’s general barcode for an item with variants, you can select the variant yourself from the list. Please note that the “Purchase Price” field is automatically filled with the product’s cost price; if the variant has its own cost price, correct the amount before saving. See Quick Inventory Addition.
- Quick Change in the Inventory Overview. The “Quick Change” field in the inventory overview accepts a change, not a final quantity. If you enter 5, 5 will be added, and you can process many items on a single screen.
- Returns and credit memos. When you credit item lines on an order, the item is returned to inventory, and the inventory increase is assigned the credit memo’s order number. If the item is not to be returned to the shelf because it is defective, check the “Do not return to inventory” box, and no inventory increase will be created.
- Customer-Initiated Returns. If the customer returns an item themselves through the online store, the item is automatically restocked if “Automatically restock returned items ” is enabled in the store settings. If you have also selected “Add the item to inventory only after the return is marked as received,” the inventory entry will be created only after the package has physically arrived.
- Order cancellation. If you mark an order as canceled, all items in the order are returned to inventory with one inventory receipt per line item, and the entries retain the order number.
- Importing a stock file. If you import a file containing item numbers and quantities, Shoporama compares the quantities to those in the store and posts only the difference. If the file reports 30 units and you have 22, a single stock increase of 8 is created.
- Shared inventory across multiple shops. If you run multiple online stores with the same products, the synchronization creates entries marked “From shared inventory.”
Entries that deduct from
- Sales. This is by far the most common deduction. When the customer completes their order, each item line is deducted from inventory immediately, not just when the package is shipped. The entry includes the order number and the actual sales price excluding tax.
- Exchange. For an exchange, two documents are created: a credit memo for the item the customer returns, and a new order for the item the customer receives in its place. The returned item results in an addition to inventory, and the replacement item results in a deduction.
- Reactivating a Canceled Order. If you restore a canceled order to active status, the items are deducted from inventory again so that the inventory count matches the fact that the order is to be fulfilled after all.
- Manual adjustment. A negative number in Quick Edit creates a deduction. This is the correct way to record shrinkage, breakage, product samples, and items you remove from inventory yourself.
- Inventory Count. If you adjust the inventory count directly on the product, Shoporama calculates the difference and creates a single entry for the discrepancy. If you count 18 items on the shelf where the system shows 23, a deduction of 5 is recorded.
- Import with a lower quantity. If your inventory file reports fewer units than the store has, the difference is posted as a decrease, just as in the opposite situation.
Good to know
Because the deduction occurs at the time of order and not at the time of shipment, your inventory count is always the number of items you can actually resell. This is also why a sale can cause your inventory to go into the negative if you’ve enabled that setting for the product. The negative balance isn’t an error, but a backorder that you’re responsible for fulfilling.
All Entries for a Single Product
The complete list of inventory movements is a great way to keep track of what’s happening in the store right now. If, on the other hand, you need to dig into a specific item, there’s a dedicated page. You’ll find it on the product’s inventory page, where you’ll see “Edit entries manually” at the bottom.
The page is titled “Inventory Entries” followed by the product name, and it displays up to 1,000 entries for the item, with the most recent ones at the top. Here, the columns are organized for troubleshooting rather than for an overview:
- Time of Movement
- Variant ID, so you can see which variant the entry belongs to, or if it has none at all
- Quantity with a plus sign before additions and a minus sign before withdrawals
- Cost per unit
- SKU under which the entry was posted
What makes this page special is that you can select multiple entries at once using the checkboxes on the left, or select them all using the checkbox in the table header, and then clear them using the "Delete Selected" button. This is the fastest way to clean up a situation where an import or integration has added a few hundred incorrect lines.
The page is also used to correct inventory errors
If Shoporama detects entries that don’t match the product’s setup, a yellow warning appears at the top of the product’s inventory page. There are two types:
- The product has variants, but there are entries without a variant reference. These aren’t counted toward any size or color, so the total and the variant lines may not match.
- The product does not have variants, but there are entries with a variant reference. This typically happens if the variants were removed from the product after the inventory was posted.
The "Correct Error " button in the warning takes you directly to the entries for the product, where you can correct the variant reference on the individual lines or delete them and post the inventory again. The inventory count is automatically recalculated when you’re done.
Important: A deleted entry cannot be undone, and the inventory count changes immediately. If you delete a receipt of 50 units, the inventory will decrease by 50. Therefore, only delete entries you are certain are incorrect, and consider noting down what you removed if it relates to a closed fiscal year.
How to Correct an Old Incorrect Entry
Sooner or later, you’ll discover an entry that’s incorrect. An incorrect quantity in a goods receipt, a cost price entered with sales tax, or an item placed in the wrong location. You have two options, and they aren’t equally suitable in all situations.
Option 1: Correct the entry directly
Find the entry under Inventory → Inventory Movements, on the product’s inventory page, or on the product’s page with inventory entries, and click Edit. You’ll be taken to the Edit Inventory Status page, where you can change:
- Quantity, if it was counted or entered incorrectly
- Unit price (purchase), if the cost price is incorrect
- Stock location, if the item should be stored elsewhere
- Variant, if the transaction was posted to the wrong size or color
- Batch, if the wrong shipment was selected and you use batch management
When you save, the product’s stock count is recalculated immediately. The Delete button on the same page completely removes the entry if it should never have been there.
It’s important to understand that the timing of the entry does not change. If you correct a goods receipt from March today, it will still appear as a transaction in March, just with new figures. The history is thus rewritten retroactively. This is exactly what you want if the error is caught quickly and no one has used the figures for anything yet.
Option 2: Make a reversing entry
The second approach is one that any bookkeeper will be familiar with: leave the incorrect entry as is and enter a new transaction that offsets the error. If 100 units were posted when only 90 were received, you would enter a withdrawal of 10 today. The result for the inventory count is the same, but both the error and the correction will be visible afterward.
You can make the offsetting entry using “Quick Change” in the inventory overview or “Add to Inventory ” on the product, depending on whether you need to subtract or add to the inventory.
Which one should you choose?
- The error is from today or yesterday, and the month hasn’t been closed yet: correct the entry directly. This is the fastest way, and no one has built anything on top of the incorrect figure yet.
- If the error is in a closed month, a closed fiscal year, or in figures that have already been sent to the auditor: make a reversing entry. This way, the inventory value as of the cutoff date remains unchanged, and the correction is recorded in the period when it was discovered.
- If the entry is related to an order: think it through one more time. If the item was never shipped, it’s usually better to cancel or credit the order so that inventory, the invoice, and the financial statements are all in sync, rather than just correcting the inventory entry.
- There are many incorrect entries for the same item: use the summary page with inventory entries for the product, select the lines, and delete them all at once. Then post the correct inventory balance as a single net increase.
Important: The cost price of the entries is included in your inventory value. If you retroactively correct cost prices for many items, you’ll also change the inventory value you may have already reported. Consult with your bookkeeper or accountant on how to handle these types of corrections before you begin a major cleanup.
What is batch management?
A batch is a specific shipment or series of a product. Two shipments of the same item are two different batches, even if they have the same item number. Each batch has its own batch number and may have its own production date, expiration date, receipt date, supplier, and notes.
Batch management is essential if you sell products where it’s important to know which specific shipment each individual item comes from. This typically applies to:
- Food products with a best-by date
- Cosmetics and skincare products with expiration dates
- Medications and dietary supplements where traceability is required by law
- Technical products with lot numbers for quality control
- Products where you need to be able to recall a specific production batch
With batch management, you can instantly answer questions such as “Which orders contain items from batch 12345?” or “How many units from this batch have we sold?” This is invaluable if, for example, you need to recall a specific production batch from the market.
The FIFO Principle in Picking
When batch management is enabled, Shoporama automatically selects the oldest batch as soon as an order withdraws items from inventory. This is called FIFO (First In, First Out). The system first checks the expiration date and selects the batch that expires first. If multiple batches have the same expiration date (or none), the batch with the lowest batch number is selected. The selection appears on the picking list, where you can switch to a different batch if you need to pick from a different shipment.
This means that, as a store owner, you don’t have to worry about the order. The system automatically ensures that items with the shortest shelf life are sold first, so you minimize waste and avoid being left with expired products.
Good to Know
A single order line can be split across multiple batches, but you’re in charge of how you split it. If a customer orders 10 units and your oldest batch only has 6 left, add an extra batch line to the picking list using the plus button and assign the remaining 4 to the next-oldest batch. The allocation is saved on the order line.
How Inventory Entries and Batches Work Together
Inventory entries and batches work together. When you receive a new shipment and create a batch, inventory entries are generated for that batch. When an item is sold, a negative entry is created linked to the batch from which it was picked. If an item is returned, however, a regular receipt is created without a batch, and you assign the correct batch to it yourself afterward.
This provides you with two layers of information: the entries show what has happened, and the batches indicate which specific delivery each transaction belongs to. Together, this ensures full traceability from supplier to end customer.
You can filter inventory entries by batch so you can quickly view all transactions for a specific delivery. This is useful if, for example, you need to check how many units of an expired batch are still in stock and how many have already been shipped to customers.
How to Get Started
Step 1: Enable inventory management
Inventory entries and batches require that inventory management be enabled on your online store. You can enable it at the bottom of Inventory → Inventory Movements in the admin panel. Once inventory management is enabled, inventory entries are created automatically from that point on.
Step 2: Enable batch management (optional)
If you want to use batches, check the box next to “Use batch management ” in the same section, under “Batch Management.” This requires that inventory management is already active.
Step 3: Create and Receive Batches
When a new shipment arrives, go to Inventory → Batches → Goods Receipt and register the shipment as a new batch. Fill out one line per item:
- Product(search for it)
- Batch number, so you can identify the shipment
- Quantity received
- Expiration date, if the item has a shelf life
At the bottom, enter the supplier and production date for the entire shipment at once, and the receipt date is automatically set to the time you save the entry.
When you save, the batch and the associated inventory entries are created all at once. The goods receipt does not ask for the cost price; if the inventory value needs to be correct, you can enter it later in the entry. You can edit the name and notes for a batch under Inventory → Batches, where you can also change the other details.
Daily Use
Keep an eye on expiration dates
Under Inventory → Batches, you can filter by expiration date. You can choose between:
- Expired, so you can see which batches have expired
- Expires within 30 days, so you can act in time with, for example, special offers or sales
- Not expired, so you can focus on the batches that can still be sold as usual
- No expiration date, for items without a shelf life
Expired batches are not automatically hidden from the picking list. They remain visible in the list but are clearly marked so your warehouse staff knows they must be handled manually. This allows you to assess for yourself whether a batch can be sold or must be discarded.
The picking list shows which batch to use
On the picking list, your warehouse staff can see exactly which batch an order line should be picked from. This eliminates guesswork and ensures that FIFO is followed in practice, not just on paper.
Returned items are manually assigned to the batch
When an item is returned, it is restocked as a regular receipt without a batch. To maintain end-to-end traceability, open the return entry under Inventory → Inventory Movements and, in the Batch field, select the shipment from which the item was originally sent. The order shows which batch was picked, so you can look it up.
Tips and Best Practices
- Use consistent batch numbers. If your supplier includes a batch number, use it. This makes it much easier to trace items back to their source in the event of an error or recall.
- Always record the cost price. It’s the cost price in your entries that’s used to calculate inventory value and contribution margin. If you use incorrect figures, your reporting will also be incorrect.
- Check the “Expires within 30 days” list regularly. Make it a fixed routine, such as weekly. That way, you’ll have time to set up promotions or move the items before they go to waste.
- Don’t make random manual adjustments. Every time you manually adjust inventory, it creates “noise” in the history. Instead, use the “Goods Received” function for incoming items, and only make adjustments during a physical count or to account for shrinkage.
- Combine this with warehouse locations. If you have multiple locations (e.g., a store and a remote warehouse), you can record batches at the correct location and keep track of where the items are physically located. Read more about warehouse locations.
- Make active use of the order list. Once you have your entries under control, you’ll also get a better overview of which items you need to reorder. View the order list in inventory management.
Do you use variants?
If your products have variants, Shoporama ensures that inventory and batches are handled correctly at the variant level. Learn more about inventory synchronization with variants.
The Value for Your Store
With inventory entries, you get full traceability: you can see when items arrived, what they cost, and when they were sold. This is exactly what your accountant and your accounting system need, and it ensures that inventory valuation is accurate and well-documented.
With batch management on top of that, you gain an extra dimension that’s crucial for items with shelf life or traceability requirements. FIFO picking reduces waste, and if the worst happens and a shipment needs to be recalled, you can find all orders containing that batch in minutes. It’s a safeguard that protects both your customers and your business.
Frequently Asked Questions
What’s the difference between inventory entries and the current inventory count?
The current inventory count is simply the number shown on the product right now. Inventory transactions are the history behind that number—that is, all the movements that have increased or decreased the inventory. Every time you make a sale, receive goods, process a return, or make a manual adjustment, an entry is created with the quantity, cost price, and date. This way, you can always go back and see why your inventory looks the way it does.
Where can I find my inventory transactions in the admin panel?
You’ll find them under Inventory → Inventory Movements, where all inventory movements are listed with the most recent ones at the top. If you want to see only the movements for a specific item, go to that product’s inventory page; if you use batch management, you can click from a batch to view the entries for that specific shipment. Negative entries represent withdrawals from inventory (typically sales or shrinkage), and positive entries represent additions (purchases or returns).
My accountant is asking about inventory value. How is it calculated?
Inventory value is calculated based on your inventory entries as a weighted average of the cost price. Every time you receive goods at a new price, the average is adjusted so that the inventory value reflects what you’ve actually paid for the items on the shelf. That’s why it’s important to have inventory entries enabled if you want to be able to document the inventory value for your accountant.
What happens if I turn off inventory entries?
If you uncheck the box for “Use inventory management with entries” at the bottom of Inventory → Inventory Movements, the system will only update the current quantity of the product but will not save a history of the movements. You’ll save a little space and reduce the workload on the database, but you’ll lose the ability to see when items were sold or received, and you’ll no longer be able to calculate an accurate inventory value. Only disable this feature if you truly don’t need the history.
I sell cosmetics with expiration dates. How do I get started with batches?
At the bottom of Inventory → Inventory Movements, check the box for “Use batch management” (this requires that standard inventory management is also enabled). You can then create batches under Inventory → Batches with a batch number, expiration date, production date, supplier, and notes. When you receive a new shipment, use the goods receipt feature so that each shipment gets its own batch number and expiration date.
Which batch is picked first when an order comes in?
The system uses FIFO (First In, First Out) and automatically selects the batch that expires first. If multiple batches have the same expiration date (or none), the one with the lowest batch number is selected. If the oldest batch isn’t enough to cover the entire order line, you can add an extra batch line to the picking list and distribute the remainder so you don’t ship new items before the old ones.
What should I do when a batch is about to expire or has already expired?
On the batch list, you can filter by “expired,” “expires within 30 days,” “not expired,” and “no expiration date” to easily find the batches that need attention. Expired batches are clearly marked, but they aren’t automatically hidden from picking, so it’s up to you to decide whether to sell them off, make a manual adjustment for shrink, or remove them from inventory.
A supplier has recalled a batch. How do I find out who purchased it?
Because a sale is recorded both on the order and on the batch from which the items are picked, you can filter the inventory entries for that batch and see exactly which orders received items from it. This gives you full lot traceability, so you can quickly contact the affected customers in the event of a recall without having to guess.
What happens to a batch if the customer returns the item?
When you process a return for an order, the item is returned to inventory as a regular receipt without a batch. To ensure the batch history is accurate, you can correct the return entry afterward under Inventory → Inventory Movements and select the batch from which the item was originally picked. This is especially important for items with a short shelf life, so they don’t end up at the back of the queue and get forgotten.
Can I correct a stock entry if I made a mistake?
Yes, inventory entries can be edited directly from the list if, for example, you entered an incorrect quantity or cost price for an addition. Keep in mind that a correction also affects the inventory value going forward, so it may be a good idea to consult with your accountant if the change is significant or relates to a closed fiscal year.
Should I correct the incorrect entry or make an offsetting entry?
It depends on whether the period is closed. If the error is caught immediately and the month hasn’t been closed, correct the entry directly via “Edit.” If the error is in a closed fiscal year or in figures that have already been submitted, create an offsetting entry with today’s date instead. Remember that a correction retains the entry’s original date, so it retroactively changes the history, while a reversing entry leaves both the error and the correction intact and can be explained to the auditor.
There’s a negative entry for an item we haven’t sold. What could this be?
First, check the “Order No. (if any)” column . If it’s filled in, the transaction is associated with an order—for example, an exchange or a canceled order that’s been reactivated. If it’s empty, the transaction was made outside the order system, and the typical causes are a manual downward adjustment after a count, an inventory file that reported fewer units than the store had, or a synchronization from one of your other stores. If “From shared inventory ” or “From import ” appears next to the quantity, you have your answer right away.
I need to see all transactions for a specific item. Where can I find them?
Go to the product and select its inventory page. There you’ll see the item’s own transactions, and at the bottom is the “Edit entries manually” link, which opens the full list of up to 1,000 entries, with the most recent at the top. The overall summary under Inventory → Inventory Movements, on the other hand, shows the entire store across all categories, so it’s best when you want to keep track of today’s activity rather than examine a single item.
Why is the sales price only shown on some of the entries?
The selling price is only recorded for transactions resulting from an actual sale, and it is always exclusive of sales tax. A goods receipt, a stock count, or a return has no selling price, since nothing was sold. The cost price, on the other hand, is recorded for all types of entries and is the figure on which your inventory value is based. If you need to document the profit margin for a given period, you should therefore look at the sales price minus the cost price on the sales entries.
If you have any questions about inventory entries or batch management, feel free to contact us at support@shoporama.dk.
Related articles
Calculating inventory value
Explanation of how the inventory value is calculated in Shoporama. Weighted average, cost price, bundles, variants and credit notes.
Warehouse locations
Learn how to organize your inventory across multiple locations in Shoporama.
Order list and inventory management
Learn how to use the Shoporama order list to keep track of inventory, generate shopping lists and receive goods efficiently.
Synchronizing stock with variants
Guide to stock syncing products with variants in Shoporama.
Pick list
Guide to Shoporama's pick list. Pick and pack orders efficiently with barcode scanning, batch management and mobile-friendly interface.