Edit photos: rotate, crop, and set the focus point
Here's how to rotate, crop, and set the focus point for images in the admin panel. The original is never overwritten, and you can always reset it.
You can edit an image directly in the admin panel after you’ve uploaded it. You can rotate it, crop it, and tell the system where the subject is, so that the most important part always remains in the image when the theme crops it. You can’t mess anything up along the way: the original always remains unchanged, and you can reset everything with a single click. If you delete an image, you’ll have a few seconds to undo it, and after that, it’s gone.
How to open image editing
Image editing is available in the image section of products, categories, pages, blog posts, landing pages, brands, campaigns, shipping methods, payment methods, and security profiles. If you create a new page, blog post, or landing page, you must save it first before you can edit the images.
- Go to the product or page where the image is located.
- Find the image section. On product pages, it’s called “Product Images.”
- Click on the image itself. A window with the editing tools will open.
The window has two tabs: “Crop and Rotate” and “Focus Point.”
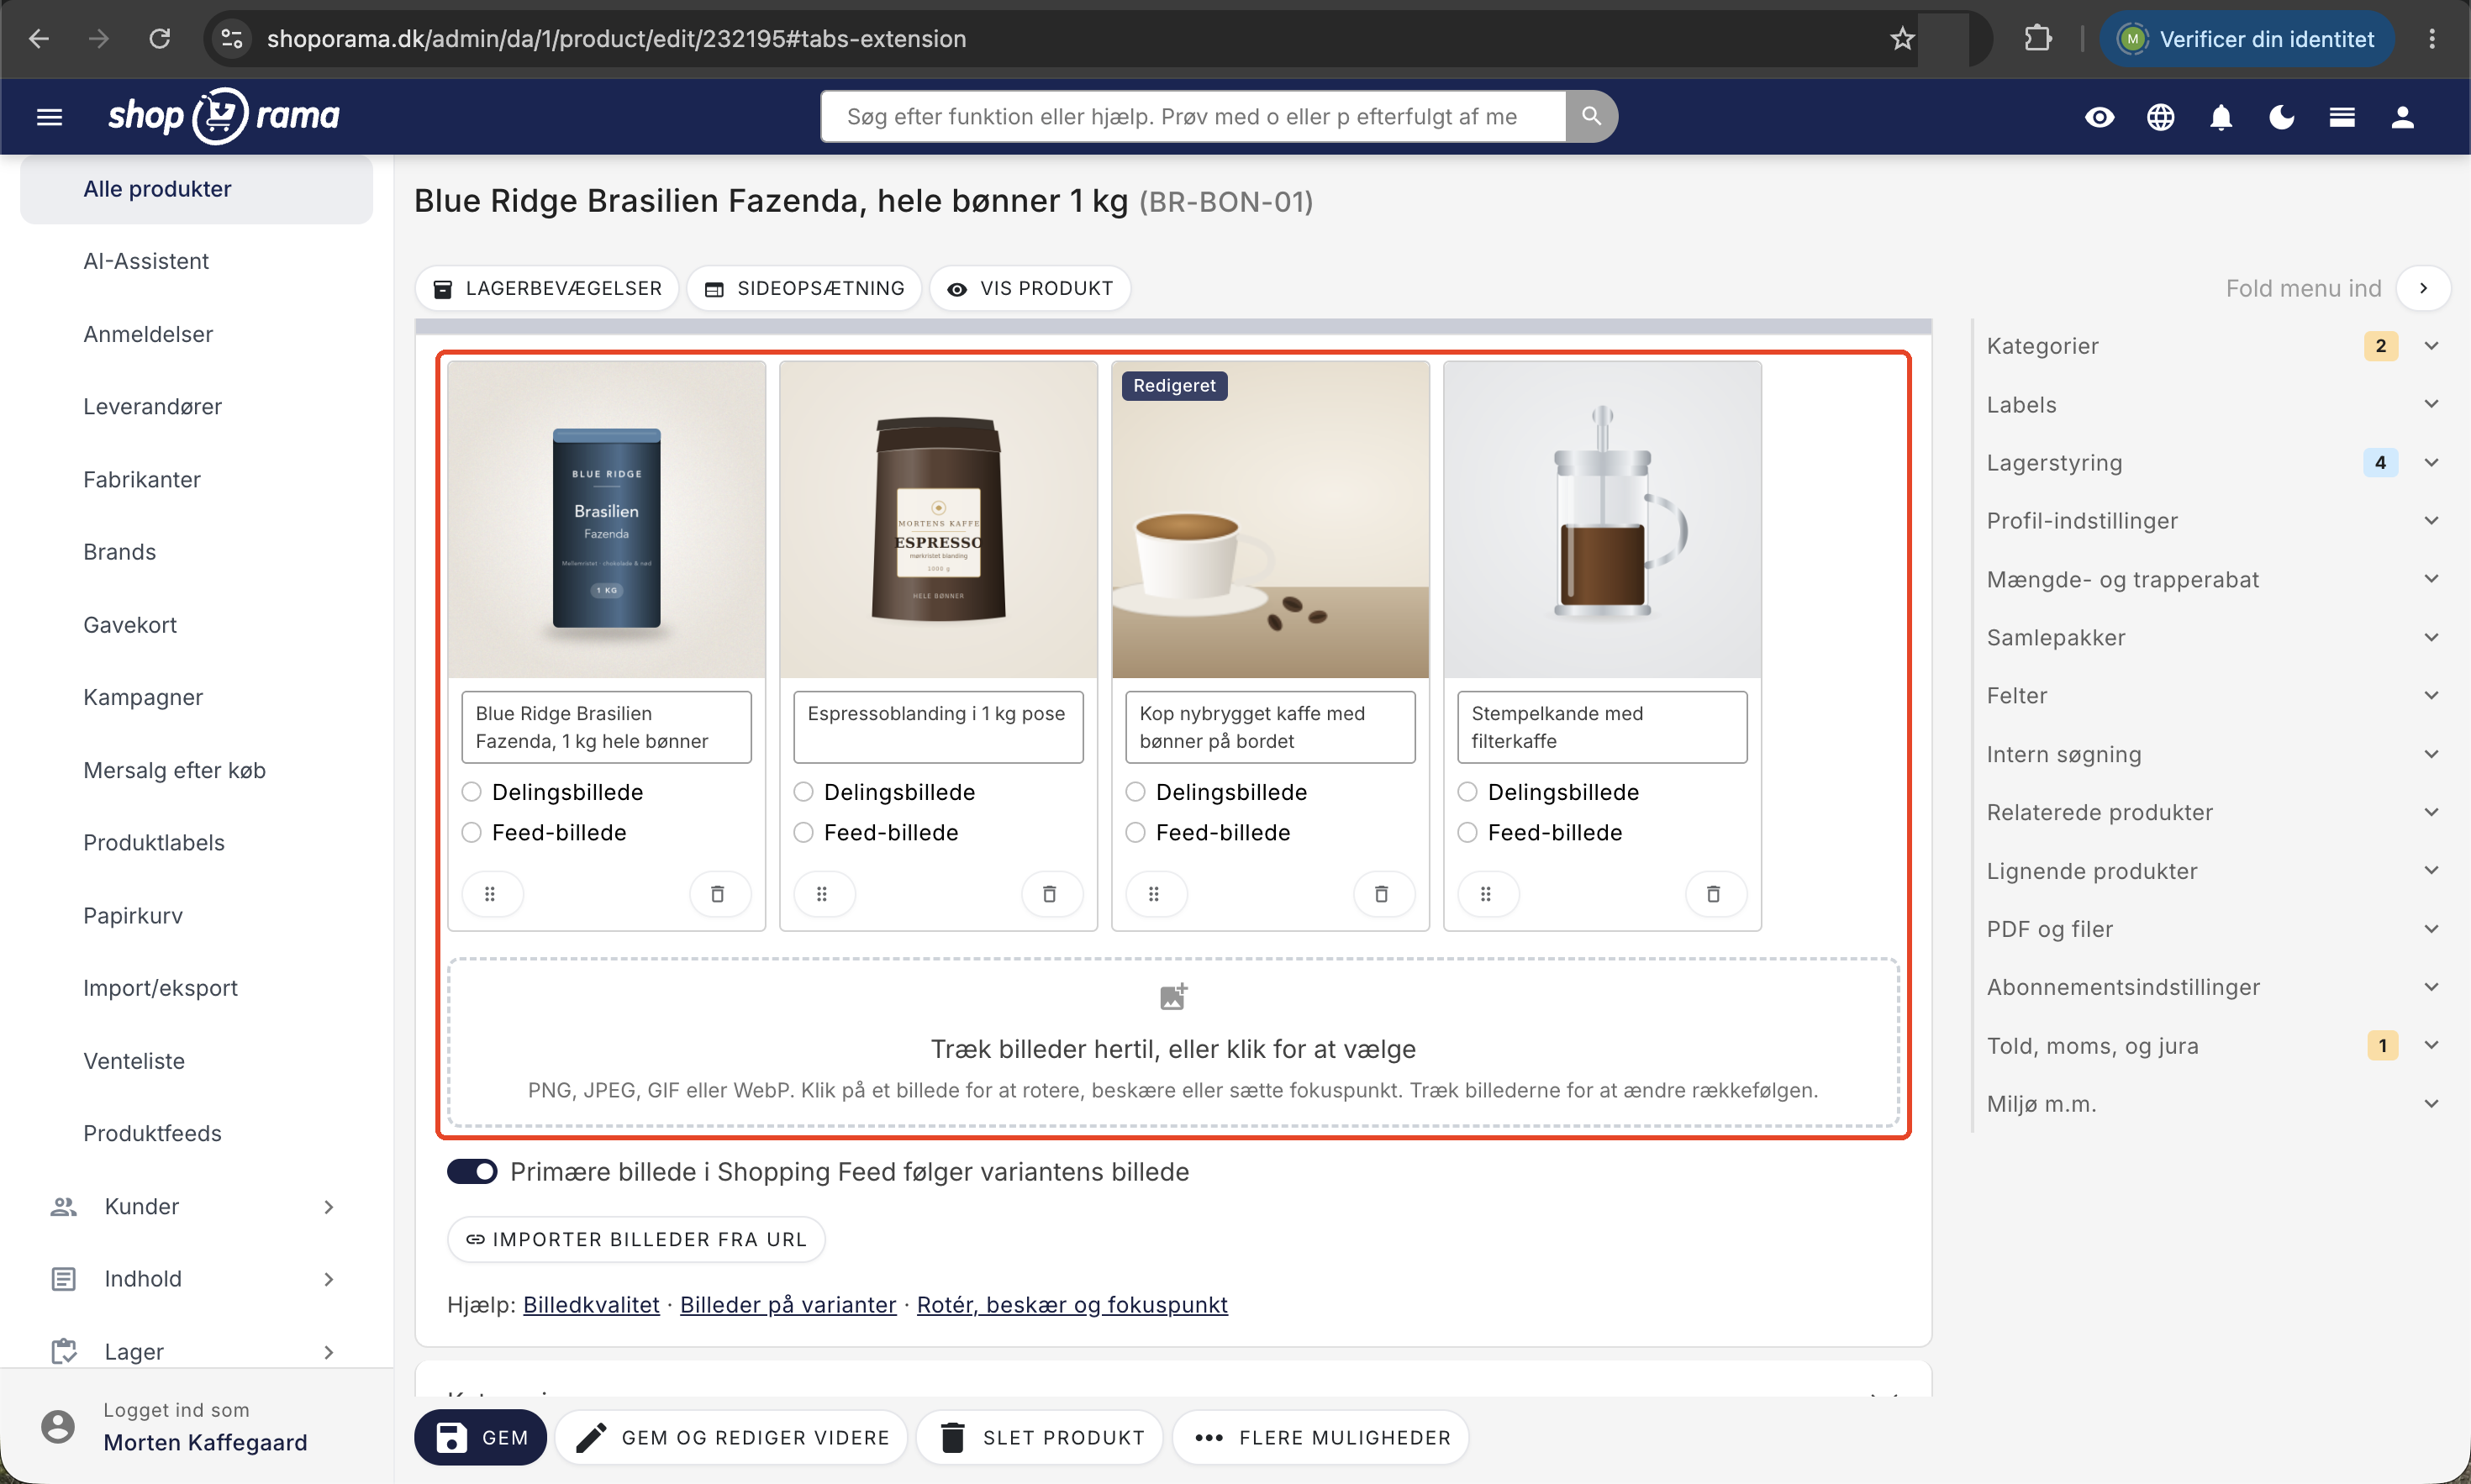
Rotate the image
Use “Rotate Left” or “Rotate Right.” The image rotates a quarter turn at a time. It’s exactly the same action you’re familiar with from your phone or computer, and no quality is lost.
Note that any crop is removed when you rotate the image. This is intentional: a frame you’ve drawn on a landscape image doesn’t make sense when the image is suddenly in portrait orientation. Rotate first, then crop.
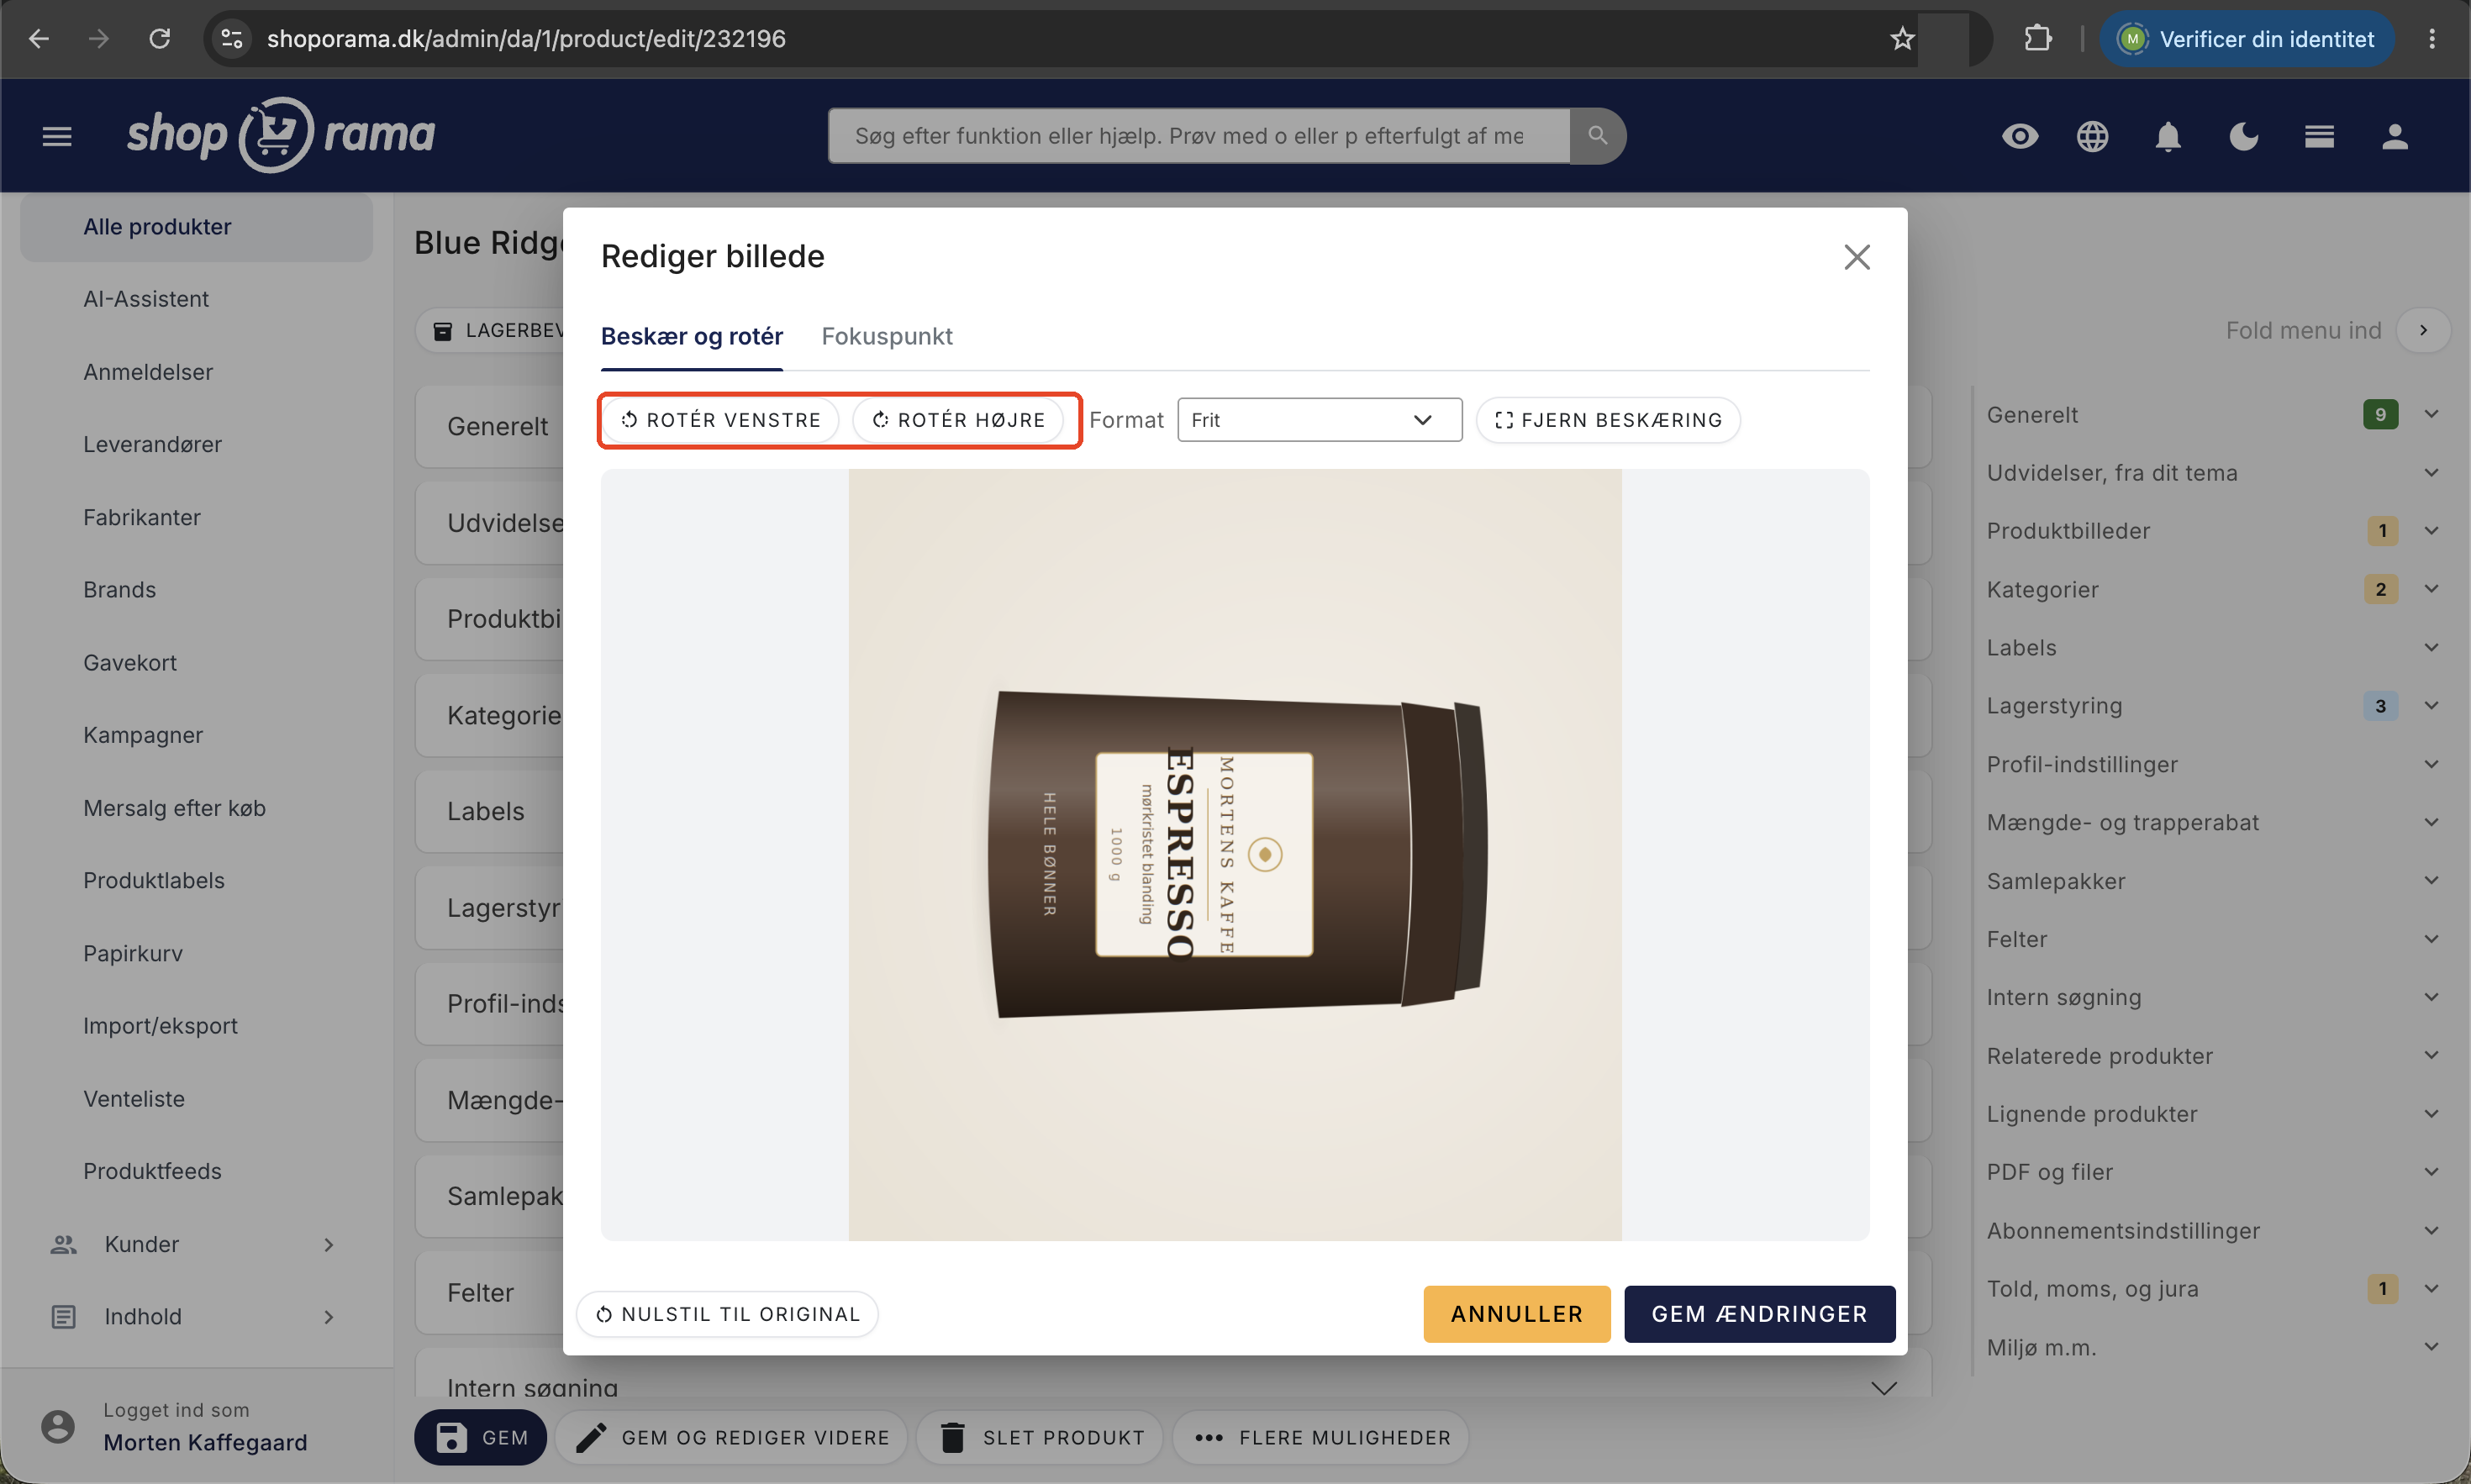
Crop the photo
Drag a frame over the portion you want to keep. You can drag the corners and sides, and you can move the entire frame by dragging the center.
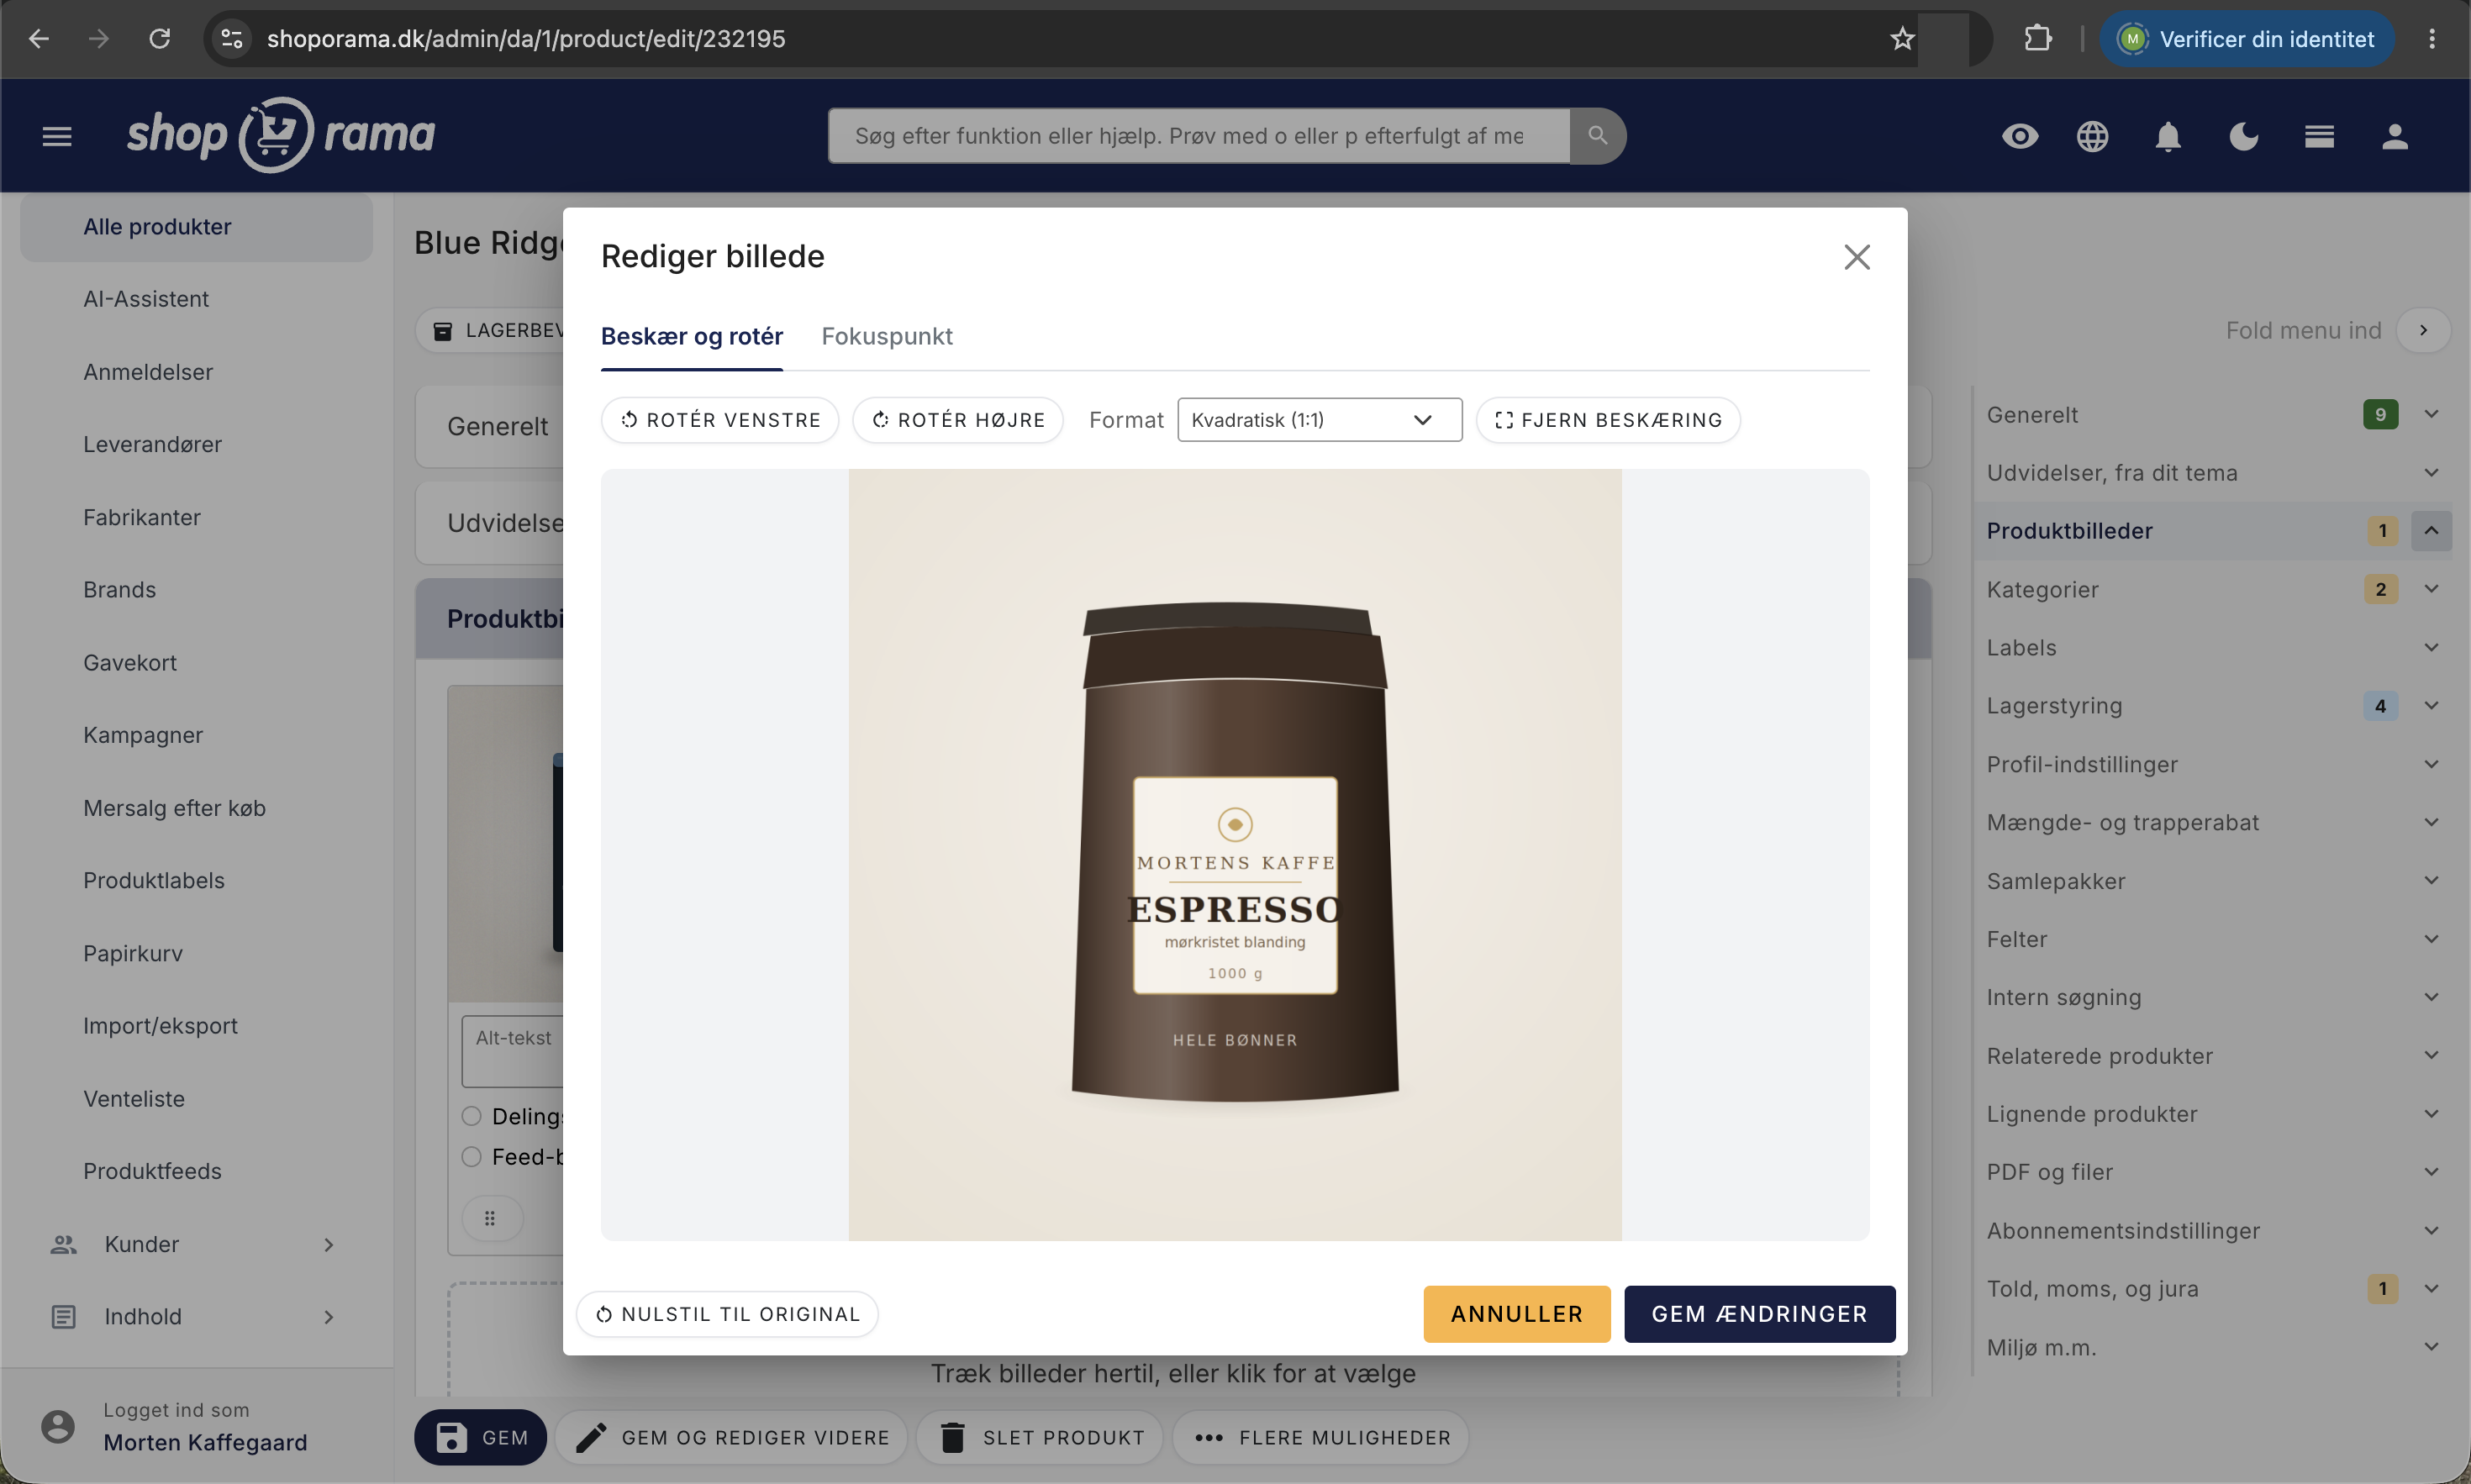
In the Format field, you can lock the frame to a specific aspect ratio:
- Free gives you complete freedom.
- "Square" (1:1) is suitable for product cards and Instagram.
- Landscape (4:3) and Widescreen (16:9) are suitable for banners and cover images.
- Portrait (3:4) is suitable for clothing and other tall images.
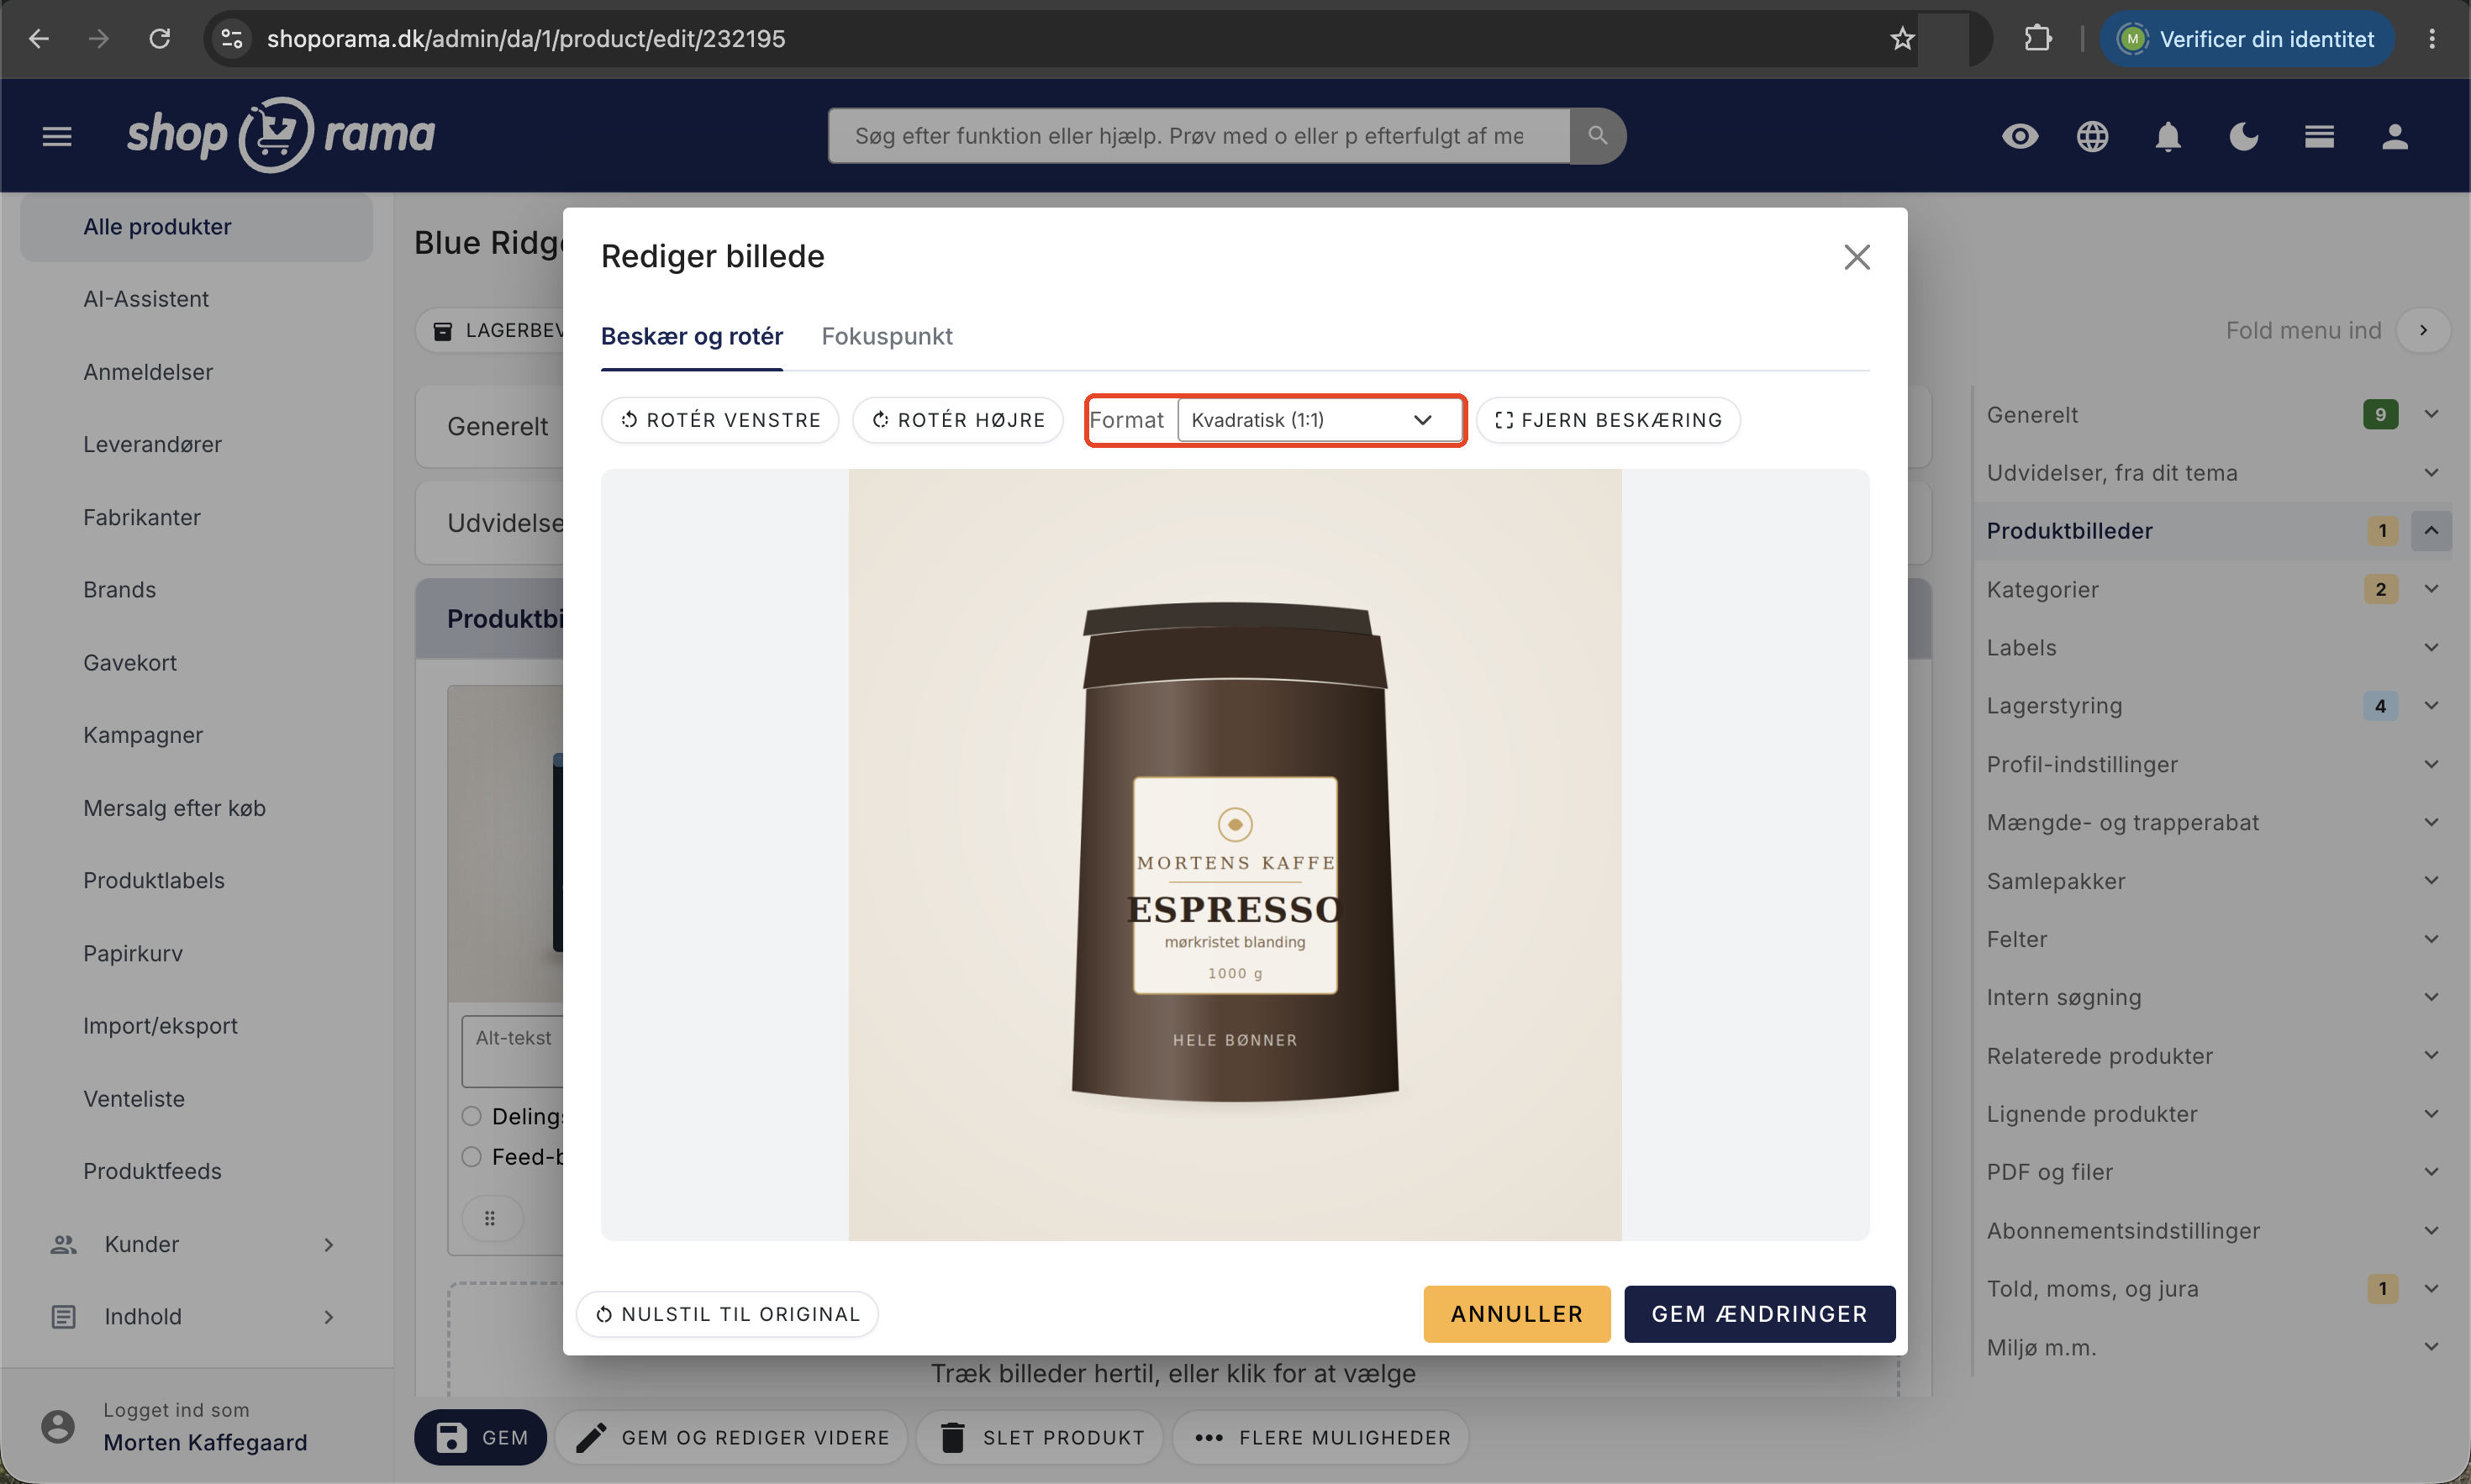
To remove the crop again, click Remove Crop.
Focus point: keep the subject in the frame
Themes often display images in fixed formats. For example, a product card on the front page might be perfectly square, even if your image is wide. In that case, part of the image has to be cropped, and until now, the crop has always been taken from the center.
This becomes a problem when the subject isn’t centered. If the model is on the left side of the image, their head or half of their body will be cut out of the square crop.
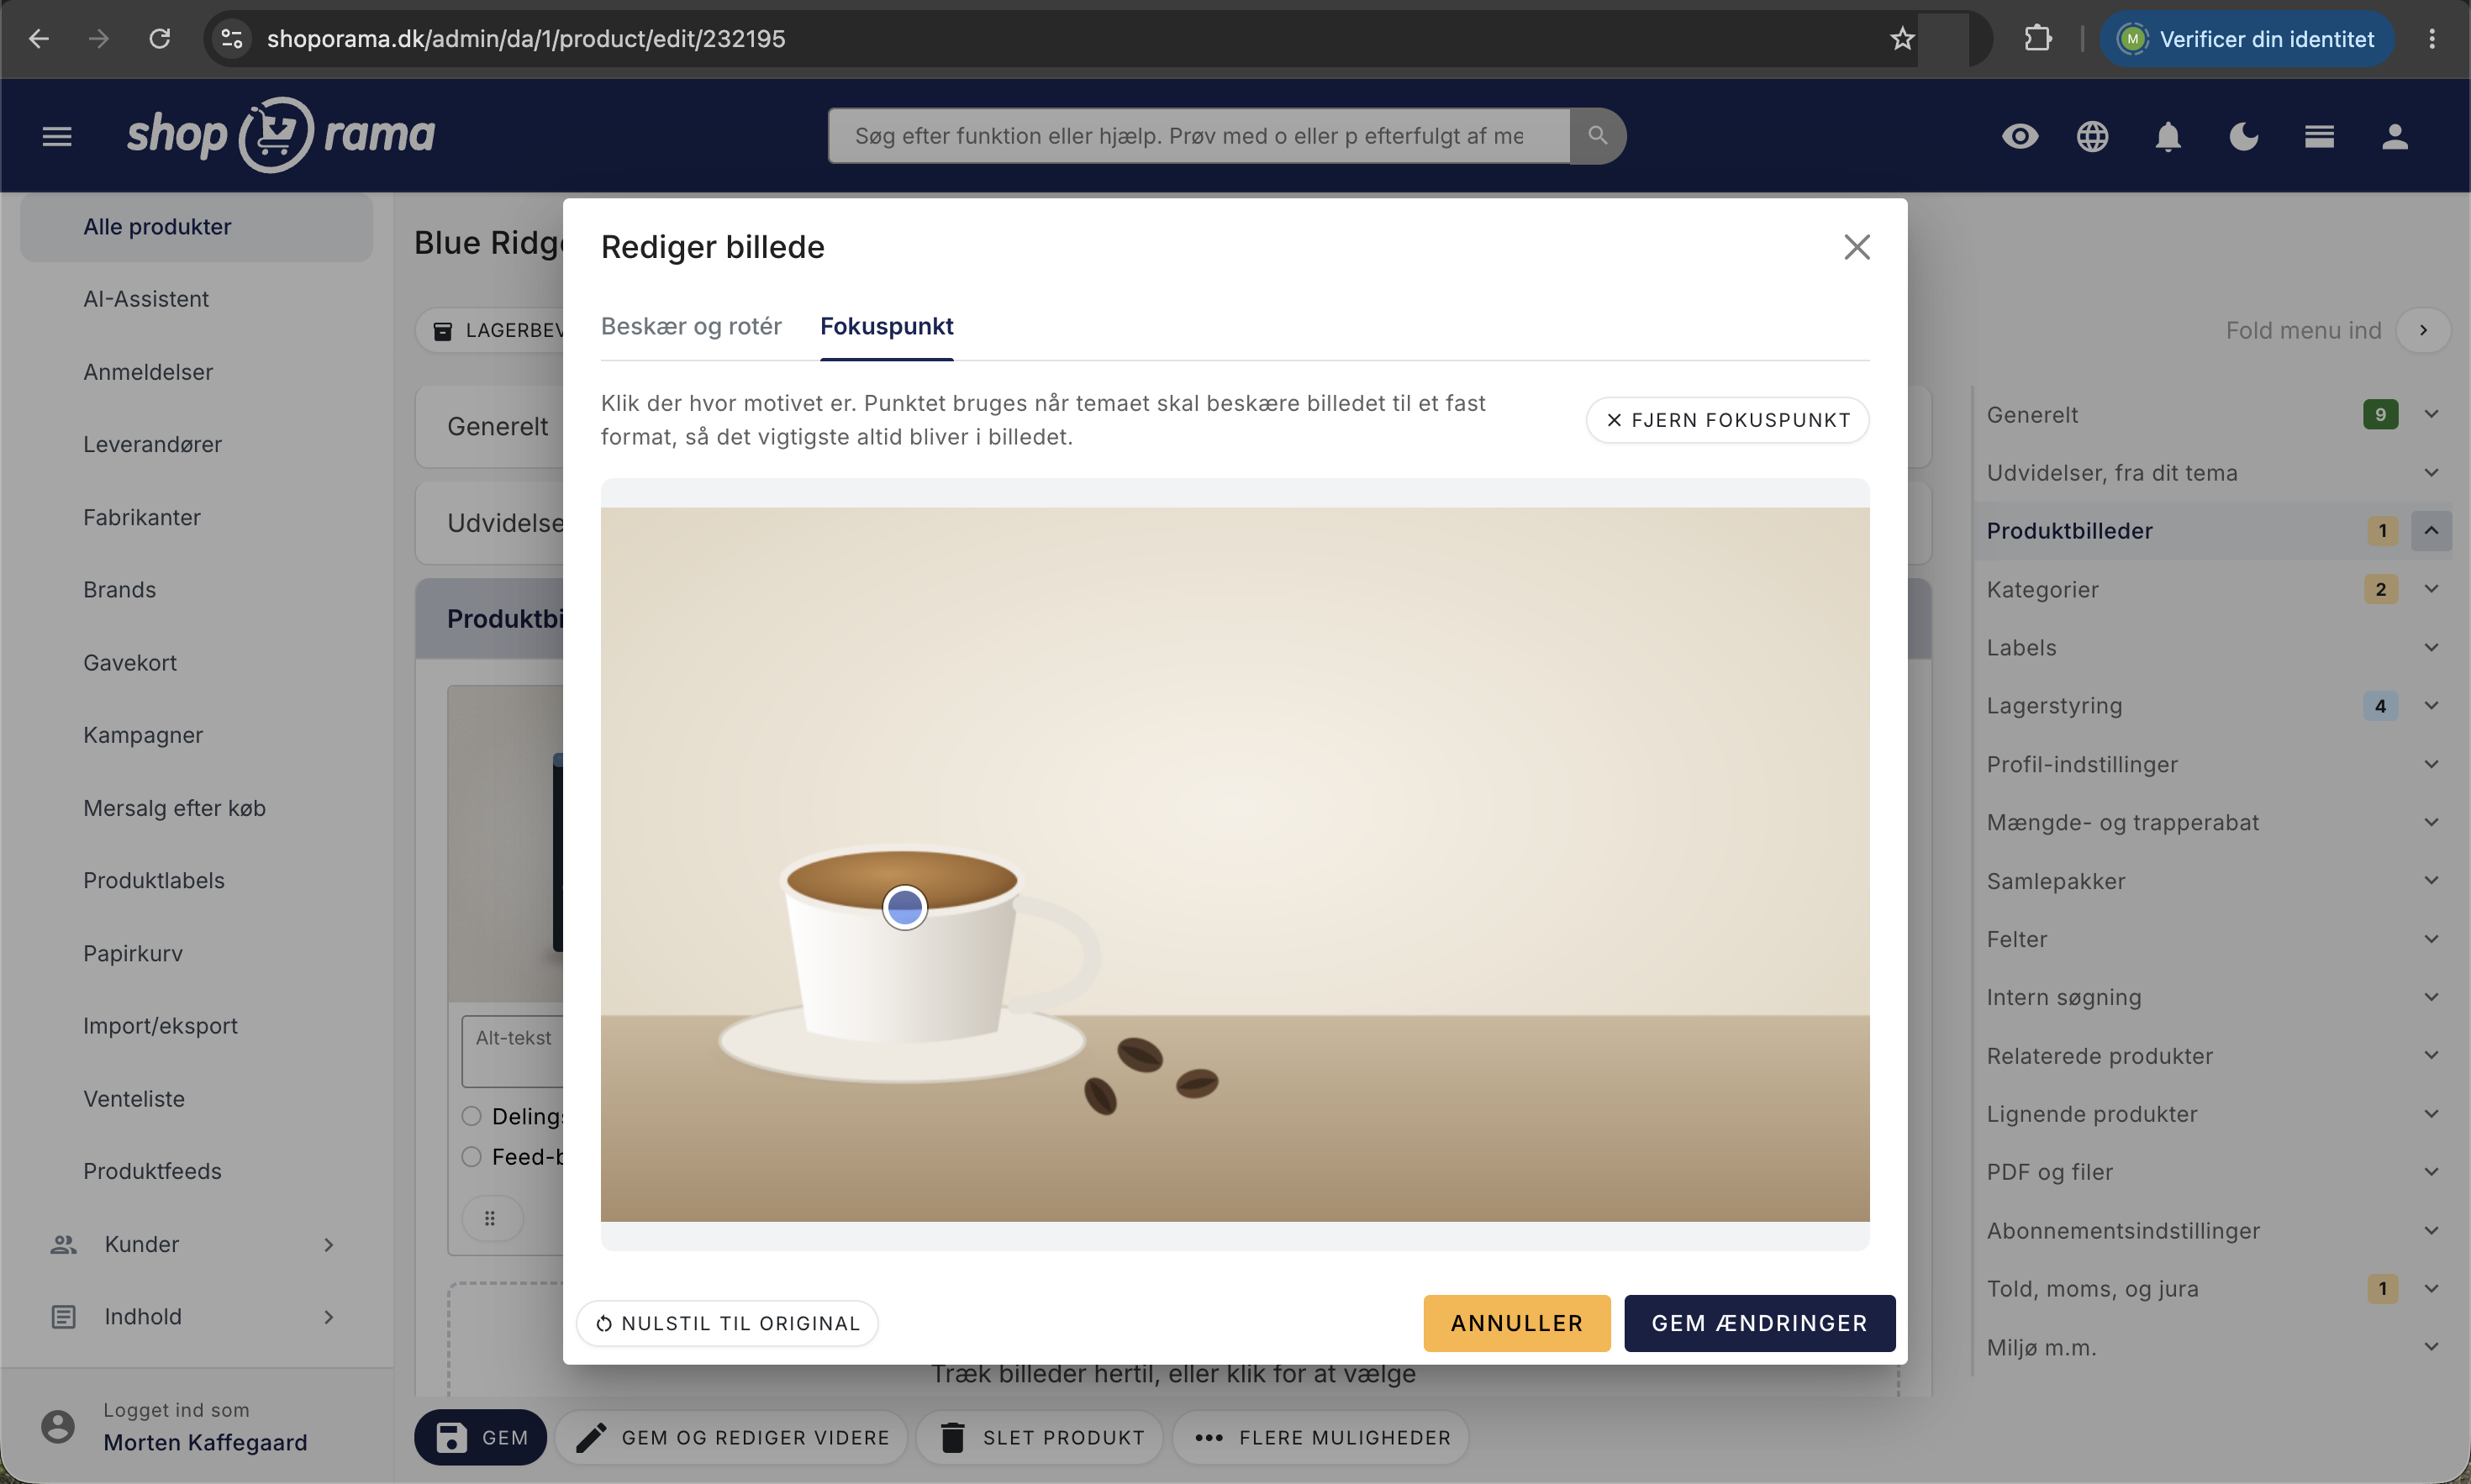
With a focus point, you specify where the subject is. Go to the Focus Point tab and click the spot in the image that you always want to include. A blue dot will appear. When the app then crops the image, it will crop around your point instead of the center.
You can move the point by clicking a new location, and remove it again using “Remove Focus Point.” Without a focus point, the image is cropped from the center, just as before.
The focus point is only used when the image needs to be cropped to a fixed format. If the image is displayed at its full height and width—for example, on a product page—the focus point has no effect.
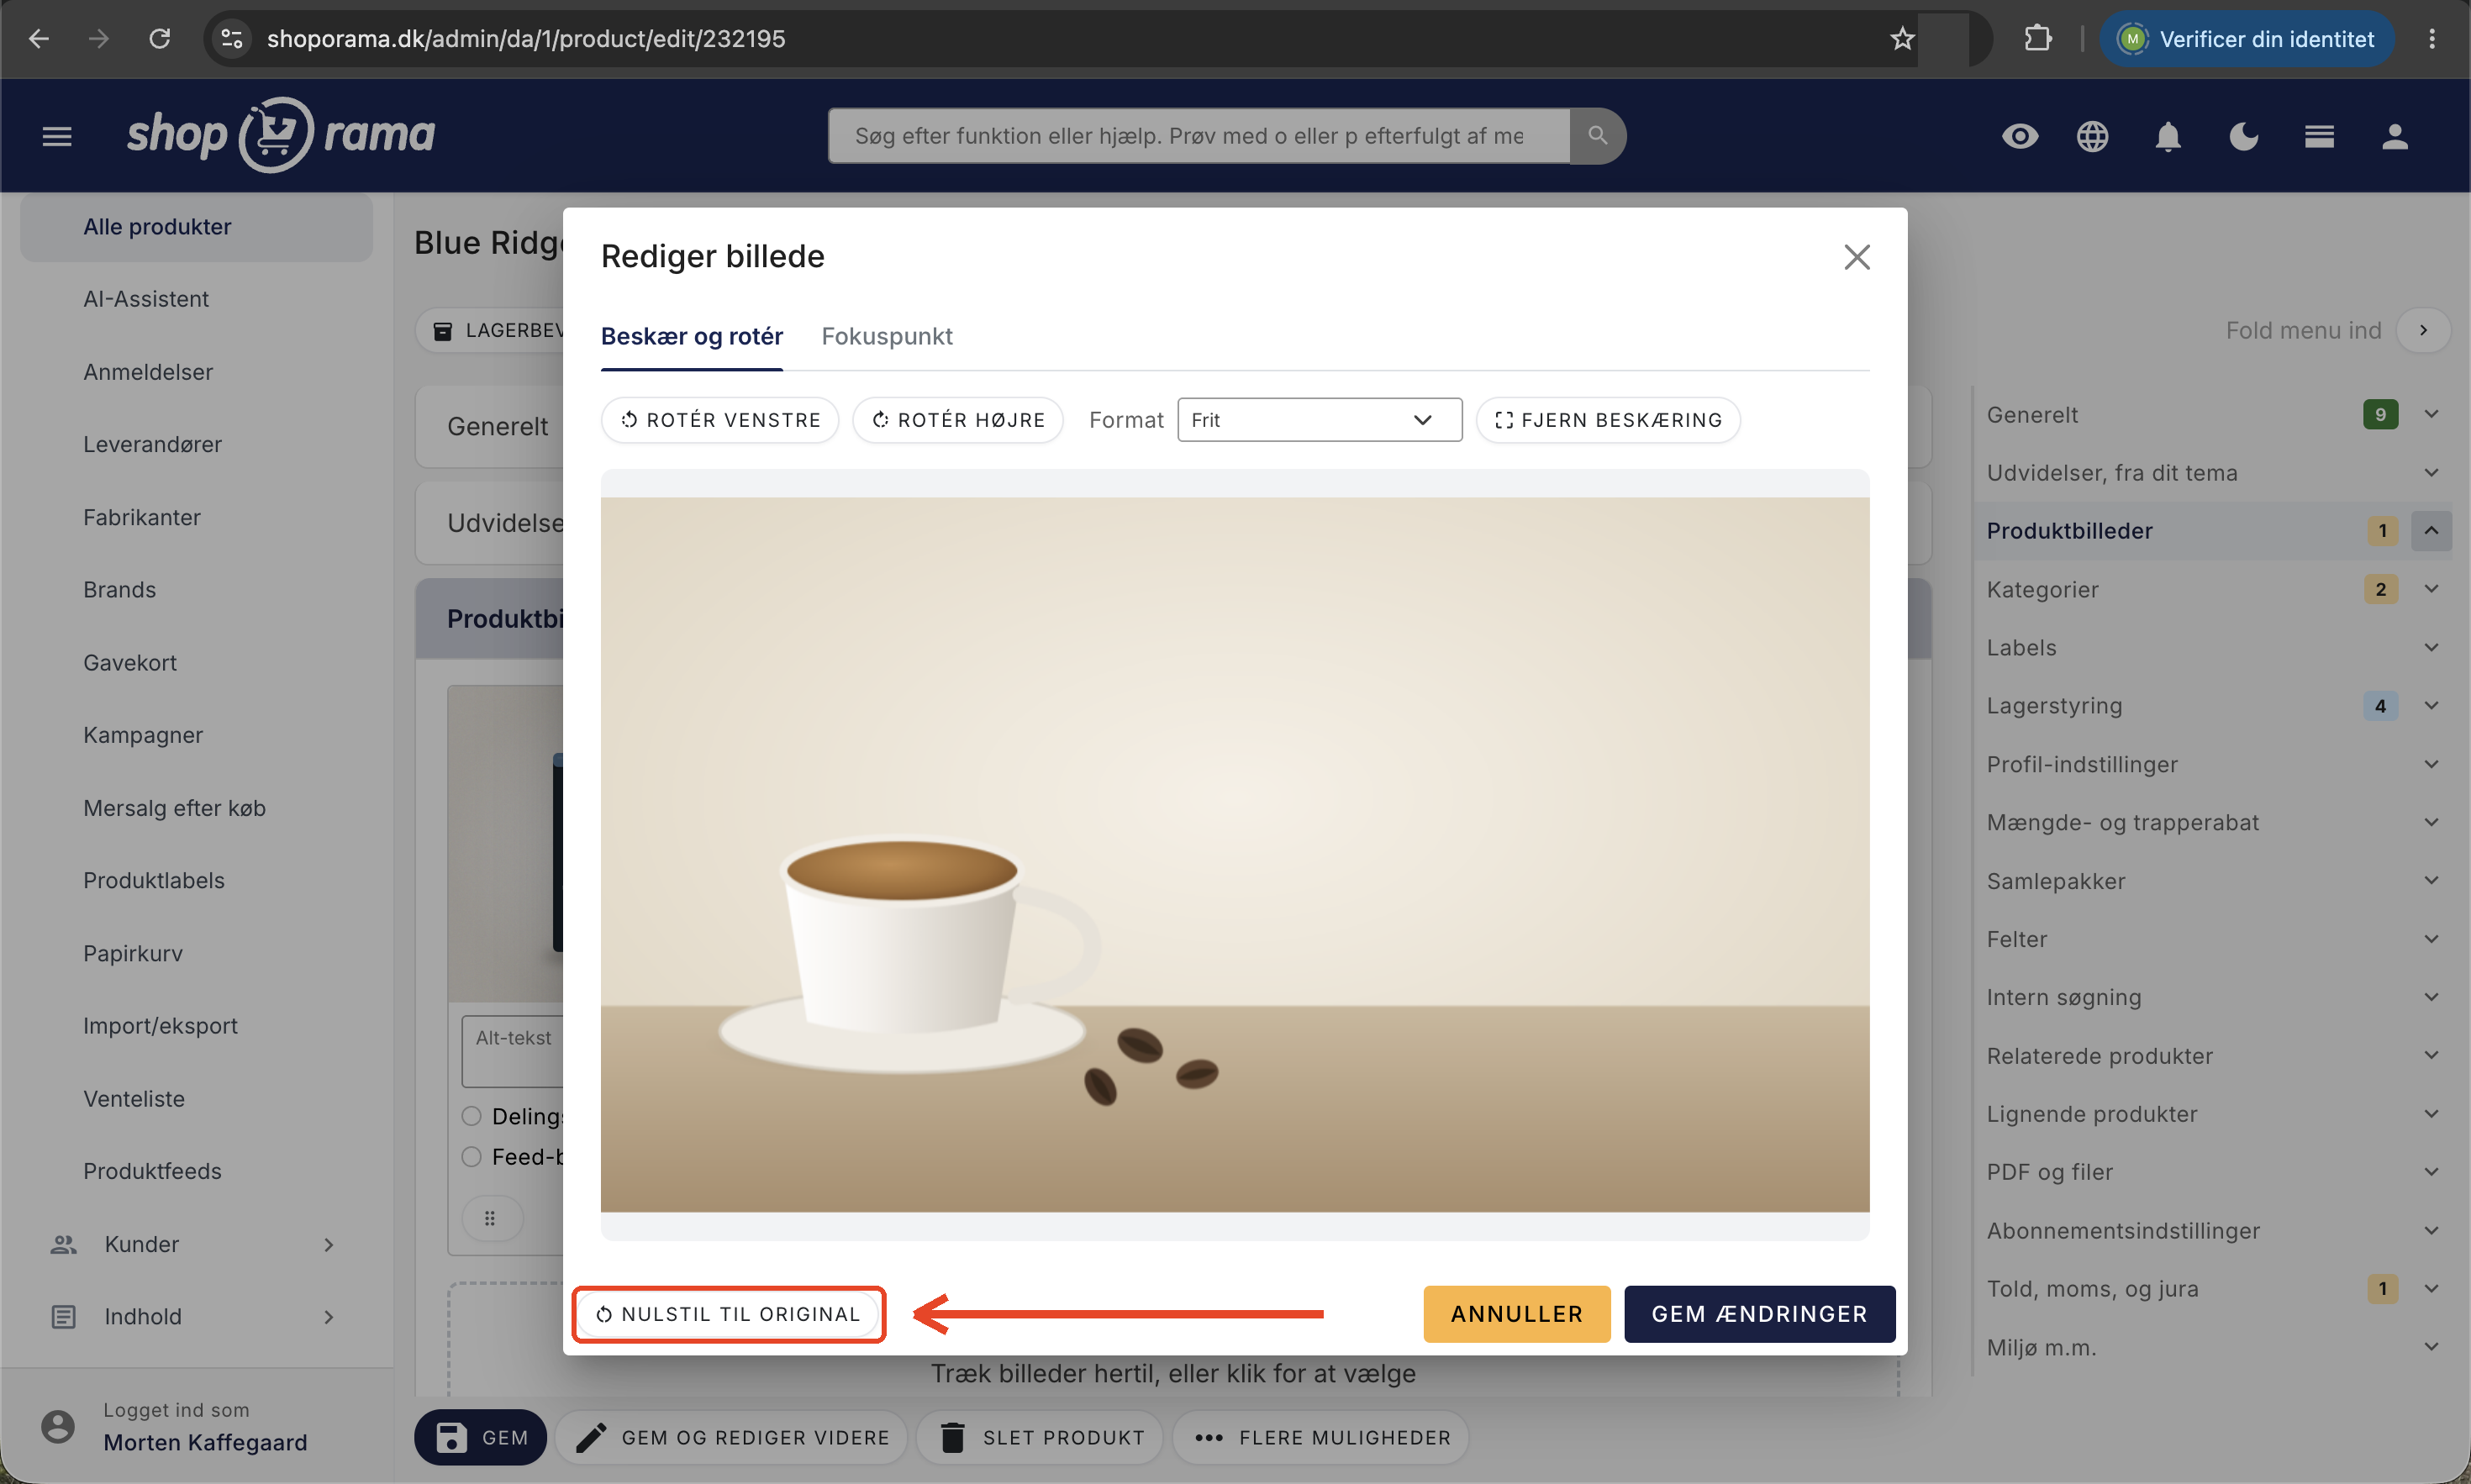
You can’t ruin your image
The original image is never overwritten. Rotation, cropping, and the focus point are saved as a few numbers next to the image, and they are only applied when the image is displayed in the shop.
That’s why you can always undo an edit. The “Reset to Original” button at the bottom of the window removes rotation, cropping, and the focus point all at once, and the image is restored to the way it was when you uploaded it. This applies even months later.
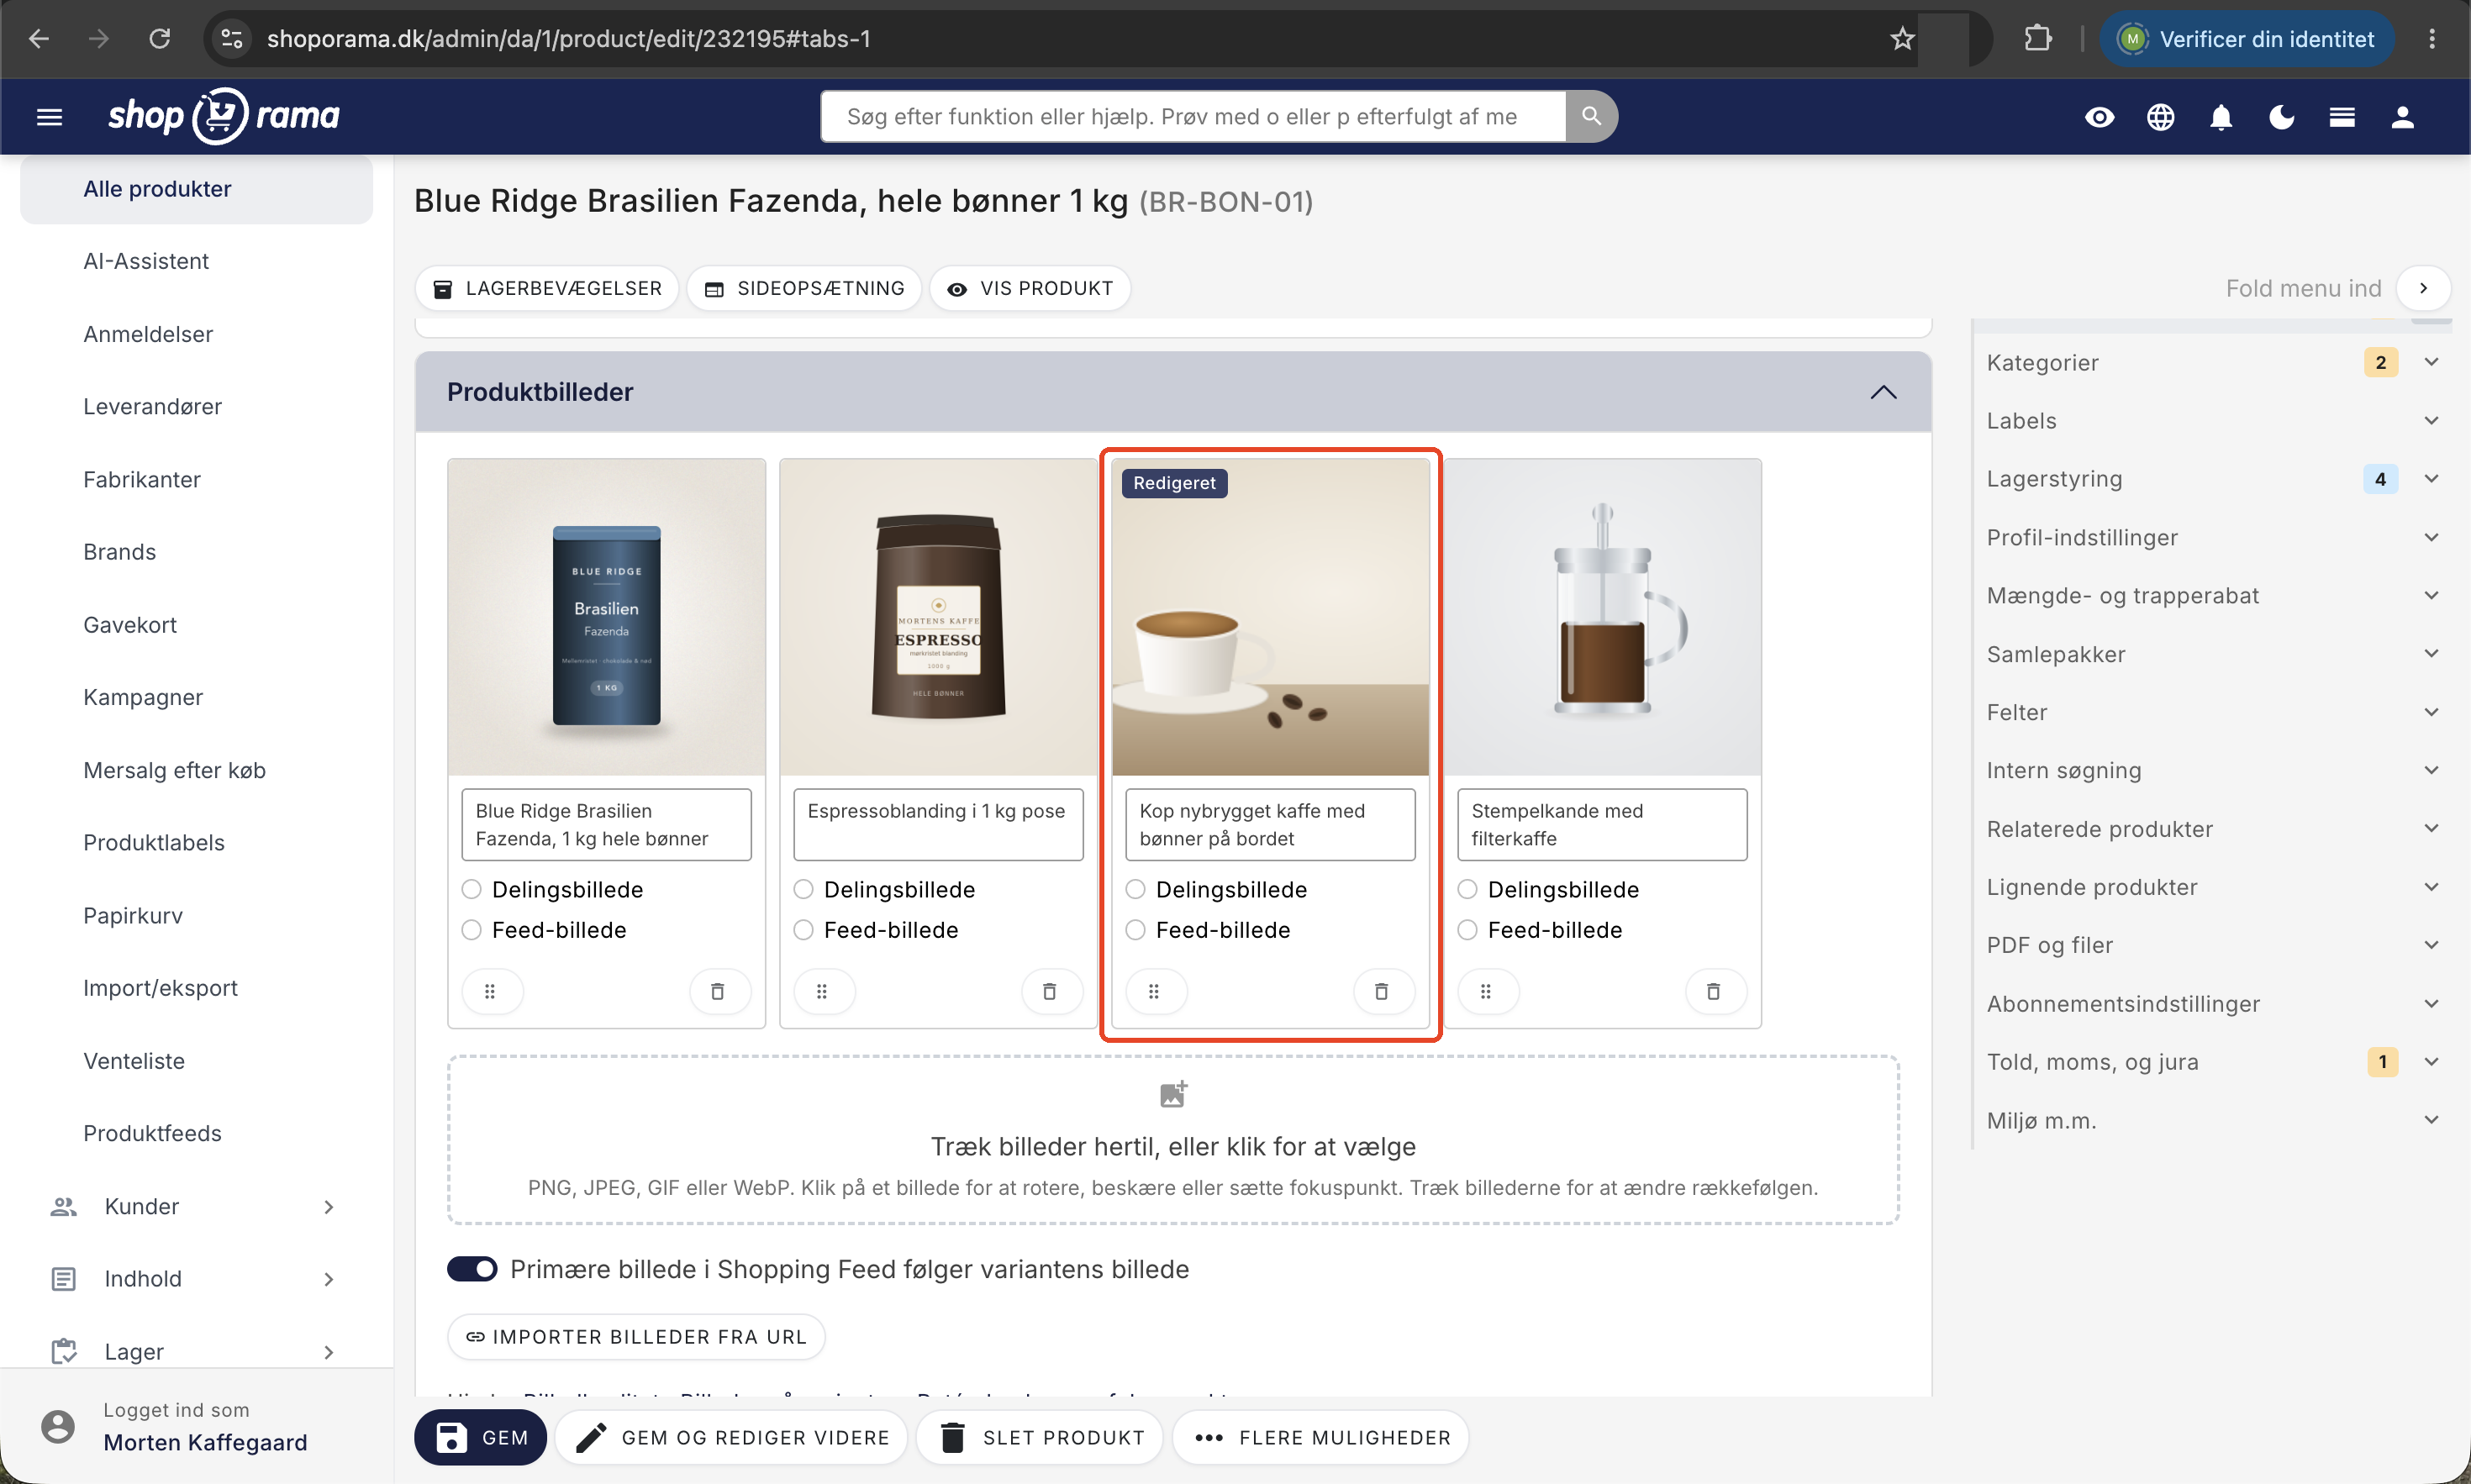
Images you’ve edited are marked with a small “Edited” label in the image overview, so you can see this without opening them.
Photos you’ve selected from the photo library are marked “From the Library.” You edit them just like any other photo, and the changes apply only here—not in the library or anywhere else the photo is used.
Upload, Order, and Alt Text
The image section works the same way throughout the admin panel:
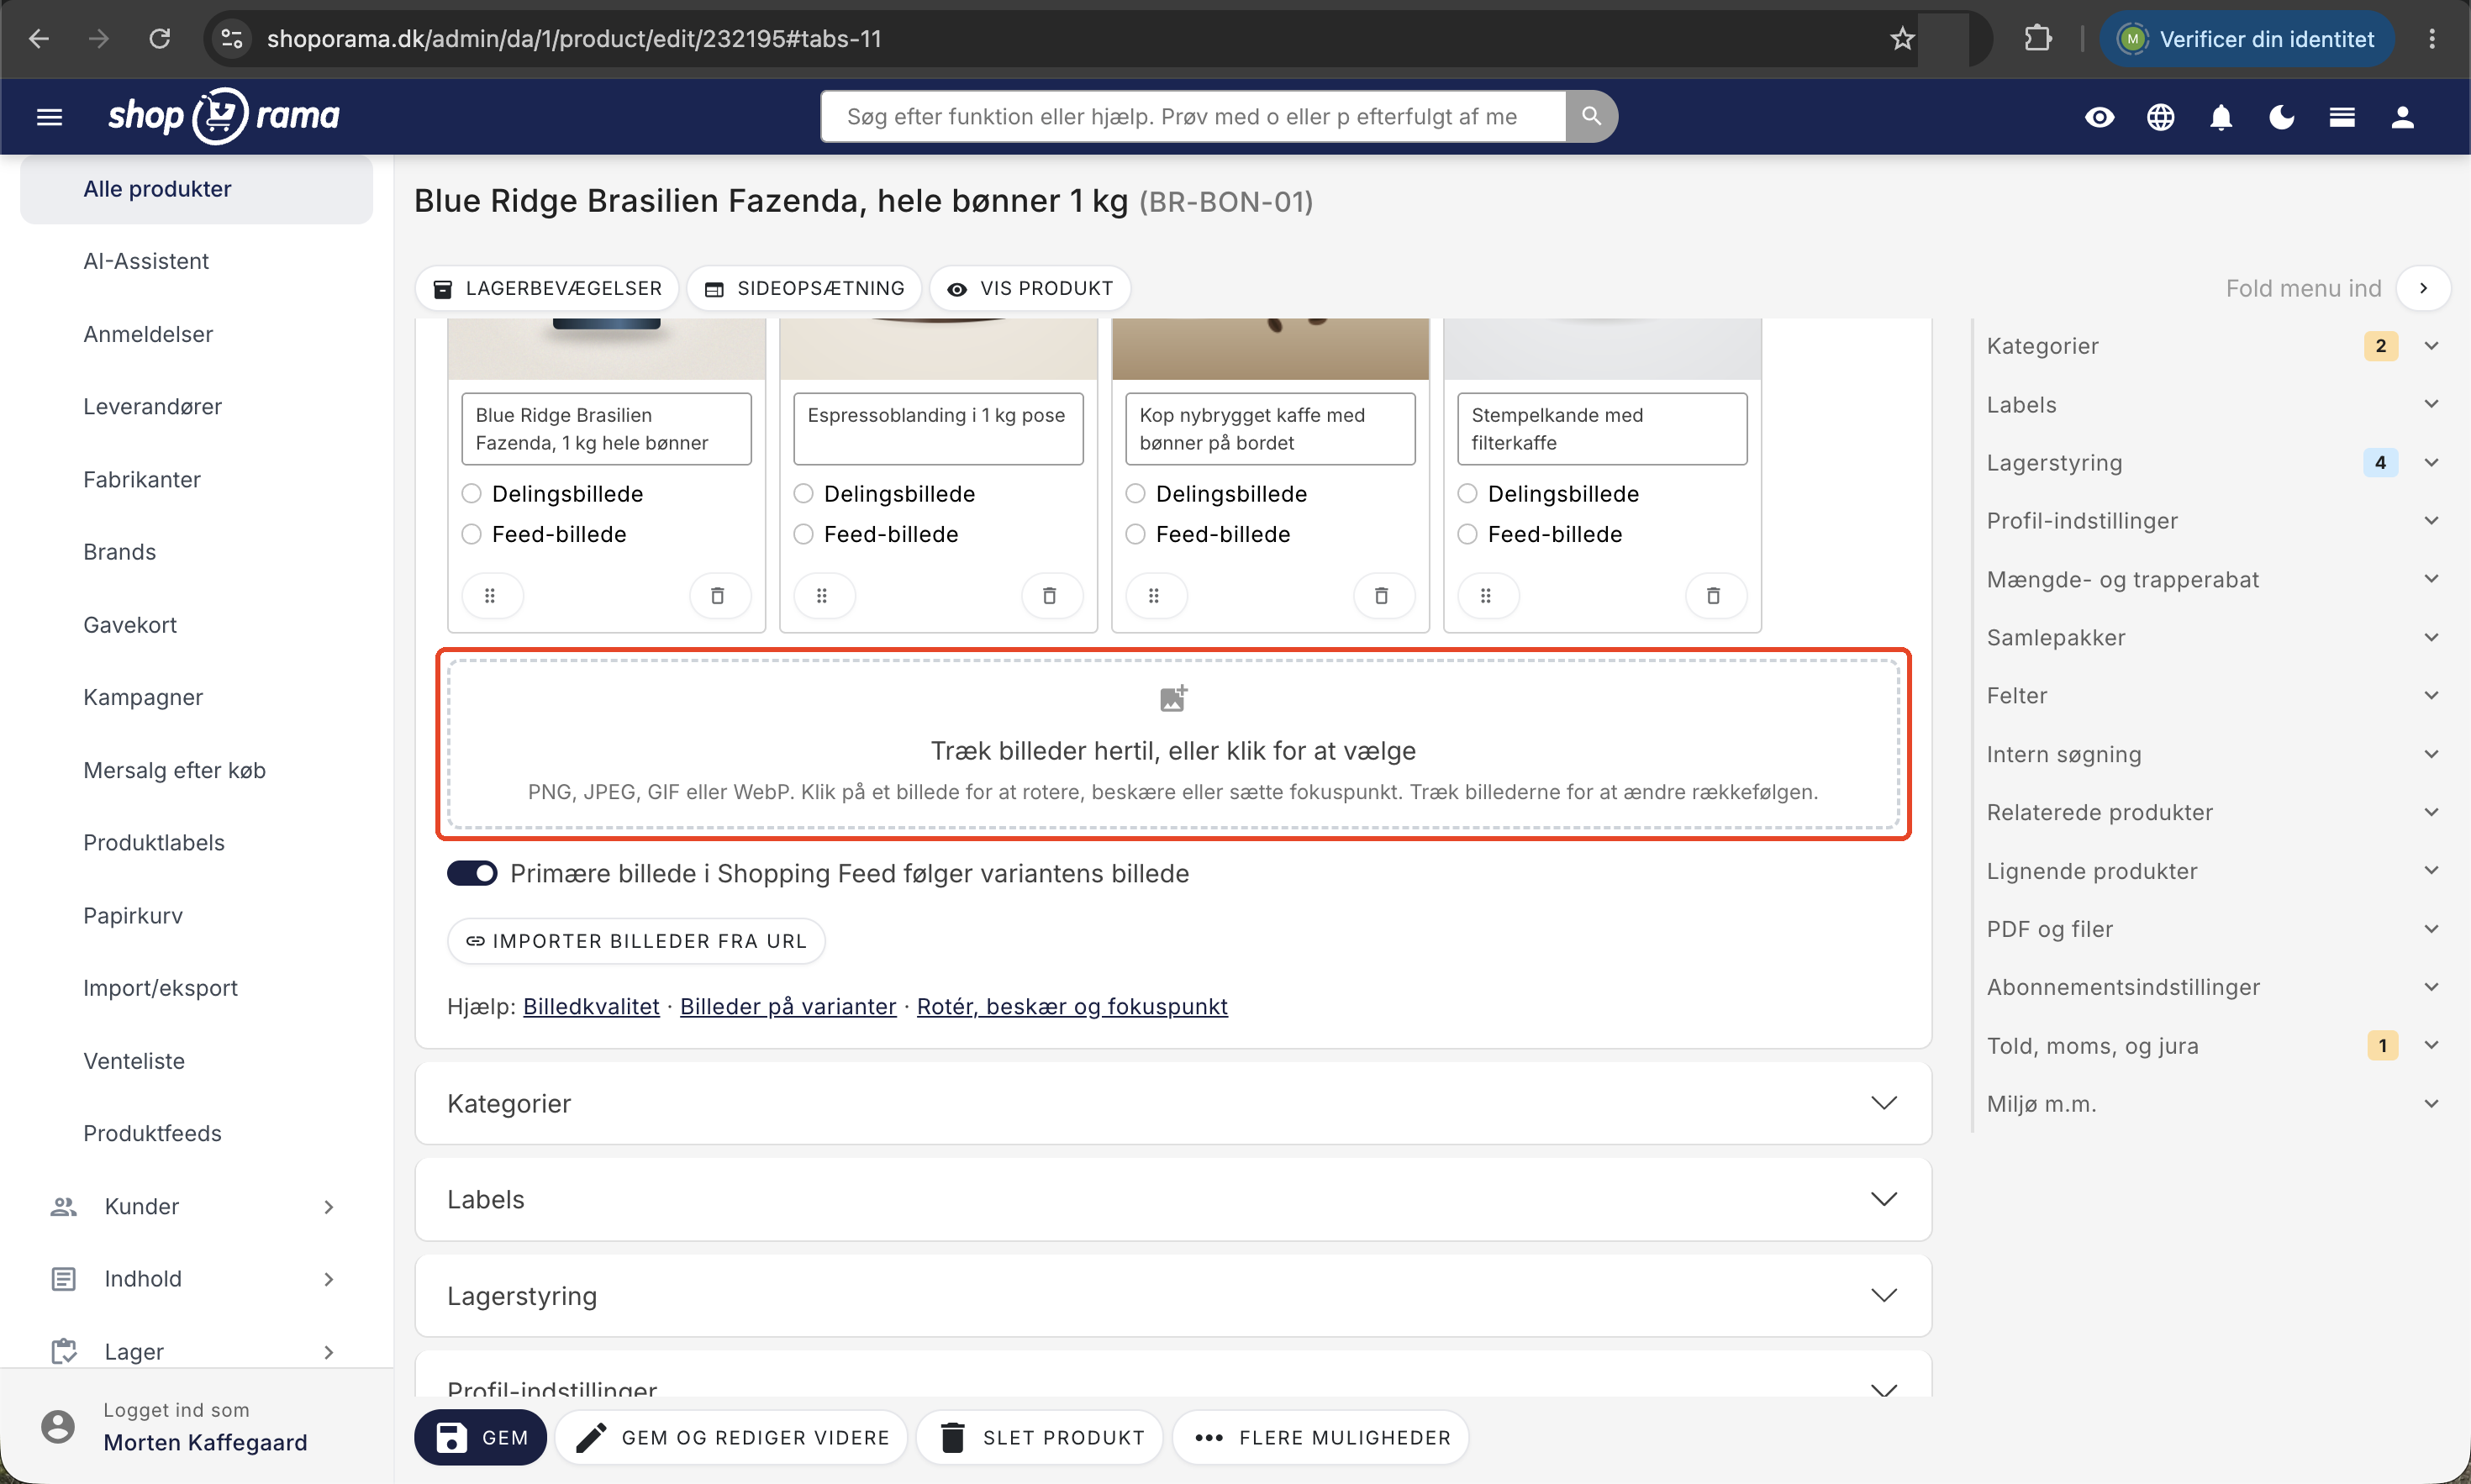
- Upload: Drag images into the dotted field, or click anywhere in the field to select them from your computer. Where multiple images are allowed, you can drag several in at once. The images upload immediately, so you don’t need to save the page first to enter alt text. If the image is already in the image library, click “Select from image library” below the field and choose it from there.
- Order: If there are multiple images, drag the handle with the six dots at the bottom left of the image card to reorder the images. The order is saved automatically. The first image is the main image.
- Alt text: Enter a brief description of what’s in the image. It’s saved when you save the page.
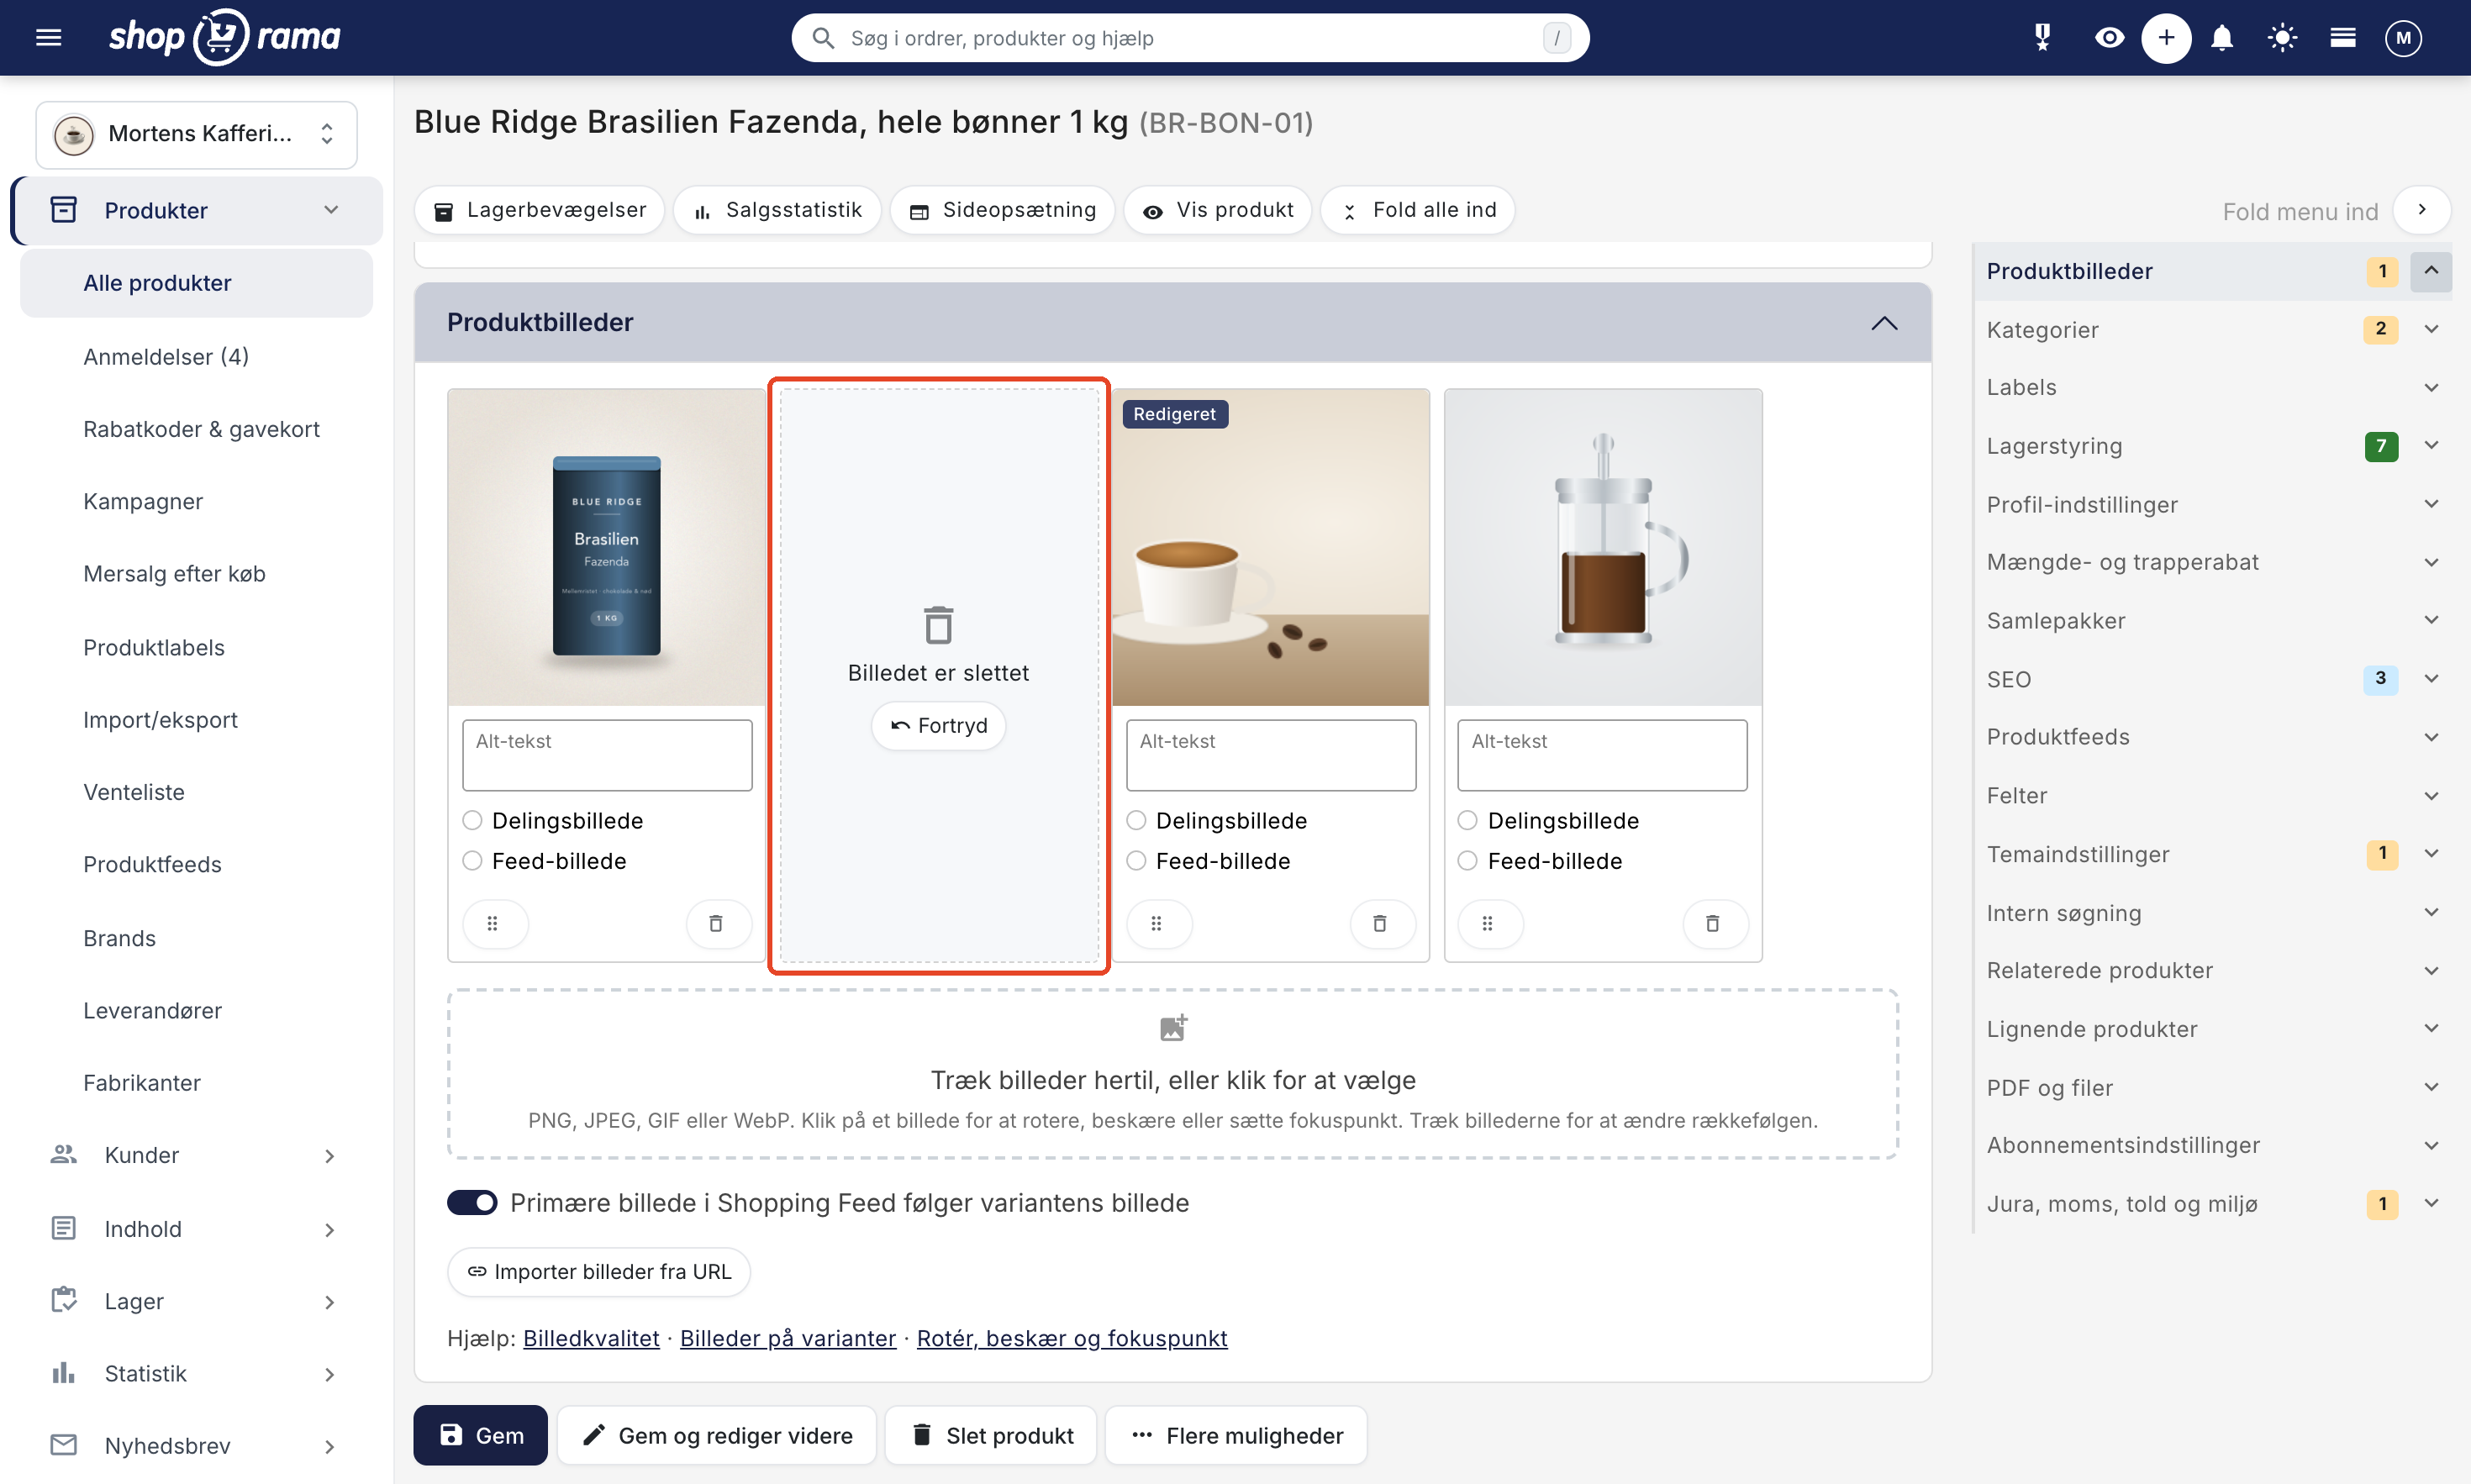
- Delete: Click the trash can icon in the lower-right corner of the image card. The card will remain on the screen with the text “Image deleted” and the “Undo” button for a few seconds, giving you time to undo an accidental click. After that, the card disappears, and the image is deleted. You do not need to save the page. If the image is from the archive, it is only removed here and remains in the archive.
You can upload PNG, JPEG, GIF, and WebP files. SVG is not supported because images must be resizable to the dimensions used by the theme.
If an image from your phone is oriented incorrectly
Phone cameras sometimes save a portrait-oriented image as landscape, even if it was taken in portrait mode, and include a note in the file specifying how it should be rotated. Not all systems read this note, so a portrait-oriented image may end up landscape after upload.
If that happens, you can fix it in a moment: click on the image and use Rotate Left or Rotate Right until it’s oriented correctly. The rotation is saved without altering your original file, so you can always reset it.
For developers
Cropping and rotation are applied directly to the image itself, so the theme doesn’t need to do anything. Both “fit” and “box” modes work on the edited image, and the focus point is automatically used by the “box” mode.
If your theme crops the image itself using CSS into a box with a fixed format, you can retrieve the focus point as a ready-made ` object-position`:
<img src="<{$image->getSrc(800, 800, 'fit')}>" alt="<{$image->getDescription()|escape}>"
     style="object-fit: cover; object-position: <{$image->getFocalPoint()}>"/>
Use ` fit ` here instead of `box`, because a `box` image is already cropped around the focal point. If no focal point is set, the value is empty, and the browser crops from the center.
There are also getFocalX() and getFocalY(), which return numbers between 0 and 1, or nothing if no focal point has been set.
Via the REST API, the `rotate`, `crop`, and `focal` fields are available for each image, both when you retrieve it and when you save it. Rotation is measured in degrees clockwise; cropping consists of four numbers between 0 and 1 in the order x, y, width, and height; and the focal point consists of two numbers between 0 and 1. The crop is calculated based on the rotated image, so the rotation is applied first.
Frequently Asked Questions
Will I delete my original image when I crop it?
No. The image you uploaded remains unchanged. The crop is applied only when the image is displayed, and you can always click “Reset to Original” to restore everything.
Can I undo it if I accidentally delete an image?
Yes, but only while the card displays the “Undo” button. If you click “Undo,” the image will be restored with its alt text and the selections you had made. If you save the page, leave it, or reload it before doing so, the image will be deleted. If the card has disappeared, the image is deleted along with its rotation, cropping, and focus point, and you’ll need to upload it again. If the image came from the image library, you can select it from there again instead.
Do I need to do anything differently, or does it work as usual?
It works as usual. You drag and drop the images just as before. The difference is that they’re uploaded immediately, you can click on an image to edit it, and you can delete an image without saving the page—with a few seconds to undo the action.
Do I need to edit all my old images again?
No. Old images are untouched and look exactly the same as before. You can edit them if you want, but you don’t have to.
How can I tell if a colleague has already edited an image?
Edited images have a small label that says “Edited” in the image overview. If you open the image, you can see the rotation and frame as they were saved.
Does it work the same way for products and categories?
Yes. The image section is the same everywhere. Products have a few extra fields per image—for example, linking to a variant—but uploading, ordering, and editing work the same way.
Can I set the focus point for multiple images at once?
Not in the admin panel, where it’s set image by image. If you have many products, you can set the fields via the REST API, which includes rotation, cropping, and focus point for each image.
Does this take up more space on the server, and does it slow down the store?
No. Only a few files are stored in addition to the original. The edited version of the image is created once and then reused, just like all other image sizes in the store.
How long does it take for customers to see the changes?
Immediately. An edited image gets its own URL, so customers see the new version and not an old one cached in their browser.
Does the cropping carry over to Google Shopping and when someone shares a link?
Yes. Feeds and shared images use the same images as the store, so your rotation and cropping will be updated the next time the feed is fetched.
Is the alt text sufficient for SEO?
The alt text describes the image for search engines and screen readers, and it’s also included in the image’s URL. It does not replace the product’s own text and description. If a product image is missing alt text, you can see this in the keyword analysis on the SEO tab for that product.
Related articles
Image quality and aspect ratio in Shoporama
Understand how Shoporama handles image quality and aspect ratio - and what you can do if your images don't look sharp enough.
Associate images to a variant
Guide to associate product images to specific variants so that the correct image is displayed when selecting a variant.
Image Archive: Upload, Organize, and Reuse Your Images
Collect, organize, and reuse your images all in one place with the Image Library. Use them as images for products, categories, and pages, and...
Optimizing images for mobile
Guide to using responsive images with srcset in your Shoporama theme to provide optimized images for mobile users.
Image name in the URL
Guide to getting the product image name in the URL for better SEO.