Implement tracking in a Shoporama theme
Developer Guide to E-commerce Tracking in a Shoporama Theme: Data Layer, Google Tag Manager, Custom Events, and Correct Product IDs Using getTrackingId().
This guide is for theme developers and freelancers who want to implement e-commerce tracking in a Shoporama theme. We’ll walk you through the theme’s data layer, setting up Google Tag Manager, using getTrackingId() to ensure correct product IDs, and how to fire custom events from your own theme.
Important to know before you start coding
Shoporama’s built-in tracking is injected server-side, bypassing the theme. It works in all themes, including fully custom themes, and requires no theme code. As a theme developer, you don’t need to do anything to make it work. This article is for stores that build their own tracking setup on top of or instead of the built-in one. Read more about built-in tracking in Tracking in your Shoporama online store.
1. Shoporama’s built-in tracking requires no theme code
Before writing your own code, consider Shoporama’s tracking module. You’ll find it in the left sidebar under Webshop (the gear icon) → Tracking. Check the box next to Enable Tracking, select the platforms you want to send data to, and enter your IDs and access tokens.
The tracking module automatically inserts its own scripts and fires its own events. This happens on the server side, bypassing the theme’s files, so you don’t need to include partials, insert scripts, or change a single line in the theme. The module supports:
- Facebook Pixel and Conversion API
- Google Ads (including offline conversions)
- Microsoft Ads
- Google GA4
- Pinterest, Snapchat, TikTok, and LinkedIn
- Server-side tracking via your own subdomain (bypasses ad blockers)
- Consent Mode v2
If the store only needs standard e-commerce tracking, your work as a theme developer is done here. The rest of this article is for stores that want to run their own setup—typically via Google Tag Manager—in addition to or instead of the built-in tracking.
2. The Theme’s Data Layer
The default themes (Delaware, Montana, Massachusetts, etc.) include a partial file named partials/datalayer.html. It pushes GA4-compatible e-commerce events to ` window.dataLayer` as soon as tracking is enabled on the store. This is the file you’ll build upon if the store needs its own GTM setup.
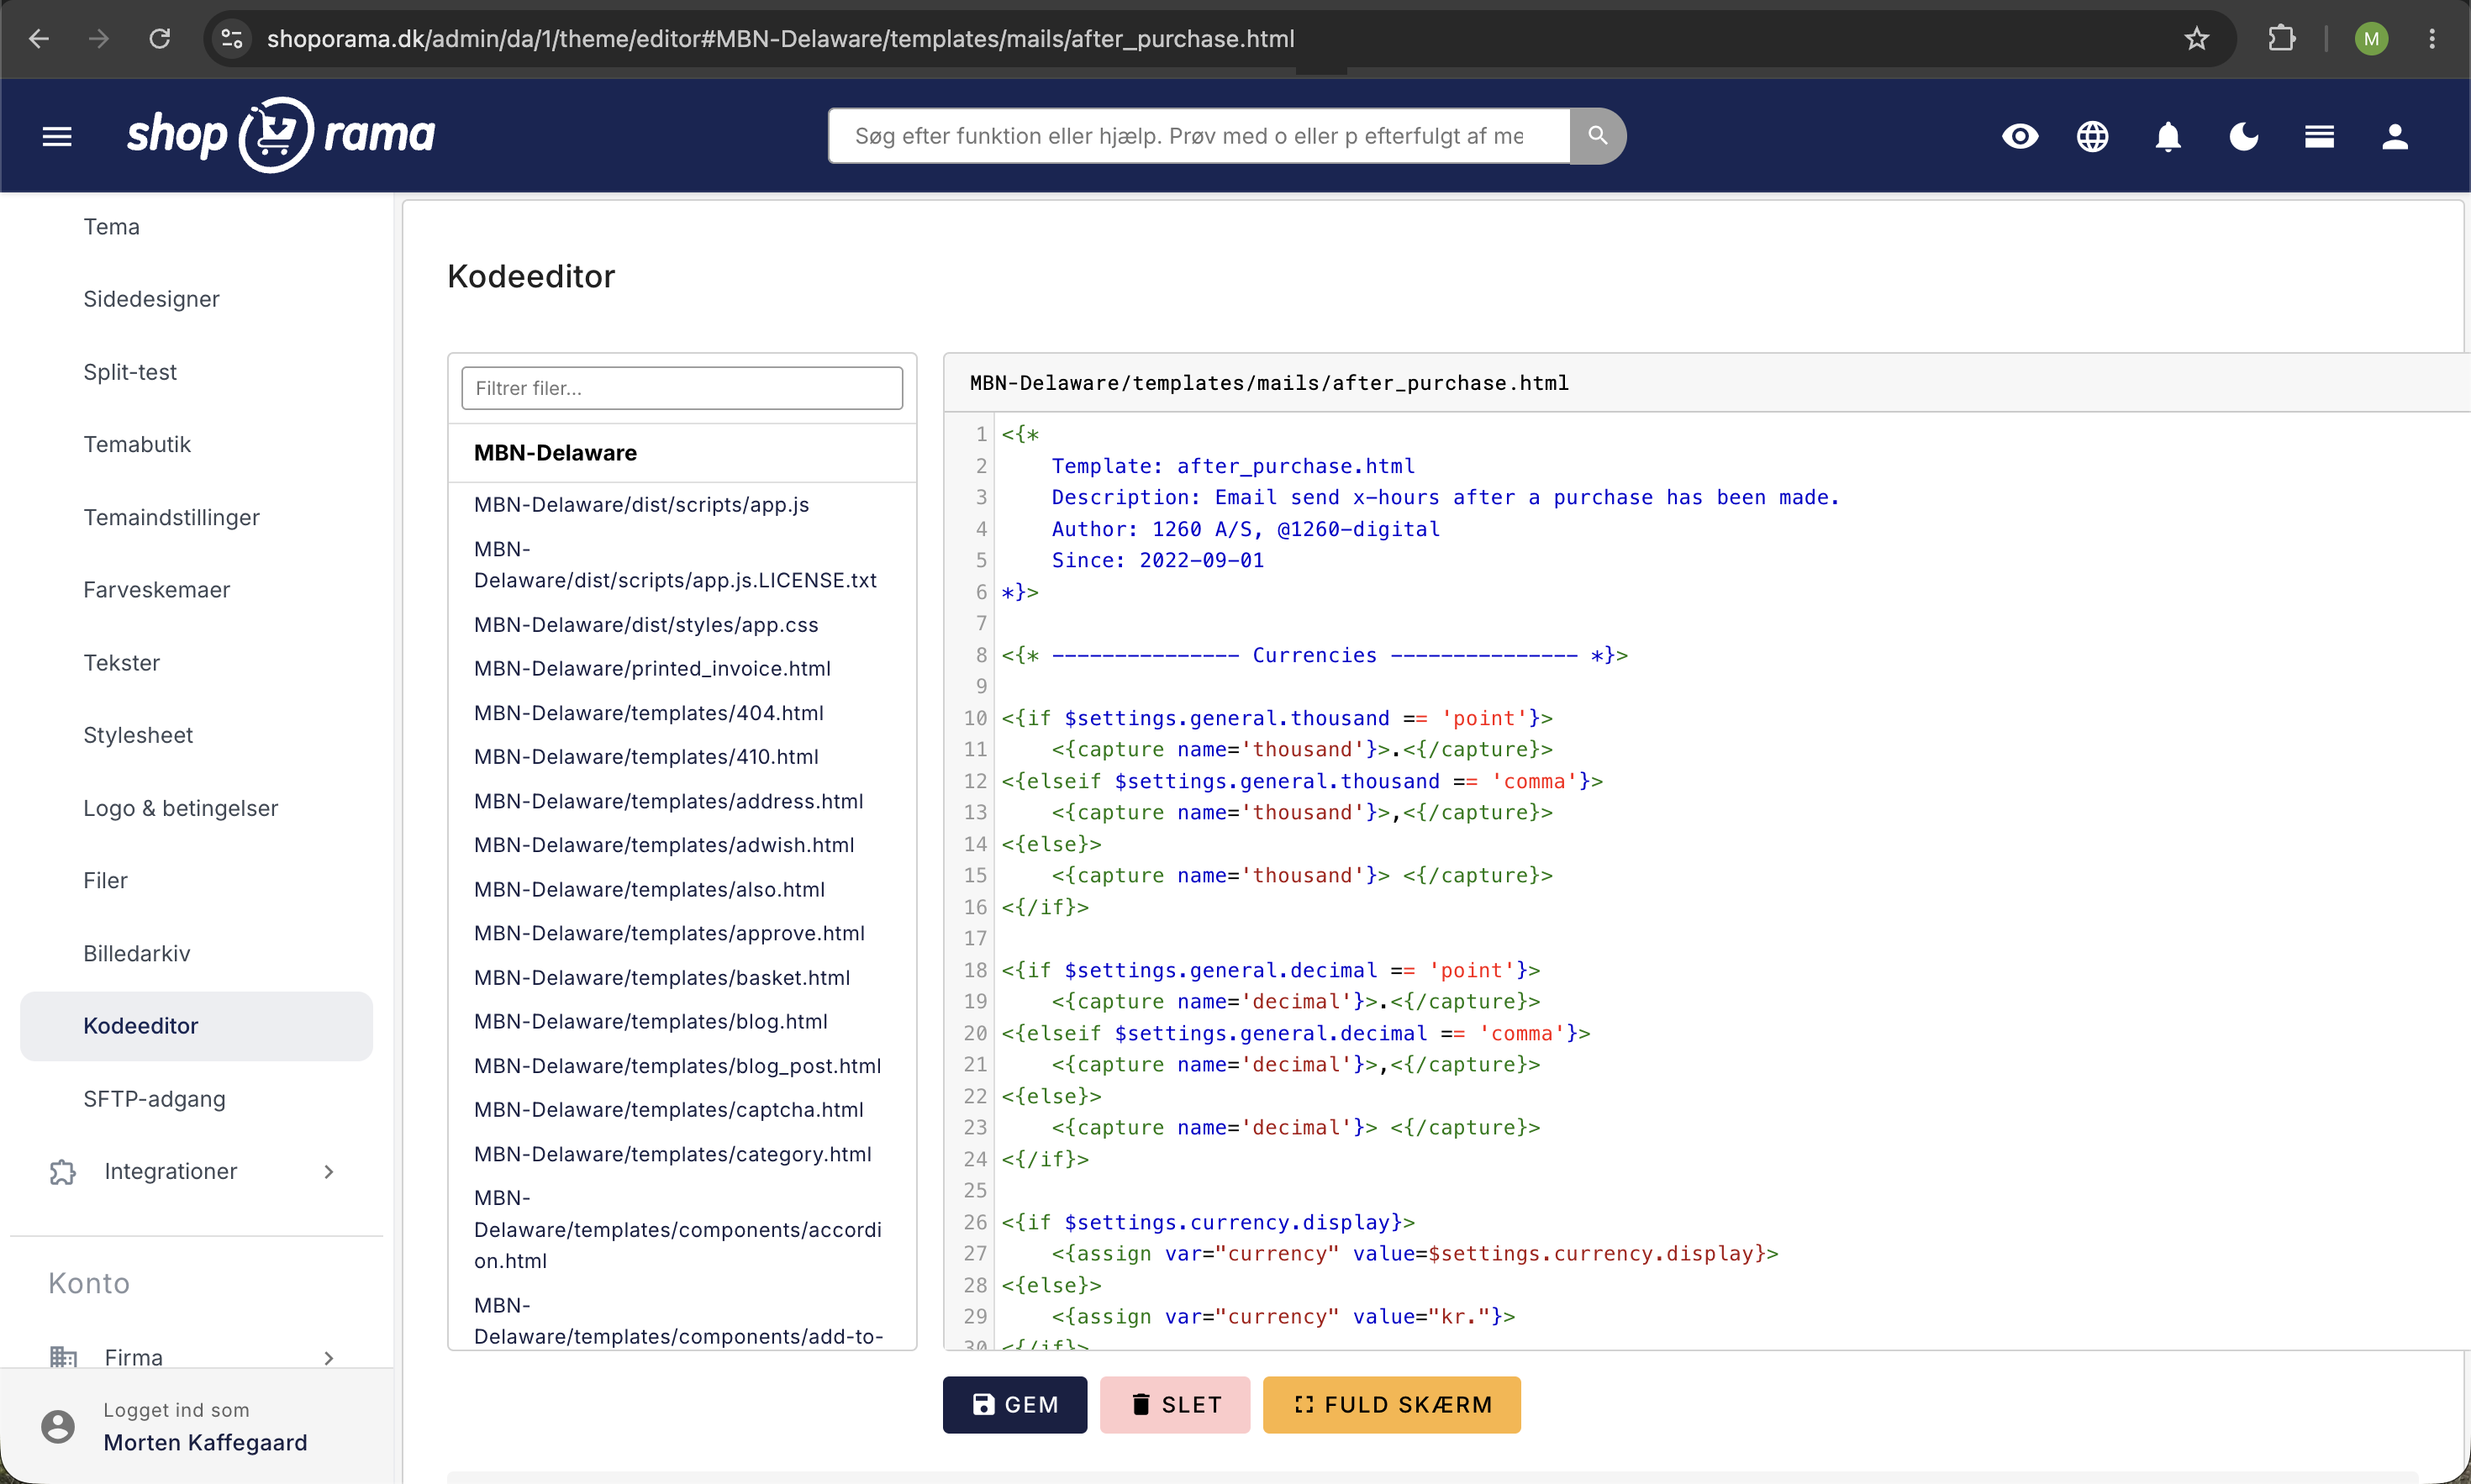
The following events are automatically triggered by the theme:
| Event | When |
|---|---|
| view_item | Product page is displayed |
| view_item_list | Category or landing page displayed |
| select_item | A product card is clicked |
| add_to_cart | Product is added to the cart |
| remove_from_cart | Product is removed from the cart |
| view_cart | Shopping cart page is displayed |
| begin_checkout | Address page displayed (checkout begins) |
| add_shipping_info | Shipping method is selected |
| add_payment_info | Payment method is selected |
| purchase | Thank-you page (receipt) displayed after purchase is complete |
| search | Search results page is displayed |
| customerInfo | Logged-in customer with email |
| ShopOramaSettings | Settings pushed on page load (pixel ID, currency, GA4 ID, etc.) |
A ` view_item ` push on the product page should look like this in the template:
<script>
window.dataLayer = window.dataLayer || [];
window.dataLayer.push({ ecommerce: null });
window.dataLayer.push({
  event: 'view_item',
  ecommerce: {
    currency: '<{$webshop->getCurrency()}>',
    items: [{
      item_id: '<{$product->getTrackingId()}>',
      item_name: '<{$product->getName()|escape:"javascript"}>',
      price: <{$product->getRealPrice()|number_format:2:".":""}>,
      quantity: 1
    }]
  }
});
</script>
Note the `item_id`: It comes from ` $product->getTrackingId() ` and not from an ID you create yourself. We’ll explain why this is crucial in the next section.
If you’re building your own theme from scratch, you can copy templates/partials/datalayer.html from the Delaware theme and include it in your global.html:
<{include file="partials/datalayer.html"}>3. The product ID: always use getTrackingId()
Ad platforms like Meta and Google match your events to the product catalog using the product ID. This means that the `item_id` in your events must be identical to the ID (g:id) in the store’s product feed. If the two are different, the platform cannot link the event to the product in the catalog, causing catalog matching, dynamic remarketing, and product reports to fail.
Therefore, you should never manually construct product IDs in your templates. Instead, use `getTrackingId()`, which always returns the exact ID used by the store’s feed:
item_id: '<{$product->getTrackingId()}>'The format depends on the store’s setup:
- Default: the numeric product ID, e.g., 154585.
- Variants: the product ID and the variant value’s ID separated by a colon, e.g., 154585:45789.
- Stores with language or country feeds: the stock keeping unit (SKU) instead, as it is the stable key across country stores. The variant’s SKU is used if it’s provided; otherwise, the product’s SKU is used. If the product doesn’t have an SKU at all, the ID reverts to the numeric format.
getTrackingId() handles all of this automatically for each shop. If you know the variant value’s ID—for example, in the context of the cart, checkout, or receipt—you can pass it as a second parameter:
item_id: '<{$product->getTrackingId(null, $attribute_value_id)}>'The first parameter is the attribute’s ID. It can be set to null, in which case it is automatically looked up based on the variant value.
Warning: Older datalayer partials swap the variant ID
If you’re working with an older version of the themes’ data layer partials, be aware of a known issue: On product views, some older partials construct the variant ID in reverse order (variant value ID:product ID), while the checkout and purchase sections use the correct order (product ID:variant value ID). The reversed ID does not match either the feed or the purchase event, so the platforms treat it as an unknown product. The solution is to replace all manually constructed IDs with `getTrackingId()`.
Read more about the ID schema and how to troubleshoot the match rate in Product IDs and Catalog Matching on Meta and Google.
4. Set up Google Tag Manager via HTML fields
If you’ve filled in the Google Tag Manager ID field under the shop’s settings, Shoporama automatically inserts the GTM snippet for you. It’s located at the bottom of partials/datalayer.html.
If you’d rather manage GTM (or other scripts like Cookiebot, Hotjar, or Klaviyo) manually, you’ll need to use HTML fields. Go to Webshop → HTML Fields. Here, you can create named fields and choose whether they should be automatically inserted into the head or body, or used manually in your theme via a tag name.
A typical GTM snippet in an HTML field set to “Automatically add to head” looks like this:
<!-- Google Tag Manager -->
<script>(function(w,d,s,l,i){w[l]=w[l]||[];w[l].push({'gtm.start':
new Date().getTime(),event:'gtm.js'});var f=d.getElementsByTagName(s)[0],
j=d.createElement(s),dl=l!='dataLayer'?'&l='+l:'';j.async=true;j.src=
'https://www.googletagmanager.com/gtm.js?id='+i+dl;f.parentNode.insertBefore(j,f);
})(window,document,'script','dataLayer','GTM-XXXXXXX');</script>
<!-- End Google Tag Manager -->
Also remember the <noscript> fallback in the body element:
<!-- Google Tag Manager (noscript) -->
<noscript><iframe src="https://www.googletagmanager.com/ns.html?id=GTM-XXXXXXX"
height="0" width="0" style="display:none;visibility:hidden"></iframe></noscript>
<!-- End Google Tag Manager (noscript) -->
Learn more about how HTML fields work in HTML fields: Insert Cookiebot, GTM, and other scripts.
5. Tags and Triggers in GTM
With the standard data layer enabled, you can use GA4’s built-in tags and custom event triggers. A typical setup looks like this:
- GA4 Configuration Tag with your Measurement ID, fired on All Pages
- GA4 Event Tag for each e-commerce event, set to read the e-commerce object from the data layer
- Custom Event triggers with the names view_item, add_to_cart, begin_checkout, purchase, etc.
- Use Preview mode in GTM to verify that events are firing with the correct data
For Google Ads conversions, link your Google Ads Conversion ID/Label to the purchase event. See also Google Analytics tracking for your online store.
6. Custom events from your own theme
If you need to fire events not covered by the standard data layer—such as a video play, a tab click, a chat opening, or a custom CTA—push directly to `window.dataLayer ` from your theme:
<button onclick="trackVideoPlay()">Play video</button>

<script>
function trackVideoPlay() {
  window.dataLayer = window.dataLayer || [];
  window.dataLayer.push({
    event: 'video_play',
    video_title: 'Product Demo',
    video_id: 'demo-123'
  });
}
</script>
On the confirmation page, you can fire your own purchase event using the order object and Smarty. Use ` getTrackingId()` for `item_id`, and wrap everything in the duplicate protection ` getTrackingCalled() ` / ` setTrackingCalled()` so that the event is fired only once per order, even if the customer reloads the receipt page:
<{if $order && !$order->getTrackingCalled()}>
<{assign var="orderproducts" value=$order->getOrderProducts()}>
<script>
window.dataLayer = window.dataLayer || [];
window.dataLayer.push({ ecommerce: null });
window.dataLayer.push({
  event: 'purchase',
  ecommerce: {
    transaction_id: '<{$order->getWebshopOrderId()}>',
    value: <{$order->getTotalPrice()|number_format:2:".":""}>,
    currency: '<{$webshop->getCurrency()}>',
    coupon: '<{$order->getVoucherCode()|escape:"javascript"}>',
    items: [
      <{foreach from=$orderproducts item=op}>
        <{assign var="p" value=$op->getProduct()}>
        <{assign var="attributes" value=$op->getAttributes()}>
        {
          <{if $attributes|@count == 1}>
            <{foreach from=$attributes item=attr}>
              item_id: '<{$p->getTrackingId(null, $attr.attribute_value_id)}>',
              item_variant: '<{$attr.val|escape:"javascript"}>',
            <{/foreach}>
          <{else}>
            item_id: '<{$p->getTrackingId()}>',
          <{/if}>
          item_name: '<{$op->getName()|escape:"javascript"}>',
          price: <{$op->getPrice()|number_format:2:".":""}>,
          quantity: <{$op->getAmount()}>
        },
      <{/foreach}>
    ]
  }
});
</script>
<{$order->setTrackingCalled()}>
<{/if}>
This flag is shared by all tracking snippets on the order, including the theme’s default data layer. If you have multiple conversion snippets on the receipt page (e.g., a Pricerunnerpixel plus your own purchase event), check the flag with ` getTrackingCalled() ` in each snippet, but call `setTrackingCalled()` only once—as the very last step, after all snippets have been fired. The same pattern is used in the guide “Implement Pricerunner Tracking.”
7. Testing and Troubleshooting
- Use the Chrome extension GTM/GA Debugger or Tag Assistant to see which events are firing
- Type ` window.dataLayer ` into the browser console to view the entire dataLayer history
- Use GTM’s Preview mode to see tags fire in real time
- Verify purchase events in GA4 DebugView
- Check catalog matching in Meta’s Events Manager → Test Events or using the Meta Pixel Helper browser extension. The error message “No content IDs received” typically means that the `item_id` is missing or does not match the feed. See the section on getTrackingId() above
- If the theme’s data layer isn’t firing: check whether “Enable Tracking” is set in Webshop → Tracking. Without it, the data-layer.html block is inactive
Frequently Asked Questions
Do I have to choose between Shoporama’s built-in tracking and my own GTM setup?
No, you can easily run both at the same time. The built-in tracking module handles its own events independently of the theme, while your own GTM setup runs within the theme. Many stores use both to ensure the most robust tracking, especially in Consent Mode, where client-side events can be blocked.
What format should the `item_id` have in my events?
The same format as the ID in the store’s product feed: numeric product ID by default, product ID:variant value ID for variants, and the stock keeping unit (SKU) for stores with language or country-specific feeds. You don’t need to keep track of this yourself. Use $product->getTrackingId(), and the ID will always match the feed. See the details in Product IDs and Catalog Match.
Why is the match rate for my Meta catalog low, even though my events are firing?
Almost always because the event’s `item_id` isn’t identical to the feed’s ID. Common culprits include manually created IDs, variants in the wrong order, or using an SKU in one place and a numeric ID in another. Switch to ` getTrackingId()` everywhere, and verify using Test Events in Meta Events Manager.
Where should I place the GTM snippet if I don’t want to use HTML fields?
Directly in your theme’s templates/global.html or a custom header partial. However, we recommend HTML fields, as they survive theme updates and can be modified without deploying a new theme.
Can I override or disable the default events that Shoporama fires?
Yes, for the theme’s data layer. If you have a completely custom theme, do not include partials/datalayer.html. If you’re building on top of Delaware or Montana and only want to change individual events, create your own partial and include it instead of the default version. The built-in server-side tracking, on the other hand, is controlled from Webshop → Tracking and is not affected by the theme.
Which variables do I have access to in the dataLayer template?
The typical ones: $webshop, $product, $category, $order, $basket, $customer, $voucher, and $inc, which indicates which template is being rendered (e.g., basket.html, thanks.html).
How do I prevent the purchase event from being fired twice if the customer refreshes the receipt page?
Check $order->getTrackingCalled() before firing the event, and call $order->setTrackingCalled() once all your conversion snippets have been fired. The flag is stored on the order, so it persists even after a refresh. See the full example in the section on custom events above.
Do I need to account for Consent Mode in my own theme?
Yes. If the customer has not given consent, you must not fire tracking events that use cookies. Use a cookie consent manager (Cookiebot, CookieInformation, or your own solution) and make GTM tags dependent on the consent state. Shoporama’s server-side tracking automatically handles Consent Mode when you enable “Use Consent Mode” in the tracking module.
Can I send my own dataLayer events to platforms other than Google?
Yes. The dataLayer is platform-agnostic. You can set up tags in GTM for Meta CAPI, the TikTok Events API, or any platform that supports the dataLayer as a source. Alternatively, you can fire events directly to the platforms’ own SDKs (e.g., fbq() or ttq.track()) from your theme. Remember to use getTrackingId() as the product ID, regardless of the platform.
Need help with implementation? Email support@shoporama.dk.
Related articles
Implement Pricerunner tracking
Guide to implementing Pricerunner conversion tracking on your Shoporama online shop with proper Smarty code.
Set up Daisycon tracking on your webshop
Guide to implementing Daisycon conversion tracking on your Shoporama webshop with correct Smarty code.
SEO in Shoporama
Complete guide to the SEO features in Shoporama - from meta tags and sitemap to Google Shopping and AI Assistant.
Related features
dataLayer
dataLayer is the link between your online store and Google Tag Manager. Learn how e-commerce data—such as product views and purchases—is sent to...
Pixel swapping
Pixel swapping is a fraud technique where tracking pixels are manipulated to hijack conversions. Learn how it works and how to protect your online...
Server-side tracking
Server-side tracking collects data via your server instead of the browser. Learn why it provides better data and how it works in your online store.
Server-side tracking - accurate tracking without cookies
Server-side tracking for Google, Facebook, Pinterest, TikTok, LinkedIn and Microsoft Ads. Unaffected by adblockers. Included in Shoporama Pro.