HTML fields: Insert Cookiebot, GTM and other scripts in your online store
How to use Shoporama HTML fields to insert Cookiebot, Google Tag Manager, Facebook Pixel, chat widgets and other custom HTML/JavaScript on your online store.
Do you need to add Cookiebot, Google Tag Manager, Facebook Pixel, a chat widget, or a verification code from Google Search Console to your online store? You can do this using the HTML fields in Shoporama. Here, you can enter the code you received from a third party yourself and choose whether it should be automatically inserted into the page’s <head> or <body>.
How to Find HTML Fields
- In the left sidebar, you’ll find the Webshop section(marked with a gear icon)
- Click on HTML Fields
How to create an HTML field
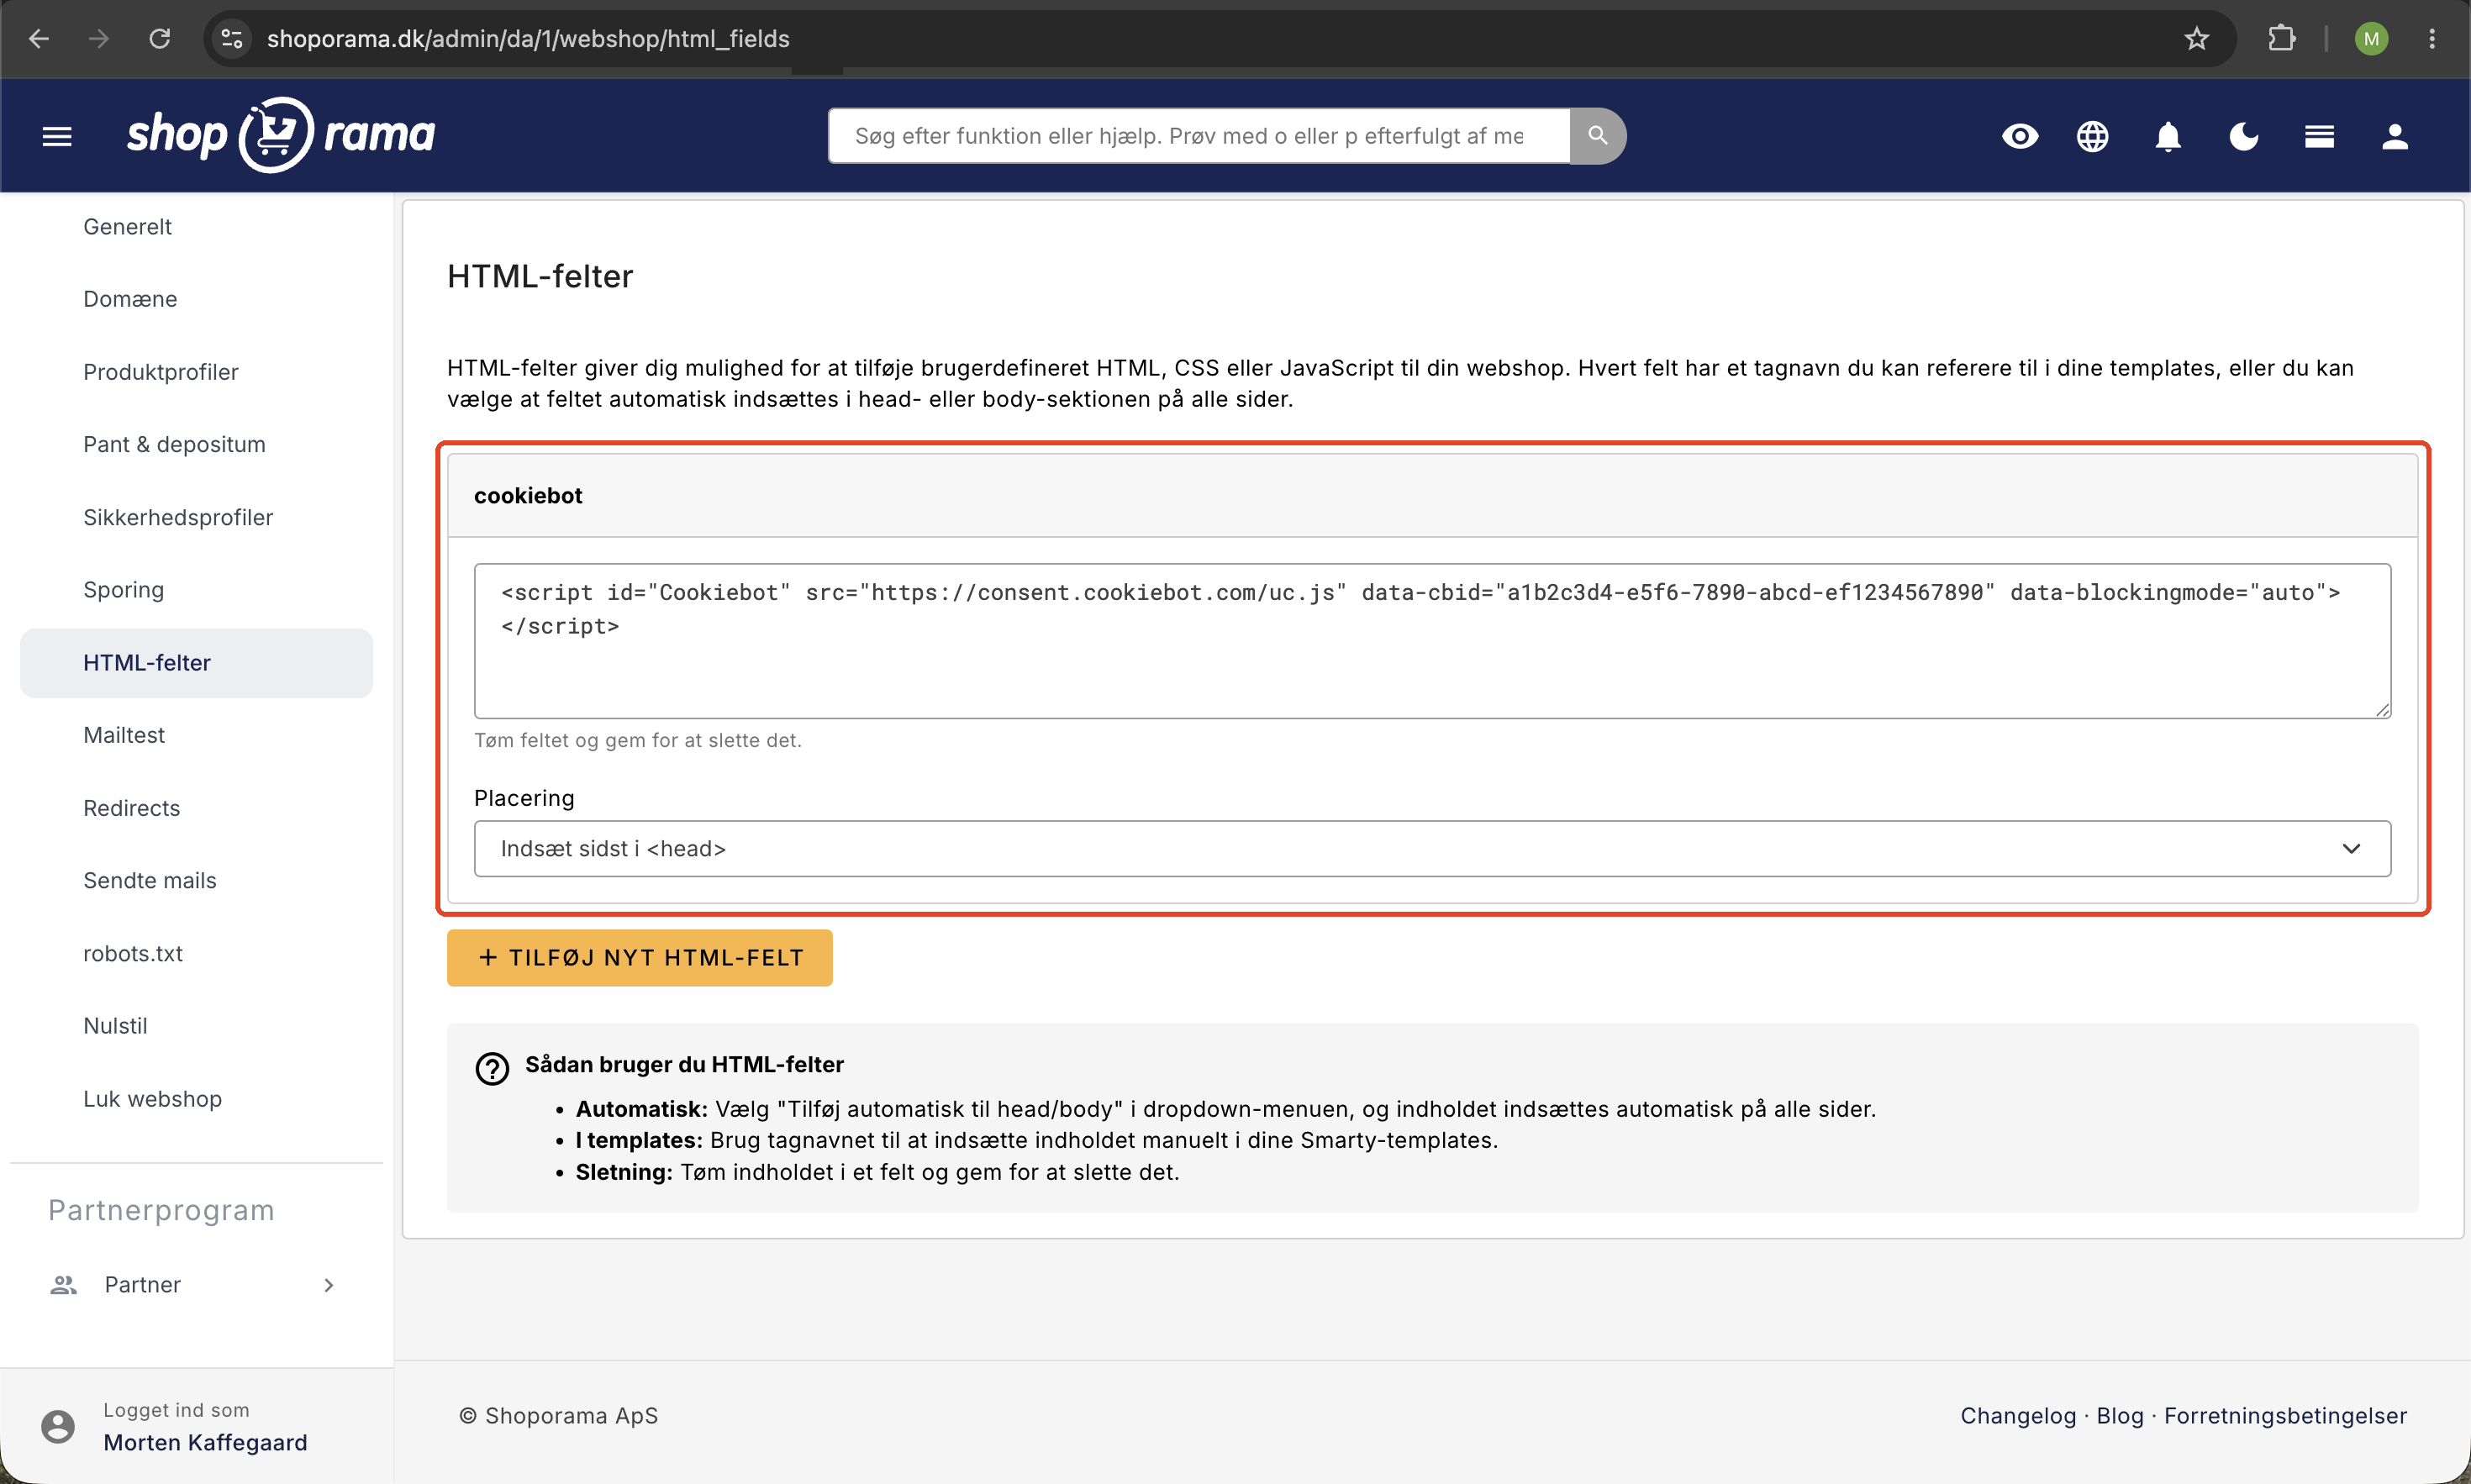
- Click “Add New HTML Field”
- Give the field a descriptive name without spaces, such as " cookiebot," " chat_widget," or " gsc_verify." The name is used as the tag name if you later want to manually call the field in a theme
- Paste your code into the text field
- Select Placement:
- Insert at the end of <head> for verification tags, Cookiebot, and scripts that need to load early
- Insert at the end of <head> for chat widgets and scripts that can wait
- Do not add automatically if you want to control the placement yourself in a custom theme
- Click Save
Tip: You can delete a field by clearing its contents and clicking Save.
Where does the code end up in the page’s HTML?
The selection under “Placement” determines exactly where your code ends up. This is important to know when a third party provides specific instructions on where their script should be placed:
- Insert at the end of <head> – the code is placed at the very end of the page’s <head>, i.e., after the theme’s own meta tags, page title, and stylesheets, but before Shoporama’s own tracking script and before code from apps. Therefore, a cookie banner from here will have time to load before tracking begins
- Insert at the end of <body> – the code is placed at the very bottom of the page, right after the theme’s own content and JavaScript. The page has finished rendering before your script starts running
- Do not add automatically – the code is not inserted on its own. It only appears when you call the field’s tag name in a theme
An HTML field you create under Webshop → HTML Fields will appear on all pages in the shop, including the cart, checkout, and receipt page. If you have multiple fields in the same location, they are inserted in alphabetical order by field name. If two scripts need to load in a specific order, you can control this through the naming convention, e.g., 1_cookiebot and 2_chat.
The content is inserted exactly as you’ve written it. Shoporama does not modify your code, and any Smarty code in the field will not be executed—the field contains plain HTML.
Typical uses
- Cookiebot – cookie consent banner. If you insert it into <head>, it can block other tracking scripts until the customer has given consent
- Google Search Console / Bing Webmaster Tools – verification meta tags that confirm you own the domain
- Hotjar, Microsoft Clarity, Mouseflow – heatmaps and session recordings
- Chat widgets – Tidio, Zendesk Chat, Intercom, Drift, and similar
- Custom HTML, CSS, or JavaScript – smart extra features in your own design
Example: verification codes for search engines and ad networks
Google Search Console, Bing Webmaster Tools, Pinterest, and Meta’s Business Manager all require proof that you own the domain before granting you access to data about your store. They provide a small meta tag that must be placed on your homepage. A meta tag only works if it’s placed within the page’s `<head>` section, so the placement should always be “Insert at the end of `<head>`.”
Create a single field—for example, “Verification”—and collect all your verification codes in it. A field can contain multiple lines:
<meta name="google-site-verification" content="YOUR-CODE-FROM-SEARCH-CONSOLE">
<meta name="msvalidate.01" content="YOUR-CODE-FROM-BING">
<meta name="p:domain_verify" content="YOUR-CODE-FROM-PINTEREST">
<meta name="facebook-domain-verification" content="YOUR-CODE-FROM-META">
Replace the values in content="..." with the ones you received from each provider, and include only the lines you actually need. If the provider offers multiple methods, choose the one labeled HTML tag or meta tag. This way, you won’t have to upload a file to the domain.
Do not use the HTML block in Page Designer for verification tags. It’s called “Custom Code” in Montana, and it only inserts code where the block is located on the page—that is, within the page’s content. The meta tag must be placed in the page’s `<head>` section, so search engines cannot find it if it’s inserted using a block. It must be entered into an HTML field here on the page.
Do not delete the field afterward. Search engines and ad networks check the code periodically. If it disappears, you’ll lose access to the data and will have to start the verification process over.
A Google Ads conversion ID, a GA4 Measurement ID, or a Facebook Pixel ID, on the other hand, should not be entered into an HTML field. You enter these under Webshop → Tracking, where Shoporama automatically links them to e-commerce events. See the section on HTML fields or Tracking further down.
Example: Chat widget and live chat
Tidio, Zendesk, Intercom, Crisp, Smartsupp, and most other chat tools provide you with a ready-made code snippet that you simply need to copy and paste. A chat bubble shouldn’t be the first thing the customer sees, and it’s fine if it loads after the rest of the page. That’s why it belongs at the bottom:
- Click “Add New HTML Field” and name the field, for example, “chat_widget”
- Paste the entire code snippet from the chat provider, including <script> and </script>
- Set “Position” to “Insert at the end of <body>”
- Click “Save”
The code snippet typically looks like this, where the ID is your account with the provider:
<script src="https://widget.dit-chatvaerktoej.dk/DIN-KONTO-ID.js" async></script>Heatmaps and session recordings from providers such as Hotjar, Microsoft Clarity, or Mouseflow are set up the same way, but they need to load early to capture the entire visit. Always follow the provider’s own instructions: if their guide says “head,” you should select “Insert at the end of <head>.”
If you use a cookie banner, remember that chat, heatmaps, and similar tools often set cookies. They must therefore be configured according to the cookie banner’s instructions so that they only start running once the customer has given consent. Read more in our guide to cookie consent and Consent Mode.
Example: Custom CSS, JavaScript, and widgets
A small design tweak
If you just need to adjust a single detail without opening the theme, you can place your CSS in an HTML field with the location “Insert at the end of <head>.” Because the field is inserted after the theme’s stylesheets, your rules will generally take precedence over the theme’s own:
<style>
/* Replace .your-class with the class you find in the browser’s inspector */
.your-class { background: #f5f5f5; }
</style>
Conversely, if you have a small piece of JavaScript that needs to run once the page has loaded, place it in a field with the location “Insert at the end of <body>.” Reserve this for minor adjustments: major design changes belong in the theme, where they’re easier to manage.
A widget that should appear in a specific location
Some widgets, such as review displays and price calculators, consist of two parts: a script that loads the tool and a piece of HTML that determines where on the page the widget is rendered. Split them into two fields:
- Place the script itself in a field with the location set to “Insert at the end of <head> ” or “Insert at the end of <body>,” depending on the provider’s recommendation
- Place the widget code in a field with the location “Do not add automatically” and specify the tag name as the location in the theme where the widget should appear
Further down in the section “Use HTML fields manually in a theme,” you can see how to specify the tag name.
HTML Fields or Tracking—Which Should I Use?
Shoporama also has a page under “Webshop → Tracking” with pre-built fields for the most commonly used tools:
- Microsoft Ads (Bing)
- Google Analytics 4 (Measurement ID)
- Google Ads Conversion ID
- Pinterest, Snapchat, TikTok, and LinkedIn
- Facebook Pixel ID and Conversion API
If you only have an ID for one of these tools, enter it under Tracking. Shoporama automatically handles the correct setup and e-commerce events. Only use HTML fields if you have a code snippet that doesn’t fit into one of the predefined fields, such as the full Cookiebot script or a verification tag.
Built-in server-side tracking: Shoporama has its own server-side tracking solution (sGTM via Stape). You don’t need to set up a Tag Manager yourself—simply enable server-side tracking under Tracking, enter your IDs for GA4, Facebook, and Google Ads, and Shoporama will send e-commerce events server-side. You’ll also receive cookie-less signals when consent is missing. Optional add-on starting at 89 DKK/month, excluding tax.
Your Own GTM: If you prefer to manage everything yourself in your own Google Tag Manager container, you can insert the GTM snippet as an HTML field (placed at the end of <head>) and manage Cookiebot, Pixel, Hotjar, etc., within GTM. The two solutions should not run simultaneously.
Use HTML fields manually in a theme
If you have a custom theme and want to place an HTML field in a specific location in your template, set the field to “Do not add automatically” and call the tag name in your Smarty template:
<{$webshop->getHtmlField('cookiebot')}>The content is rendered raw, so `<script>` tags work as expected. Remember to turn off auto-insertion; otherwise, the field will appear twice.
HTML fields outside the webshop
The HTML field you create under “Webshop” applies to the entire webshop. If you only want a script on specific products, categories, pages, blog posts, or landing pages, you can create HTML fields directly on these objects via their respective edit pages. This is useful, for example, for schema markup or a campaign pixel that should only be triggered on a single landing page.
Important Information About Security and Speed
- Only insert code from sources you trust. Malicious or faulty JavaScript can affect the entire store, including the checkout
- Every additional script slows down page loading. Use ` async ` or `defer` if the third-party provider recommends it
- Always test your store afterward—for example, by right-clicking in the browser and selecting “View Source” to verify that the code has been loaded
Frequently Asked Questions
Where can I find the HTML fields in the admin panel?
Go to Webshop → HTML Fields. If the menu item isn’t visible, you may not have the necessary permissions—ask the person who set up your account.
Can I break my store by messing with HTML fields?
You won’t affect your products, orders, or customers. At worst, an incorrect piece of code might make pages look strange or affect performance. Just clear the field and save, and it’ll be gone.
I added the meta tag using a block in Page Designer, but Google can’t find it. Why?
Because the HTML block in Page Designer (called “Custom Code” in Montana) places the code within the page’s content, not in the page’s <head>. A verification meta tag only works within <head>. Remove the block again, and instead place the tag in an HTML field under Web Store → HTML Fields with the placement “Insert at the end of <head>.” Read more about Page Designer.
How do I test whether my HTML field is working?
Open the store in an incognito browser tab, right-click, and select “View Source.” Look up a section of your code (e.g., a comment or a tag ID). For tracking scripts, you can install browser extensions such as Tag Assistant (GTM/GA4) or Pixel Helper (Facebook).
How do I delete an HTML field I no longer use?
Clear all content from the field and click Save. The field will disappear. First, check that the tag name isn’t being called manually somewhere in a custom theme; otherwise, you might end up with a blank space or an error.
What’s the difference between Webshop → Tracking and HTML fields?
Tracking provides pre-built fields for the most commonly used tools (GA4, Facebook Pixel, Google Ads, Microsoft Ads, etc.), where you simply enter your ID. In the same place, you can enable Shoporama’s built-in server-side tracking, so you don’t have to maintain a Tag Manager container yourself. HTML fields are the flexible solution for everything else—such as Cookiebot, verification codes, and chat widgets. If you have the option, use “Tracking”—Shoporama will set up the official integrations correctly.
Should Cookiebot be placed in <head> or <body>?
Cookiebot must be placed in <head> so that it can block tracking scripts until the customer has given consent. Therefore, select “Insert at the end of <head>” in the HTML field. Then follow Cookiebot’s own instructions to mark other scripts with consent attributes.
Do HTML fields affect page speed?
Yes—every extra script adds to load time and can affect Core Web Vitals. Keep the number to a minimum, use `async` or `defer` where possible, and consider consolidating multiple scripts in Google Tag Manager so they load in a controlled manner from a single location.
Do I need to set this up again in each of my online stores?
Yes—HTML fields are specific to each online store. If you want to keep things consistent across multiple stores, the easiest way is to put everything in a single GTM container and insert the GTM snippet as an HTML field in each store.
I’ve saved my HTML field, but the code isn’t showing up on the store
First, check that the Placement setting isn’t set to “Don’t add automatically” —otherwise, the code will only be displayed if it’s called from the theme. If the placement is correct, it’s usually because the pages on a live store are cached in an HTML cache for up to four hours. You’ll always see the latest version if you’re logged into the admin panel in the same browser, have something in your cart, or add a random parameter to the URL, such as ?test=1. The cache will refresh automatically within four hours at the latest, and all visitors will see the code.
Should my chat widget go in the <head> or <body>?
The `body`. A chat bubble doesn’t need to be ready until the page has finished loading, and a script in the `<head> ` section delays the display of content. Therefore, select “Insert at the end of <body>.” The exceptions are tools that specifically require placement in the <head>: cookie banners that need to block other scripts in time, and heatmap tools that need to track the entire visit.
Can I place a script on just one campaign page or one product?
Yes. The same HTML fields are available on individual products, categories, pages, blog posts, and landing pages. A field located on, for example, a landing page is inserted only when that specific page is displayed, and it is placed after the field that applies to the entire store. This is useful if an advertising partner requires a pixel on a single campaign page without it triggering on the rest of the store.
The provider is asking me to upload an HTML file to my domain. What should I do?
Choose a different method. Almost all search engines and ad networks also offer verification via a meta tag, and this is the method that works with HTML fields. Simply copy the tag into a field with the location “Insert at the end of <head> ” and click Save. If you can only use the file method, please email support@shoporama.dk, and we’ll find a solution.
If you have any questions, feel free to email us at support@shoporama.dk.
Related articles
Server-side tracking in Shoporama
A Complete Guide to Server-Side Tracking in Shoporama. Better data quality, fewer ad-blocker losses, product IDs that match your feed, and...
Cookie consent and Consent Mode v2
How to set up Shoporama's free cookie consent app: categories, automatic blocking, consent revocation, and Google Consent Mode v2.
GDPR and Cookie Policies for Your Online Store
Overview of the GDPR and cookie regulations for online stores: consent before tracking, documentation, and cookie policies, and how Shoporama meets...
Data Processor Agreement
Guide to approving the data processing agreement with Shoporama under the GDPR.
Page designer
Lær hvordan du bruger Sidedesigner i Shoporama til at opbygge sidelayouts med blokke som hero-sektioner, produktlister, bannere og meget mere, helt...
Related features
dataLayer
dataLayer is the link between your online store and Google Tag Manager. Learn how e-commerce data—such as product views and purchases—is sent to...
Exit intent popup
An exit intent popup appears when a visitor is about to leave your online store. Learn about triggers, content, Shoporama's popup system and best...
GTM - Google Tag Manager
Google Tag Manager manages tracking codes without code changes. Read about GTM, tags, triggers and e-commerce tracking for webshops.
Slide-in
A slide-in slides in from the edge of the screen with an offer or newsletter sign-up. Learn about types, triggers, Shoporama's slide-in system and...
Sticky bar
A sticky bar is a fixed bar in your webshop with important messages such as free shipping and promotions. Learn about uses, impact and best practices.
Consent Mode
Consent Mode controls Google tags based on the user's cookie consent. Learn how it works, why v2 is required and how to set it up.
Server-Side GTM (sGTM)
Server-side GTM is a tag container on a server that receives events from your online store via your own domain. Learn about the difference between...
Cookie Consent - free and GDPR friendly
Free cookie consent included in Shoporama. Google Consent Mode, categorized cookies, automatic blocking and consent logging. GDPR ready.
Server-side tracking - accurate tracking without cookies
Server-side tracking for Google, Facebook, Pinterest, TikTok, LinkedIn and Microsoft Ads. Unaffected by adblockers. Included in Shoporama Pro.
Point of Sale, Email, and Integrations in Delaware
All fields in Delaware's theme settings for the checkout, emails, terms of service, integrations, and error pages explained with tags, examples,...