Suppliers in Shoporama
Guide to suppliers in Shoporama: create and manage suppliers, associate them with products, use the order list, statistics and dropshipping feature.
Suppliers in Shoporama allow you to keep track of which suppliers provide your products. You can associate a supplier with each product and use this information for order lists, statistics, and dropshipping.
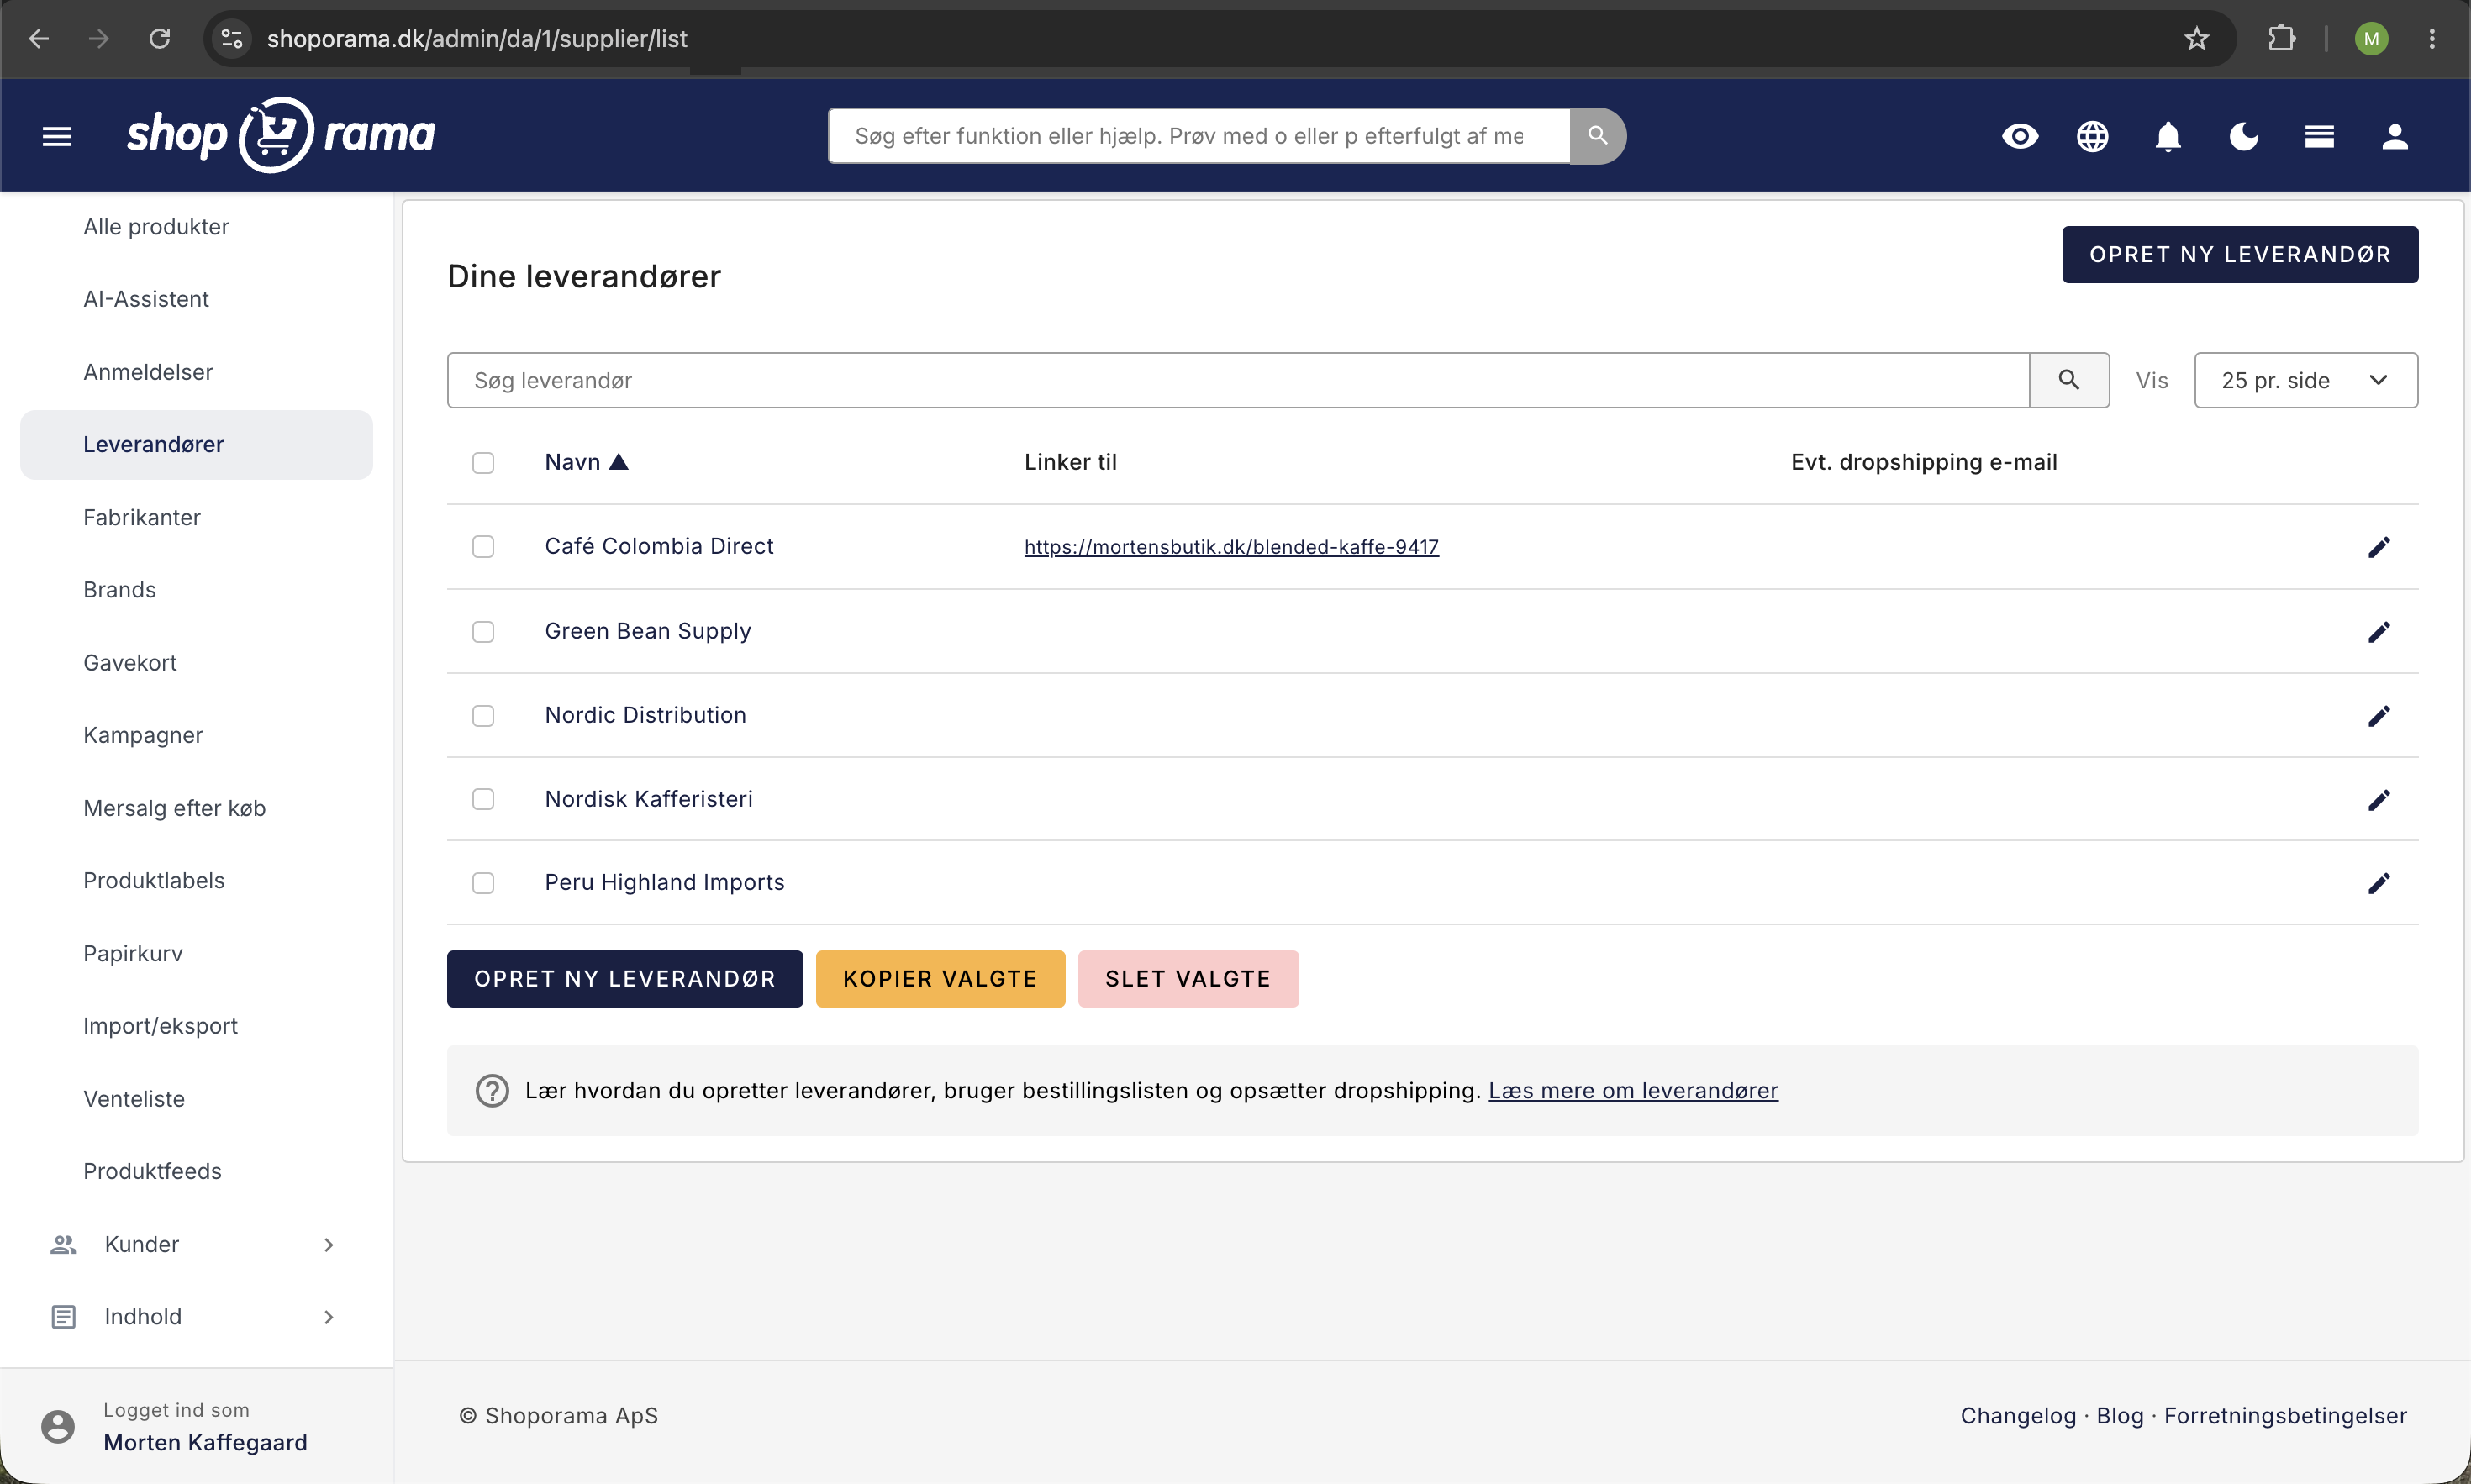
How to Use the Supplier Overview
The overview under Products → Suppliers is the starting point for all supplier-related work. The table contains:
- Name: Click the name to open the supplier. The pencil icon on the far right does exactly the same thing.
- Links to: the address in your online store that the supplier links to. This field is only populated if you’ve selected an option under “Link to” within the supplier’s details. The address opens in a new tab so you can quickly see what customers see.
- Optional dropshipping email: the address that receives the order email for dropshipping. If the field is left blank, nothing is sent.
- The checkbox on the far left: used for the actions at the bottom of the page.
The search bar at the top searches the suppliers’ names, and you only need to type part of the name. If you type “coffee,” you’ll also find “Nordisk Kafferisteri.” Clicking the X in the search bar resets the search.
If you click the “Name” column header, the list alternates between A to Z and Z to A, and the small arrow next to the header indicates the sort order. On the right, you can choose whether to display 10, 25, 50, or 100 suppliers per page, and this selection is saved for the next time you open the page. If there are multiple pages, you can navigate between them using the arrows and the page selector next to them.
At the bottom of the list are two actions that apply to the selected suppliers. “Copy Selected” creates a duplicate in the same store with “(copy)” after the name, and both the “Link to” and dropshipping email are carried over to the duplicate. "Delete Selected " first asks if you’re sure and displays the names of the suppliers that will be deleted. If you want to select all suppliers on the page at once, you can use the checkbox in the table header or press Cmd + A (Ctrl + A on Windows).
Note that the overview does not show how many products each supplier has. You’ll find that number in the product overview, as described below.
Create a supplier
- Go to Products → Suppliers in the left-hand menu.
- Click Create New Supplier.
- Enter the supplier’s name.
- Click Create Supplier.
You can also create suppliers directly from the product edit page if you haven't created them beforehand.
Create a supplier while editing a product
If you realize partway through that a supplier is missing, you don’t need to leave the product:
- Open the product under Products → All Products.
- Find the Supplier field in the General tab.
- Click Create New right below the field.
- Enter the supplier’s name in the window and click Create.
The supplier is created immediately and is selected for the product. Next to it is the Manage link, which opens the supplier overview in a new tab if you’d rather continue working there.
The shortcut only sets the name. If the supplier also needs a “Link to” page or a dropshipping email, fill in those fields later on the supplier’s own page.
Edit a Supplier
Click the edit icon next to a supplier in the list. Here you can change the following:
- Name — The supplier’s name, which appears on products and in statistics.
- Link to — Link the supplier to a category or landing page in your store. This gives the supplier a page on your online store that customers can visit to view all products from that supplier.
- Dropshipping email — If the supplier handles shipping directly (dropshipping), you can enter an email address here. When the order confirmation is sent, the supplier receives their own separate email, which contains only the items from that specific supplier, not the entire order. In other words, it is not a copy of the customer’s order confirmation. The subject line is the same as on the order confirmation, but with the store’s name in square brackets at the beginning, so you can distinguish the dropshipping emails from one another. Note that your theme must include the invoice_dropshipping.html template for this feature to work.
How “Link to” Works in Practice
"Link to" is a drop-down list with three sections. At the top is "None," followed by all your categories under the " Categories" heading, and finally all your landing pages under "Landing Pages. " You can select only one option, not multiple.
You can only select categories and landing pages from the online store you’re currently in. If the value points to a different location, the field is saved as empty. If you select “None,” the field is cleared, and the “Links to” column in the overview is empty again.
The most obvious setup is to combine the field with a landing page. Create a landing page, add the “Supplier” criterion, and select the supplier. You can select multiple suppliers on the same page if, for example, you want to gather all your organic suppliers in one place. Finally, set the supplier’s “Link to” field to that page. The page will then automatically gather all products from that supplier, including any you add later. See How to Create the Most Common Landing Pages.
Only the “Name” field needs to be filled out for a supplier. The “Link to” field and the dropshipping email can safely be left blank. At the bottom of the page, you’ll find “Save” and “Save and Edit, ” which both save your changes and let you stay on the supplier’s page, as well as “Delete,” which asks for confirmation first.
Assign a supplier to products
When editing a product, you can select a supplier in the product form. Each product can have one supplier. The supplier can be displayed as a column in the product overview in the admin panel, so you can quickly see who supplies what.
Tip: You can also assign a supplier to multiple products at once via bulk editing or CSV import.
Assign a supplier to multiple products at once
If you need to organize an entire product range, it’s a waste of time to open the products one at a time:
- Go to Products → All Products, and search for or filter the right products.
- Check the boxes next to the products you want to edit. Cmd + A (Ctrl + A on Windows) selects all items on the page.
- Click the Bulk Edit button in the bar at the bottom of the page to open the Bulk Edit window.
- Find “Set supplier to” and select the supplier from the drop-down list.
- Click " Execute Now."
The same drop-down list includes the option “None,” so you can also remove the supplier from the selected products in a single step.
If you’re importing products from a spreadsheet, the column is labeled “ supplier, ” and you enter the supplier’s name there. If the supplier doesn’t already exist, it will be created automatically. This is the fastest way if you need to assign hundreds of products to suppliers from scratch.
Order List
One of the biggest advantages of using suppliers is the order list. It shows you which products are running low in stock, and you can filter it by supplier. This makes it easy to place reorders with the right supplier. Read more in Order List and Inventory Management.
Suppliers in Statistics
If you’ve linked suppliers to your products, you can use Shoporama’s analytics tools to analyze sales by supplier. This gives you insight into which suppliers are selling best and what percentage of your revenue each supplier accounts for. See Statistics and Analysis in Shoporama for more.
What You Can View by Supplier Afterward
Once suppliers are linked to products, they appear as filters and columns in several places in the admin panel. This is where the work pays off.
In the product overview
In the filter row at the top, you’ll find the “Suppliers” button. It opens a window where you can check multiple suppliers at once, and there’s a search field in the window if the list is long. The number on the button shows how many you’ve selected. Once the filter is applied, the number of products is displayed above the table, so this is also how you count products per supplier.
If you want to include the supplier as a fixed column, click the gear icon at the far right of the table’s header row to open “Customize View,” toggle the switch next to “Supplier” to “On,” and click “Save.” You can sort the column by clicking on the header, and this setting applies to all users of the online store.
In the order overview
The order overview has the same type of filter button, here simply labeled “Supplier.” If you select one or more suppliers, only the orders containing products from those suppliers will be displayed. This is invaluable when a supplier reports a shipping error or a recall, and you need to identify exactly which customers are affected.
Under Inventory
- Inventory → Reorder: Select the supplier from the drop-down list, and you’ll see only the items you need to reorder from that specific supplier. The supplier is also listed as a column in the table.
- Inventory → Cost Prices: Filter by supplier to find the items where the cost price is missing or appears incorrect before calculating your markup.
- Inventory → Overview: “Supplier” is one of the filters you can expand when you want to view inventory levels for one product line at a time.
Under Statistics
Statistics → Suppliers shows revenue excluding VAT, number of paid orders, number of units sold, share of total revenue, and average order value for each supplier over a period you select. The figures can be downloaded as a CSV file. The percentage is particularly worth keeping an eye on: if a very large portion of your revenue comes from a single supplier, you’ll be in a vulnerable position if the partnership ends or prices rise. See Supplier Statistics in Shoporama for a breakdown of each column.
Upload Supplier Delivery Notes
When you receive goods from a supplier, you can upload the delivery note as a PDF or image, and Shoporama automatically extracts item numbers and quantities using AI. This speeds up inventory updates and reduces errors. Read more in Upload Supplier Delivery Notes for Inventory Updates.
Dropshipping
Dropshipping is a business model where the supplier ships the item directly to the customer. Here’s how it works in Shoporama:
- Create the supplier and specify a dropshipping email address.
- Link the supplier to the relevant products.
- When a customer orders a product from this supplier, an order email is automatically sent to the supplier’s email address.
The email uses the invoice_dropshipping.html template from your theme. Learn more about email templates in Email Templates in Your Theme.
Copy suppliers to other stores
If you have multiple online stores on Shoporama, you can copy suppliers between them. Select the desired suppliers from the list, scroll down to the “Copy Selected to Another Web Store” card, check the box next to the store(s) you want to copy them to, and click the “Copy Selected” button at the bottom of the card. Please note that there are two buttons labeled “Copy Selected” on the page: the one in the button row just below the table creates a duplicate in the shop you’re currently in, while the one inside the card is the one that copies to the checked online stores. The map is only displayed if you have more than one online store.
Delete suppliers
You can delete suppliers either from the edit page (click “Delete”) or by selecting them in the list and clicking “Delete Selected.” The products are not affected: they are neither deleted nor taken offline. However, the association is not automatically removed. The supplier will disappear from the drop-down list on the product page, but the name may still appear in the “Supplier” column of the product overview until the product is saved again. If you want to avoid this, set the supplier to “None” on the products using bulk editing before deleting the supplier itself.
Tips for Effective Supplier Management
- Always assign a supplier to products —this makes the order list and statistics far more valuable.
- Enter cost prices — Specify a cost price for your products so you can see the profit margin per supplier.
- Keep the supplier list up to date — Delete suppliers you no longer work with so the list is easy to navigate.
- Link suppliers to pages — Use the “Link to” feature to give customers a dedicated supplier page.
For developers: the supplier in the theme and API
This section is only relevant if you’re working directly in the theme files or retrieving data via the API. As a store owner, you can safely skip this section.
- $product->getSupplierName() returns the supplier’s name as plain text, or an empty string if the product doesn’t have a supplier.
- $product->getSupplier() returns the supplier itself (or nothing if the product doesn’t have one), and it has the methods getName(), getSupplierId(), and getRemoteUrl().
- getRemoteUrl() returns the address from the “Link to” field, or false if the field is empty. Therefore, always wrap the call in a check before using it to create a link.
Using the REST API, you can retrieve, create, and edit suppliers. If you need to assign a supplier to a product, you can either send the supplier’s ID in `supplier_id` or the name in `supplier_name`. If you use the name, the supplier is automatically created if it does not already exist, just as with a CSV import.
Frequently Asked Questions
Can a product have multiple suppliers?
No. A product can only have one supplier at a time. If you purchase the same item from two suppliers, you must choose the one you use most often, or create the item as two separate products if you want to distinguish between them when reordering and in your statistics.
What happens to my products if I accidentally delete a supplier?
They will neither be deleted nor taken offline, but the association will not be automatically removed, as described under “Delete Suppliers” above. If you recreate the supplier with the same name, it will be treated as a new supplier in the system, and you’ll need to reassign it to the products. The quickest way to do this is via bulk editing.
How do I see how many products I have for each supplier?
Go to Products → All Products, click the “Suppliers” filter button, and select the supplier. The number is displayed above the table as “Showing X of Y products.” The supplier overview itself does not show the number.
Does the dropshipping email come along when I copy a supplier to another online store?
No. When you copy to another online store, only the name is included, and you must set up the “Link to” and dropshipping email yourself in the new store. However, if you copy within the same store using “Copy Selected,” the duplicate will include both fields, and the name will have “(copy)” appended to it.
Can I see how much I’ve spent with each supplier?
The supplier statistics show your revenue excluding VAT—that is, what you sold the items for, not what you paid for them. If you want to view the purchasing page, the products must have cost prices. Then you can use Inventory → Cost Prices to find the items missing a cost price, and Cost of Goods Sold and Profit Margin to calculate the contribution margin.
I just assigned suppliers to all products. Do they also count for old orders?
Yes. The statistics are based on the suppliers currently associated with the products, not on the situation as it was on the day the order was placed. So you’ll see the history as soon as you’ve cleaned up the associations. If the table is still empty, it’s usually due to the time period: by default, the page shows the current year and counts only paid orders. Try the shortcut “Last 12 Months” or “Last Year.”
Can my customers see who the supplier is?
That depends on your theme. The supplier is intended as internal information, but Delaware and DelawareDK display it as a line under “Product Details” on the product page if you’ve enabled the “Product Attributes” tab under Design → Theme Settings. The field is called “Enable Product Attributes Tab ” in DelawareDK and “Enable Product Attributes Tab” in the English version of Delaware. If you don’t want to display it, enter “supplier” in the “Show Product Attributes” field in the same location, and the line will be omitted. In Delaware, that field is called “Show Product Attributes.” The older Smarty 2 theme “Massachusetts,” including “Massachusetts v2,” displays the supplier directly on the product page as the word “from” followed by the supplier’s name, right below the item number, and there is no theme setting to disable that line. In addition, several themes use the supplier name as a fallback for the “brand” field in the product page’s structured data, which Google reads. If you want to deliberately highlight the supplier externally, the easiest solution is to create a landing page with the supplier as a filter and point the supplier’s “Link to” field there.
If you have any questions about supplier management, please feel free to contact us at support@shoporama.dk.
Related articles
Order list and inventory management
Learn how to use the Shoporama order list to keep track of inventory, generate shopping lists and receive goods efficiently.
Upload supplier packing slips for inventory update
Upload delivery notes from your suppliers as a PDF or image and let AI automatically extract item numbers and quantities for stock updates.
Statistics by Supplier: Who Are You Making Money From?
See what percentage of your revenue each supplier accounts for, what’s included in the figures, and how to calculate the contribution margin per...
Cost Prices and Inventory Value
Fill in any missing cost prices to get a more accurate inventory value and profit margin. Guide to the Cost Prices page.
Edit product
Guide to the Product Edit Page in Shoporama: the top section with "Edit," Inventory, and Sales Statistics; how to customize the page with tabs and...
Related features
Dropshipping
Dropshipping is a business model where you sell products without having them in stock. Learn about the pros, cons and how to get started with...
Stock integrations
Stock records, stock locations, order list, stock value and automatic notifications. Avoid overselling with Shoporama inventory management.
Cost Prices
If you don't have cost prices, your inventory value and profit margin will be incorrect. See why cost prices are worth their weight in gold for...