Unsubscriptions: How Shoporama Handles Unsubscriptions
The Unsubscribes page shows who has unsubscribed from your newsletter, when, and which campaign they received most recently. See how the unsubscribe link works and what you should do next.
Sooner or later, someone will unsubscribe from your newsletter. That’s better than the alternative: a recipient who doesn’t want to hear from you won’t open the email anyway, but might mark it as spam first. And spam reports affect all your other subscribers because they lower your sender’s reputation in the eyes of email providers.
That’s why Shoporama’s newsletter module has a dedicated page that shows exactly who has unsubscribed, when, and which newsletter they received most recently. It’s called “Unsubscriptions” and can be found in the menu under “Newsletter,” under the “Unsubscriptions” item.
Here’s what the page looks like
At the top, an information box explains the principle: “Unsubscribed recipients are added to a block list so they aren’t accidentally subscribed or contacted again.” A block list simply means that the email address is marked with a flag that says “no more newsletters to this person.” The box also explains the three actions listed on the far right of each row. We’ll go over those further down.
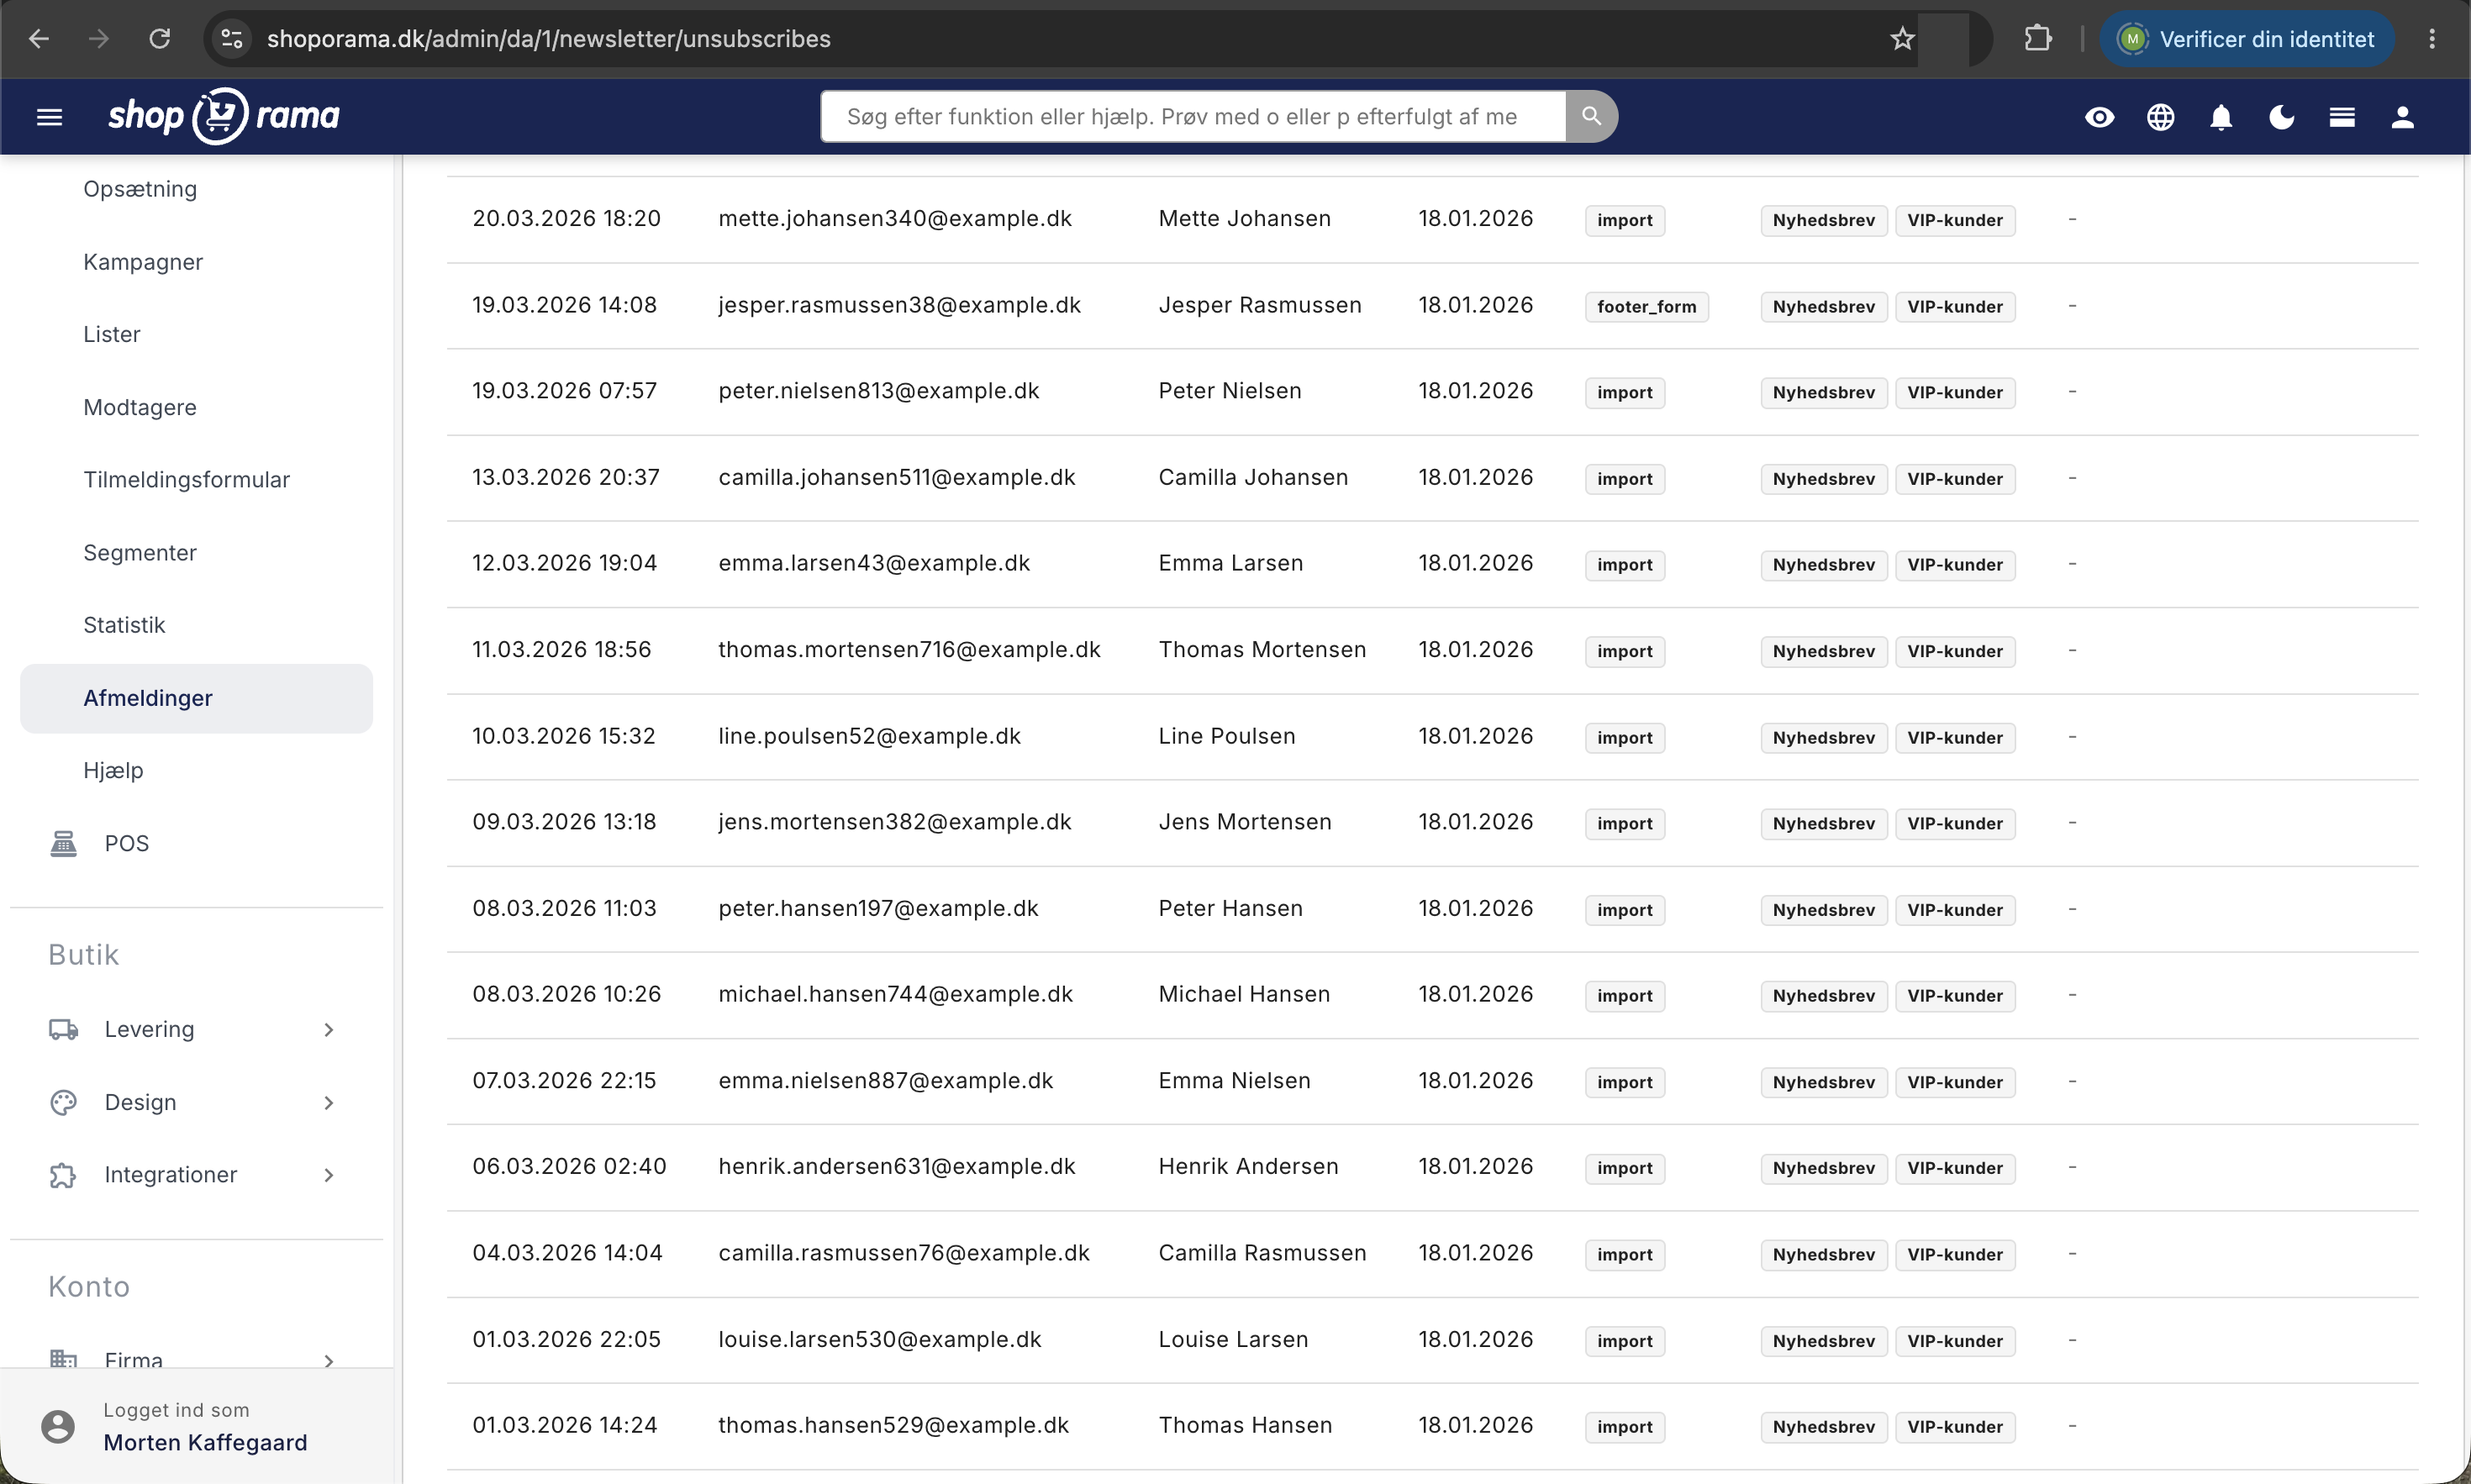
Below the box, you can select a time period with a single click: All, Today, This Week, This Month, Last 7 Days, or Last 30 Days. If you want to view a different time period, use the From and To fields and the Filter button. If you’ve set a filter, Reset appears next to it. On the far right is the “Total” counter showing the number of unsubscriptions in the displayed period, and both there and below the table, you can select 10, 25, 50, 100, or 200 rows per page. If there is nothing to display, it will say “No cancellations recorded yet” or “No cancellations in the selected period.”
The nine columns
- Unsubscribed: date and time. The most recent entry appears at the top.
- Email: the address from which the unsubscribe was sent. If the person is anonymous, a dash appears.
- Name: the name, if provided.
- Signed Up: When the person was added to the list. Combined with the unsubscribe date, this shows how long you were in contact.
- Source: where the sign-up came from, typically signup_form (the field in the store), popup (the sign-up form), purchase (checked during a purchase), import, or manual. If the person was imported from another system, that system’s name appears instead—for example, Klaviyo.
- Lists: which recipient lists the person was on.
- Last campaign received: the last newsletter the person received before unsubscribing, with the date and time listed below. The name links to the campaign’s statistics.
- Status: Unsubscribed, Never Again, or Anonymized, depending on what you’ve done with the row.
- Actions: the “Never Again,” “Anonymize,” and “Delete” buttons, which are described below.
The “Most Recent Campaign Received” column is the one you’ll learn the most from. If the same campaign appears next to a string of unsubscribes, that’s the email you need to take a critical look at. Was the subject line misleading, was there too much sales pitch and too little content, or was it sent too soon after the previous one?
Never Again, Anonymize, and Delete
On the far right of each row, you’ll find three buttons. They do different things, so it’s worth choosing the right one:
- Never Again: The person cannot be subscribed again, not even by themselves on your store. The information remains, and you can undo this using the “Remove Block” button.
- Anonymize: The name and email address are permanently deleted, but the row remains as a block without personal data. Therefore, you won’t be able to add the person again, either through an import or manually. If she signs up again on your store, it constitutes new consent. This cannot be undone.
- Delete: Completely removes the row. The block is removed along with it, so the person can be re-subscribed during the next import. Use this for test rows and cleanup.
The unsubscribe link in the newsletter
You don’t need to remember to include an unsubscribe link yourself. Shoporama automatically adds the “Unsubscribe from newsletter” link at the bottom of all newsletters generated by the module. If you want to mention it in the middle of the text, insert the placeholder [unsubscribe_url] into the content, and it will be replaced by the recipient’s personal unsubscribe address when the newsletter is sent.
The link is personalized and signed. Therefore, the recipient doesn’t need to remember which email address she used to subscribe, and a link from your store cannot be used to unsubscribe from another store. Shoporama tracks clicks in your newsletters, but the unsubscribe link is intentionally excluded from click tracking so that an unsubscribe doesn’t skew your click-through rate.
What the customer experiences
If the recipient clicks the link, the unsubscribe takes effect immediately. No extra confirmation, no login, and no questionnaires along the way. The person lands on a page in your store that confirms the action. The text comes from your theme, so it varies slightly: Montana displays “You have been unsubscribed” and “You will no longer receive newsletters from us,” while Alaska2, California, Washington, and DelawareDK display “You are unsubscribed” and “You will no longer receive newsletters from us.” Everywhere, there’s a link back to the home page. If your theme doesn’t have its own unsubscribe page, a simple default page appears with the heading “Unsubscribe from newsletter” and the text “You are now unsubscribed from our newsletter.” If the user clicks again, the same confirmation appears; if the link has been cut off by an email client, the message “Invalid link” is displayed.
If someone goes directly to the unsubscribe page without a personalized link, they’ll be asked to enter their email address and click “Unsubscribe.” The online store may first ask them to enter some characters from an image as a spam protection measure. After that, the address is unsubscribed, even if the person was never subscribed to the newsletter in the first place. The address is then added to the list of unsubscribed addresses and will not receive newsletters for buyers of a specific product either. The page displays the same confirmation message regardless of whether the address already existed. This is also how test emails work, since a test email has no actual recipient.
What Happens Behind the Scenes
When the unsubscribe is registered, the recipient’s status is set to “unsubscribed,” and the time is saved. From that moment on, the following applies:
- The person disappears from the Recipients overview, which shows only active recipients.
- The person is not included in new campaigns, regardless of whether you select recipient lists, segments, or buyers of specific products. All three methods skip unsubscribed addresses.
- The record remains with the address, name, source, sign-up date, and unsubscribe time, so the process can be documented.
- The unsubscribe is counted in the statistics for the last campaign the person received.
The unsubscribe applies only to the newsletter. Order confirmations and other emails regarding a specific transaction are not considered marketing and will continue to be sent. Automatic emails sent after a purchase and regarding product reviews have their own unsubscribe link and their own block list, which are not displayed here; see “Unsubscribe Links in Automatic Emails.”
The Unsubscribe Rate in the Statistics
On each campaign’s statistics page, the “Unsubscribed” field displays a number and a percentage, and the same figure appears in the “Unsubscribed” column on the overall statistics overview. In both places, the number links to “Unsubscriptions.” The rule behind this is simple: an unsubscription is attributed to the last newsletter the person received, and the percentage is the number of unsubscriptions relative to the total number of emails sent in the campaign. Use this figure to compare your own campaigns with one another rather than chasing a specific target. If a single campaign stands out significantly from the others, it’s usually the subject line, frequency, or target audience that’s the problem.
Unsubscribe someone yourself, and the difference between “unsubscribe” and “delete”
If a customer calls and asks to be removed from the list, don’t wait for them to find the link themselves. Go to Newsletter, Recipients, and find the person using the search field, which searches by both address and name. Check the box next to one or more recipients and click Unsubscribe at the bottom, or click on the recipient and use the Unsubscribe button on the Edit Recipient page. Here, the “Details” box also shows the status, source, sign-up date, and, if applicable, the consent date and IP address.
Next to it is the “Delete” button, and the difference between the two is important. “Unsubscribe” stops the mailings but keeps the record, and this is the correct choice in almost all cases. “Delete” permanently removes the recipient, including the subscription record. Be aware of the side effect: once the address is gone, the block is also removed. If the address ends up in an import file six months later, the person will be subscribed again without anyone noticing, and if you send newsletters to buyers of a specific product, she may start receiving them again. If someone requests that their personal data be permanently deleted, unsubscribe them and then use the “Anonymize” option on the Unsubscriptions page. This will remove the name and address, but the block will remain in place.
What Can Bring an Unsubscribed Person Back
An import won’t do that. If an unsubscribed address appears in a file you import under “Recipients,” it will be skipped and remain unsubscribed. The confirmation after the import shows the number under “Of which unsubscribed or rejected, which remain unsubscribed.” However, the import only recognizes those who have unsubscribed from you. If someone has unsubscribed in another system, you must remove them from the file yourself before importing. Read more about the import in the article on newsletter recipients.
The person re-subscribes on their own. If a previously unsubscribed customer signs up via the sign-up field, a sign-up form, or the checkbox during a purchase, they become active again. This is their own choice, so it’s as it should be. If you’ve enabled “Require confirmation” (double opt-in) under Newsletter> Setup, a confirmation email is sent first, and the person becomes active only after clicking the link in the email. This gives you additional, time-stamped proof of the subscription. If you’ve marked the person as “Never Again,” she cannot subscribe again, not even on her own.
The record has been deleted. If you used “Delete,” the block is removed, and a later import can re-subscribe the person. If you want to remove personal data while keeping the block in place, use “Anonymize.”
The Practical Rules
- Ask first. You must have an active “yes” before sending marketing emails to a consumer. A pre-checked box or an address from a business partner does not constitute a “yes.”
- Make it easy to opt out. The unsubscribe link must remain in the email and must not be hidden in gray text that no one can read.
- Respect the unsubscribe request immediately. In Shoporama, this happens automatically. If you’re also using another email system, you must ensure that the unsubscribe request takes effect there as well.
- Don’t take the back door. If you move an unsubscribed address to another list, another system, or a “we miss you” email, it’s still marketing to someone who has said no.
- Save the documentation. Under “Customers,” “Downloads,” you can download a file containing newsletter subscriptions and consent information; see “Downloads: Download Your Customers and Newsletter Subscriptions as CSV.”
The text here is not legal advice. If you’re unsure about your specific situation, consult an advisor and review the Consumer Ombudsman’s guidelines on the spam ban.
For those with a technical background
The unsubscribe page is located at /newsletter-unsubscribe on the store’s own domain. When accessed via a personalized link, it is called with a recipient ID and a signature, which are validated against the store before the unsubscribe is processed. Without parameters, it displays the form with the email address.
The appearance is controlled by the theme file templates/newsletter/unsubscribe.html, where you can branch the page based on whether the unsubscribe was successful or failed. If the file does not exist, Shoporama falls back to a built-in, standalone page, so the unsubscribe can never fail due to a missing theme. If you build your own newsletter framework within the theme, you’ll receive the unsubscribe address as a variable that you must place at the bottom of the email yourself.
Via Shoporama’s REST API, a recipient can be unsubscribed using a DELETE call on the individual recipient. Note that this unsubscribes the recipient and does not delete them—in other words, it behaves the same way as the “Unsubscribe” button. If you need to synchronize with an external email system, see Mailing List Integration: Connect Shoporama to Your Newsletter Provider.
Frequently Asked Questions
A customer says she has unsubscribed, but she’s still receiving emails. What’s wrong?
Look up the address in Unsubscriptions. If she is listed as unsubscribed, she will no longer receive newsletters from Shoporama. In that case, the emails are either order-related emails, the automatic emails sent after a purchase that include their own unsubscribe link, or emails from another email system you also use.
Why can’t I find the person under “Recipients” anymore?
The Recipients overview only shows active recipients, so unsubscribed recipients disappear from the list. They’re still in the system and can be found via the search field on the Recipients page or on the Unsubscriptions page.
Can I undo an unsubscribe on the customer’s behalf?
There is no button to re-subscribe someone, and this is by design. An import cannot do this either, as unsubscribed recipients in an import file are skipped. If the customer wants to be on the list again, she must subscribe herself via the sign-up field in the shop. This will re-register their consent, and your documentation will be in order. If you’ve marked her as “Never Again,” you’ll first need to remove the block.
Can I export the unsubscribes to a spreadsheet?
There is no export button on the “Unsubscribes” page, and the export under “Recipients” only includes active subscribers. If you need the numbers, you can filter by a specific time period and view the total in the top-right corner, or set the display to show up to 200 rows per page and copy the table.
We’re importing a list from our old system. What should I be careful about?
Make sure you only include people who are still subscribed. The import does not read the status from your old system and creates all new addresses as active, so you must manually remove anyone who has unsubscribed from the old system from the file. People who are already marked as unsubscribed in Shoporama will be skipped and remain unsubscribed.
What does “Of these, unsubscribed or rejected, who remain unsubscribed” mean after an import?
These are the addresses in your file that are already marked as unsubscribed in your system. The import intentionally skipped them. They haven’t received any emails, and they’re still listed here under Unsubscriptions. You don’t need to take any action on them.
Do unsubscribed recipients count toward the price of the newsletter module?
No. The module is billed based on emails sent, and emails are not sent to unsubscribed addresses. The price is listed under “Setup” in the “Newsletter” section and is 1 DKK per 100 emails, excluding VAT, billed monthly in arrears.
Do I need to unsubscribe recipients who never open my newsletters myself?
It’s not a requirement, but many recipients who aren’t actively reading your newsletters can lower your sender reputation. Under “Newsletter,” “Segments,” you’ll find the rule “Days since last click”—for example, set to greater than 180—which identifies those who received newsletters during that period without clicking on anything. Send them an email asking if they still want to hear from you, or send your regular newsletters to a segment of engaged subscribers. Clicks are more reliable than opens because some email programs open emails automatically.
We have multiple online stores. Does an unsubscribe request apply to all of them?
No. Recipient lists and unsubscriptions are specific to each individual store, and the unsubscribe link only works in the store from which the email originated. If a customer needs to be removed from the list in multiple stores, this must be done in each one.
A customer requests that all their data be deleted. Is an unsubscribe enough?
No. Unsubscribing stops future mailings, but the record remains with the address and history. If the customer explicitly requests complete deletion, use the “Anonymize” option for her here in Unsubscriptions. If she is still active, unsubscribe her first under Recipients. The name and email address are deleted, but the address remains blocked so it won’t be re-imported later. “Delete,” on the other hand, also removes the block.
If an unsubscribe does not behave as expected, please email support@shoporama.dk with the email address and the date.
Related articles
Unsubscribe links in automatic emails
Give your customers the option to unsubscribe from automatic follow-up emails after purchases and product reviews - with a simple link in the email.
Import Customers via CSV
How to import customers into your online store using a CSV file: which columns Shoporama reads, how duplicates are handled via email, and what to...
Downloads: Download your customers and newsletter subscribers as a CSV file
Under "Customers," "Downloads," you can download two spreadsheets: one listing all customers who have made purchases from you, including the number...
Mailing List Integration: Connect Shoporama to Your Newsletter Provider
Automatically forward newsletter sign-up notifications from your online store to Klaviyo, Ubivox, Mailchimp, Campaign Monitor, or Brevo, and see...
GDPR - Data Processing Agreement
Information about data processing agreement with Shoporama according to GDPR.
Related features
Double opt-in
With double opt-in, new newsletter subscribers must confirm their email via a link. This results in a cleaner list, better deliverability and...
Newsletter system - send professional newsletters directly from Shoporama
Built-in newsletter system with A/B testing, segmentation, product blocks and statistics. Integrates with Brevo, Klaviyo and HeyLoyalty. Included...
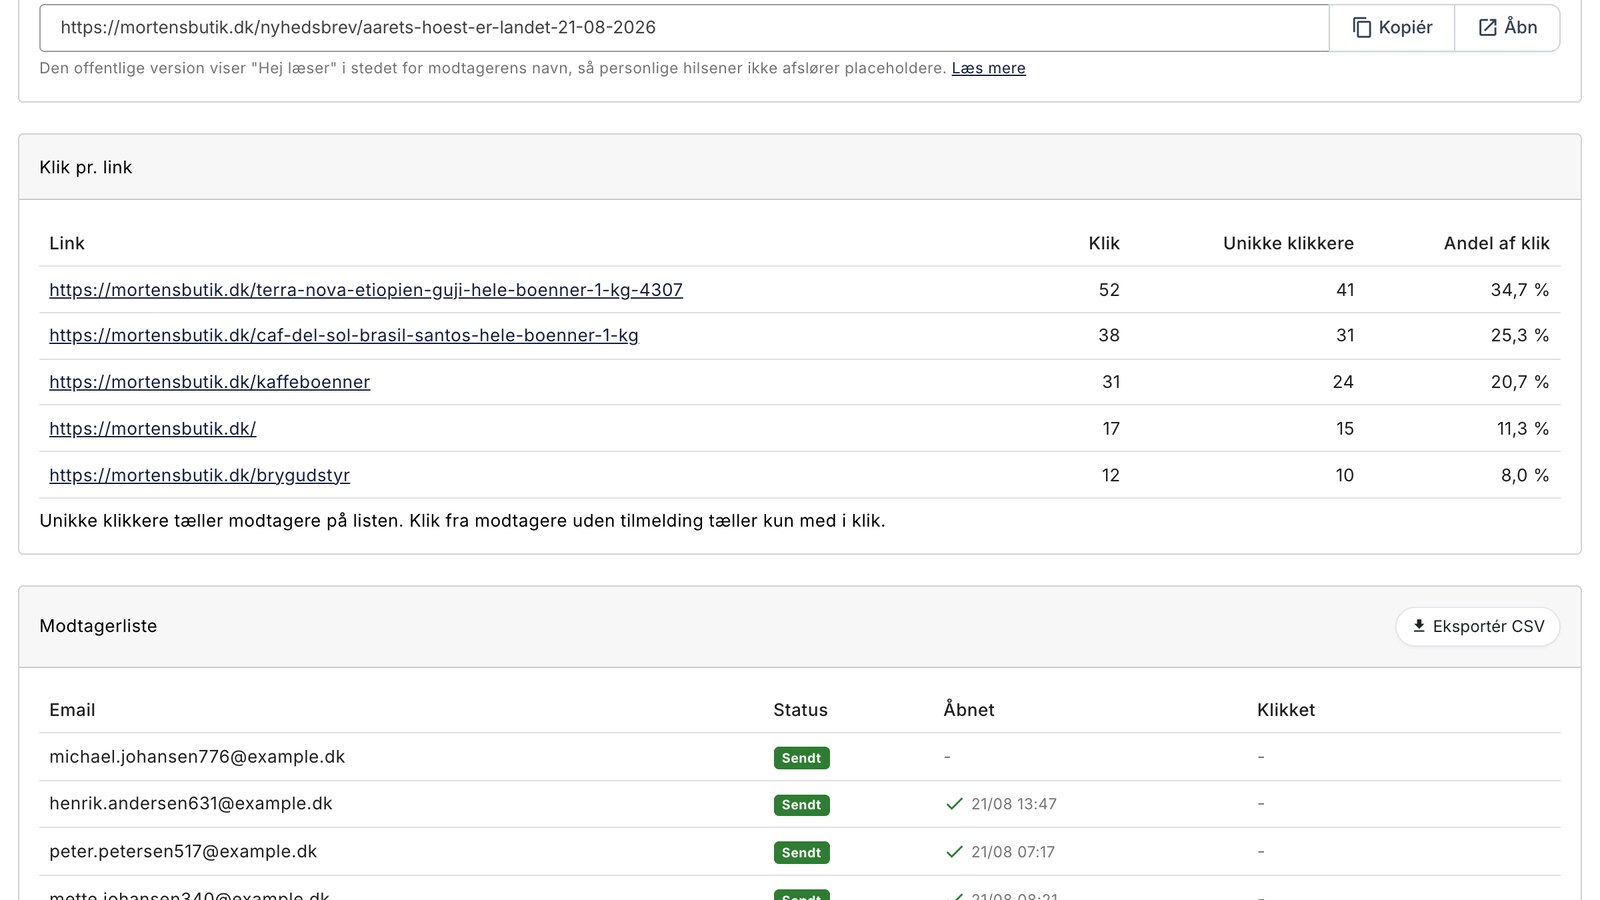
Newsletter: Move your list from Klaviyo or Mailchimp and send more targeted emails
Import recipients with their consent, without reactivating those who have unsubscribed. Send emails after the purchase of specific items, and view...