Newsletter: Move your list from Klaviyo or Mailchimp and send more targeted emails
Are you thinking about moving your newsletter from Klaviyo or Mailchimp to Shoporama? Now you can import your list without unsubscribers being reactivated, and their consent will be transferred along with the source and sign-up date. Afterward, you can send post-purchase emails to those who have bought specific items and skip the welcome email for those who have already made a purchase. At the same time, you can create segments based on when recipients last opened or clicked an email, and view clicks per link in the campaign statistics. Here are the six improvements and how to use them.
Many online stores still send their newsletters from a separate system like Klaviyo or Mailchimp. It works, but it’s one more system to keep track of. Shoporama’s built-in newsletter lives in the same system as your orders, products, and customers, so there’s a good reason to consolidate everything in one place.
The hard part is the migration. What about those who have unsubscribed? Can you document their consent afterward? And can you still send targeted emails? We’ve made six improvements that make the migration safer and your day-to-day operations more efficient afterward. They’re just as useful if you’re already using the newsletter in Shoporama.
1. The import doesn’t reactivate unsubscribed recipients
Previously, a new import could reactivate unsubscribed recipients without asking. That no longer happens. Unsubscribed recipients and addresses rejected by the recipient’s email server are skipped and remain unsubscribed. Duplicates in the file are imported only once, and an empty name cell does not delete a name the recipient already has.
Here’s how: Go to Newsletter → Recipients and click Import. Afterward, you’ll see how many were imported and how many were skipped.
There’s one thing you need to take care of yourself: the import does not carry over status information from the old system. New recipients in the file will become active, so only export those who are still subscribed.
2. Consent is carried over, along with the source and date
Before importing, you must check the box next to “I confirm that the recipients have given their consent to receive newsletters from us.” Without this, nothing will be imported. No confirmation email is sent to the imported recipients, even if you use double opt-in in your online store. You are personally responsible for verifying their consent.
The file can also include two new columns: “source” indicating where the recipient came from (e.g., Klaviyo), and “consent_date” indicating when the recipient subscribed (e.g., 2024-03-12). Both pieces of information are saved along with the time of the import and the user who performed the import. If you need to document consent, you’ll find it in the file under Customers → Downloads → Download Newsletter Subscriptions.
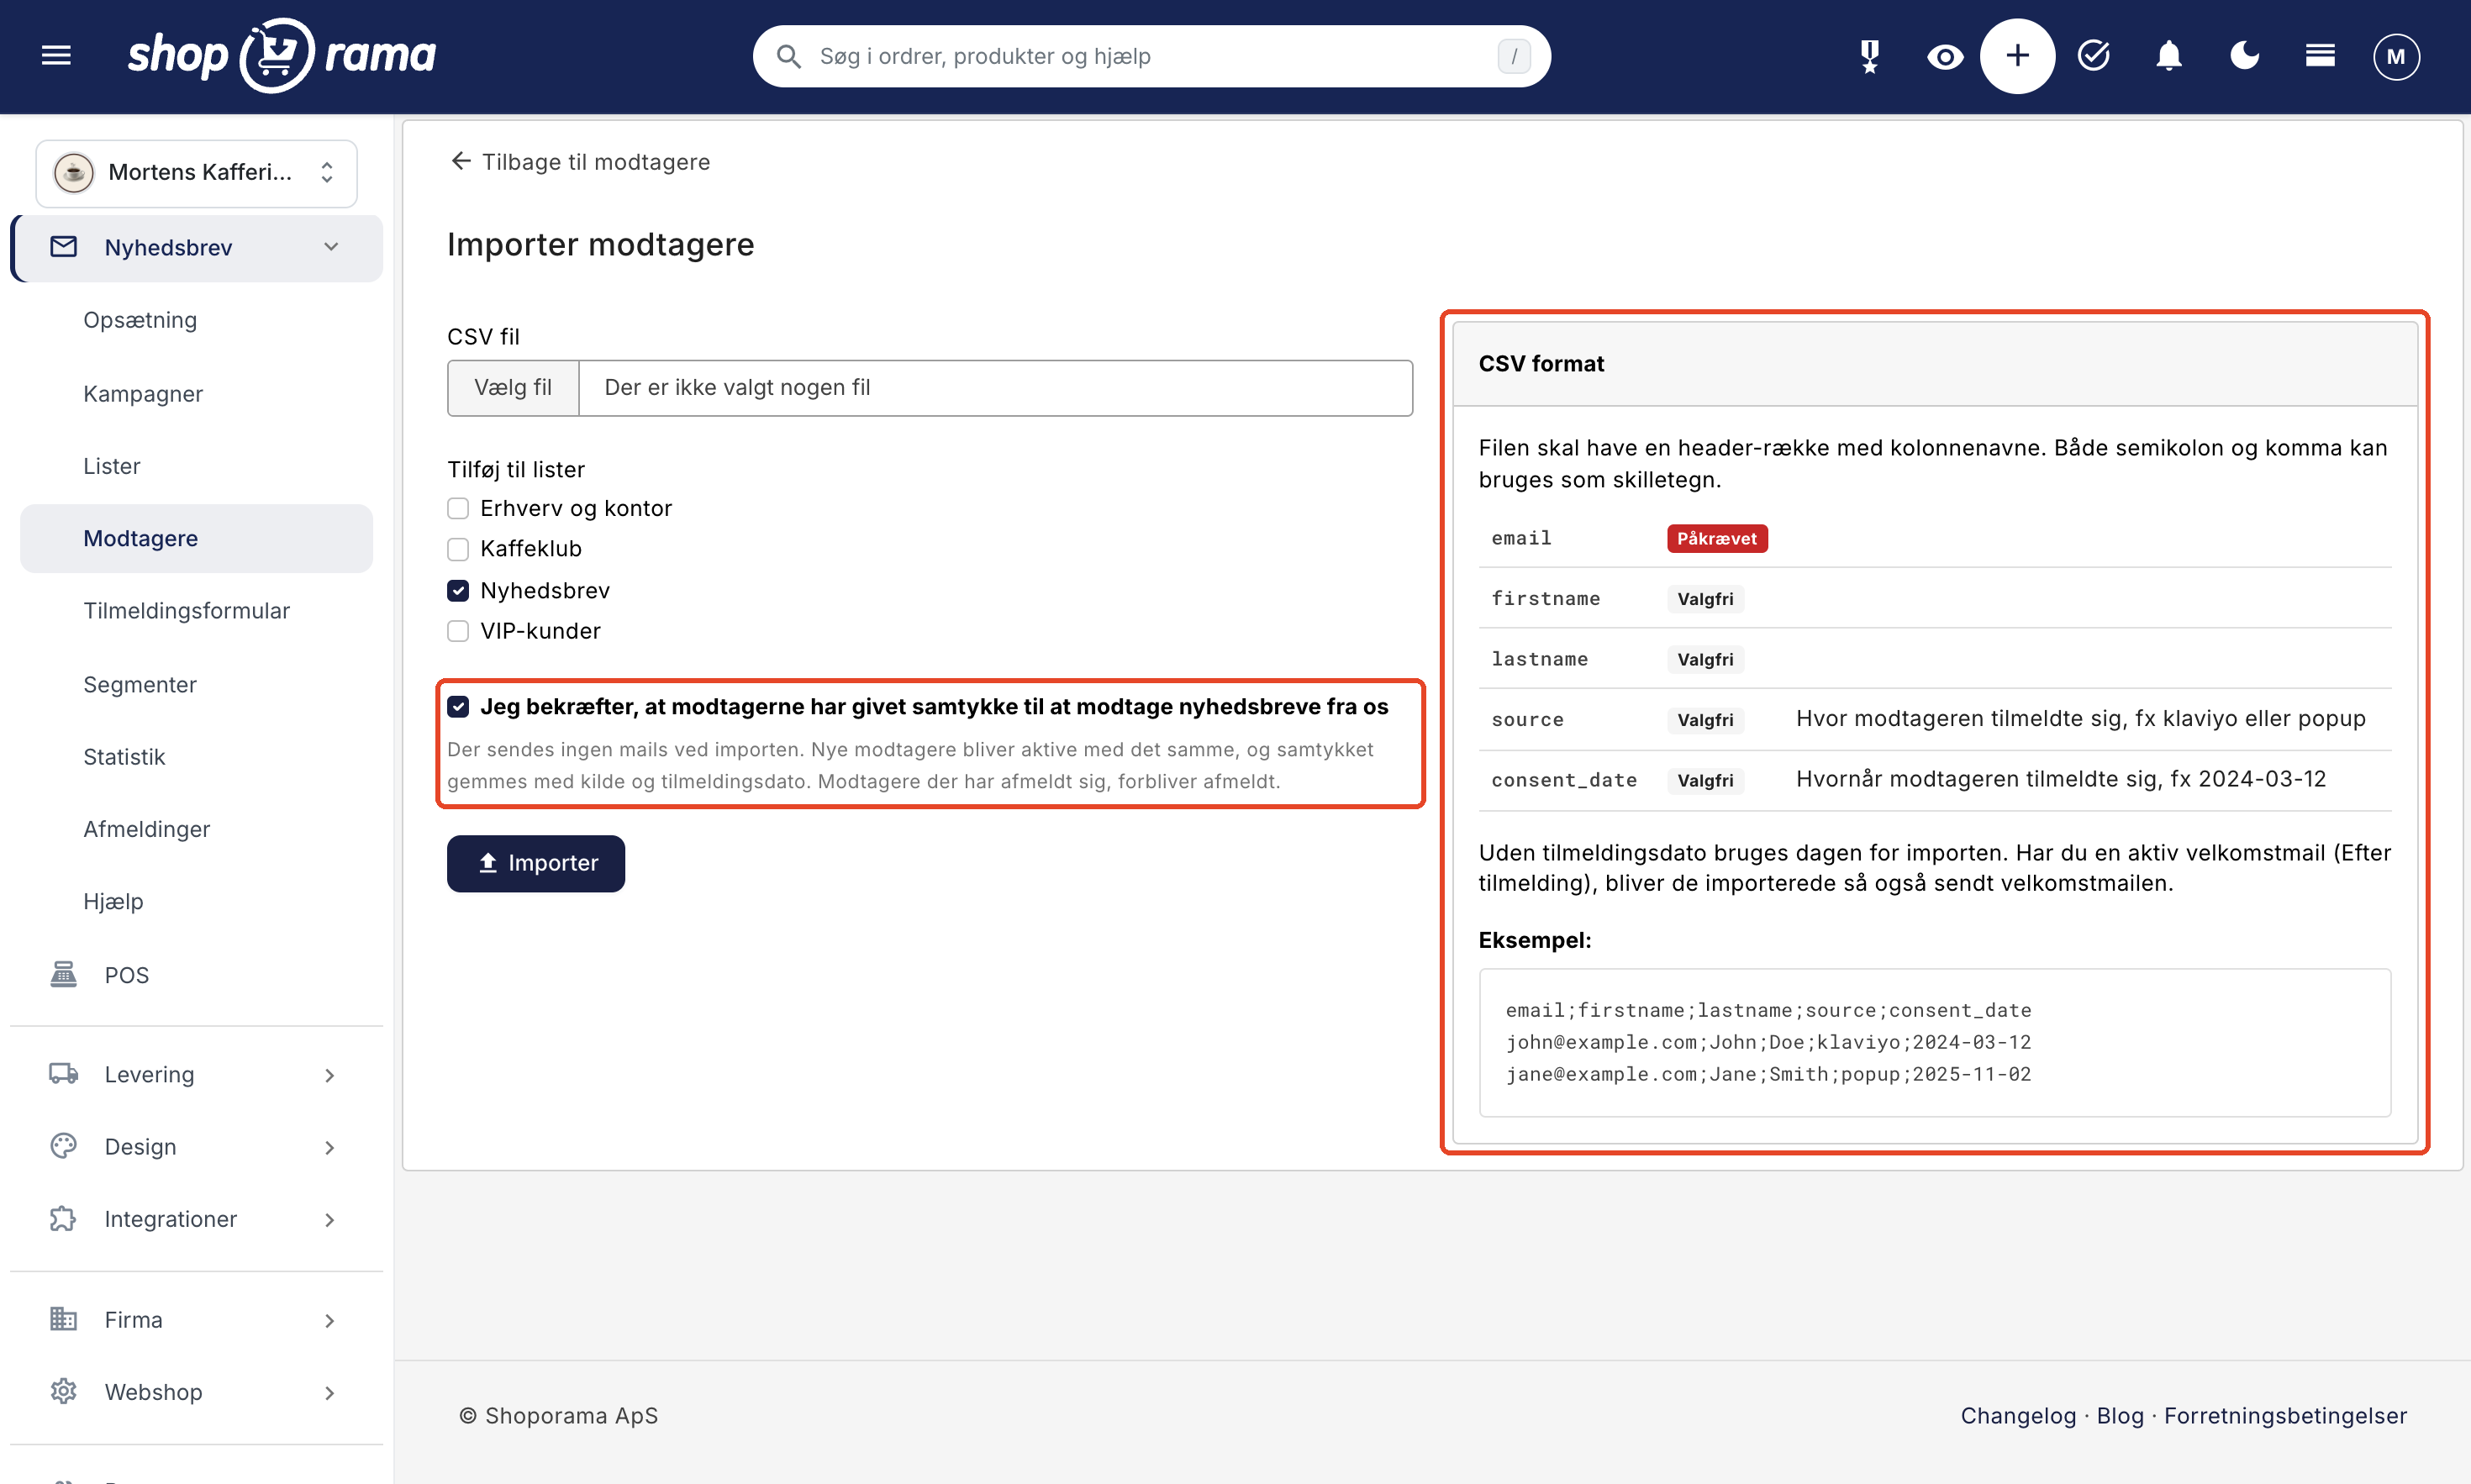
A helpful tip: Include the sign-up date if your old system can export it. Without it, the import date will be treated as the sign-up date, and if you have an active welcome email, all imported recipients will receive it. This is rarely the intended outcome for a customer who has been receiving your newsletter for three years.
3. Post-purchase emails for those who have purchased a specific item
The “After Purchase” trigger sends an email a set number of days after an order is placed. Previously, it was sent to all buyers, even those who had never subscribed to the newsletter. Now, it’s sent only to buyers who are subscribed, and you can limit it to orders containing specific items or items from specific categories.
Imagine a garden center. Customers who have bought roses receive an email about pruning and fertilizing two weeks after their purchase. Customers who have bought hedge plants receive pruning tips after one month. These kinds of emails get read because they’re useful, and they provide a natural opportunity to showcase rose fertilizer or a new hedge trimmer.
Here’s how to do it: Create a campaign for each email. Go to Newsletter → Campaigns, open the campaign, and select the Send tab. Under Automatic Trigger, click Configure and select After Purchase. Use the new fields “Only orders with these items” (optional) and “Only orders with items from these categories” (optional). If you select both, the order must meet both criteria.
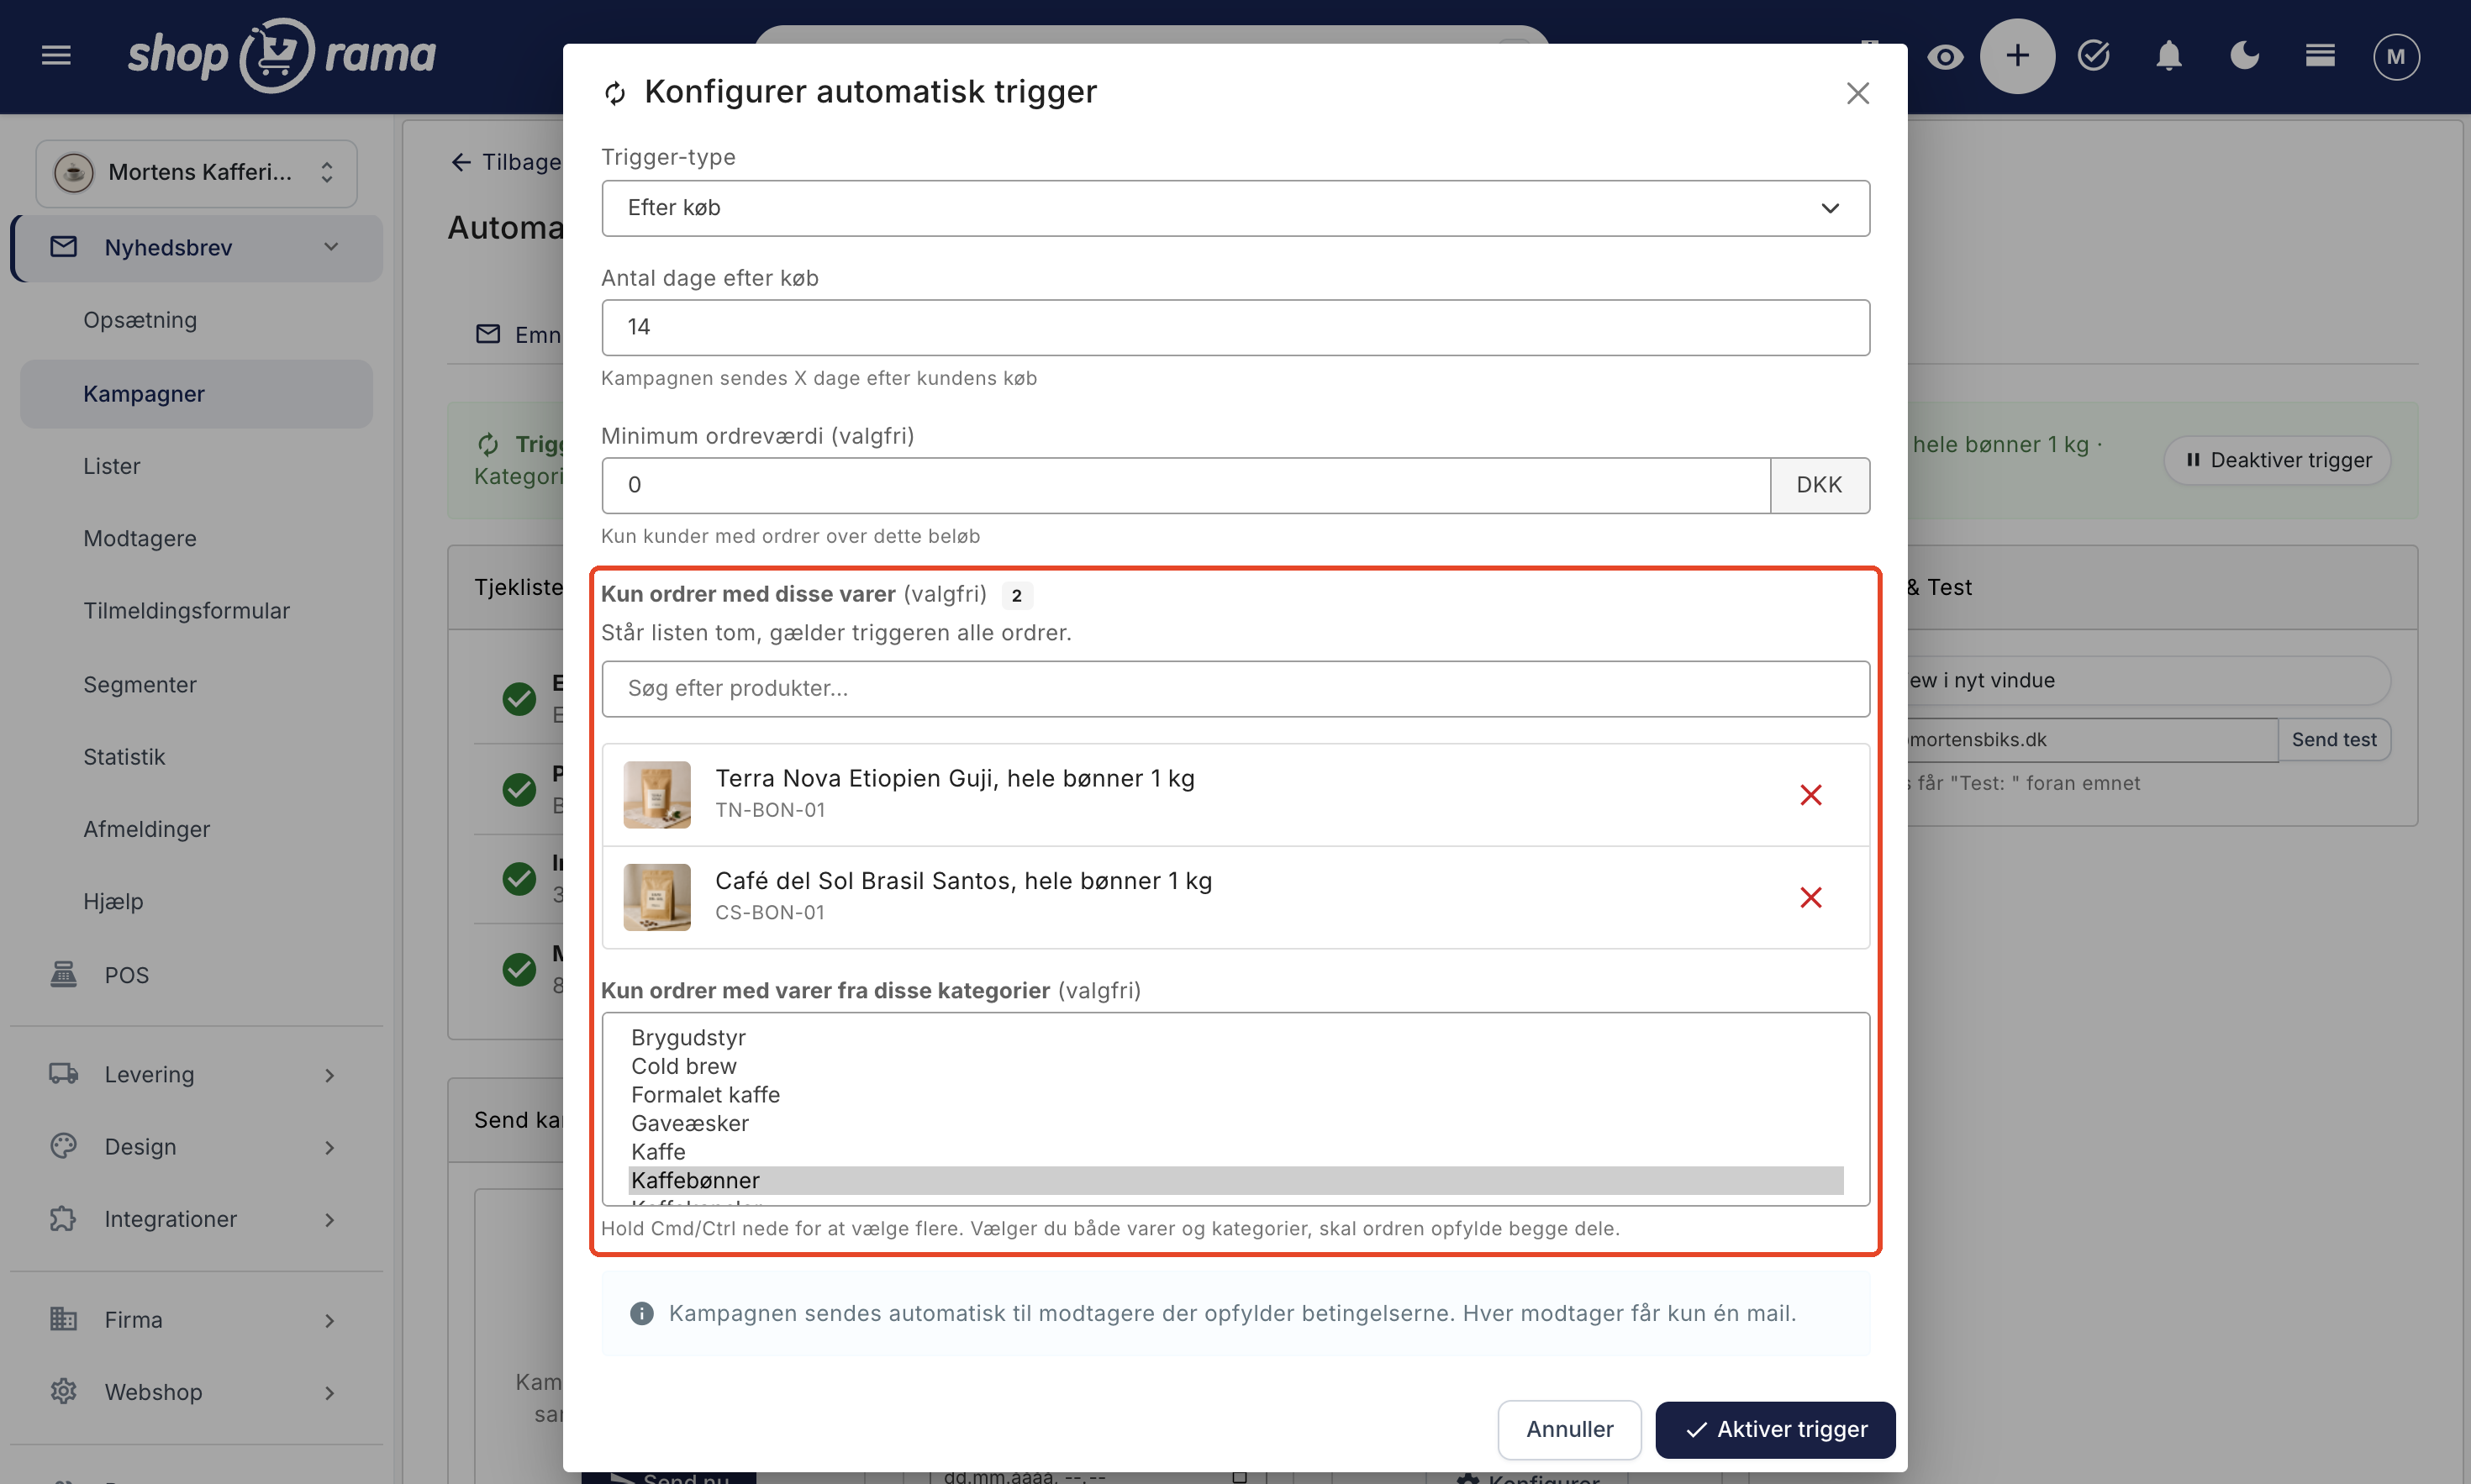
The item must be directly in the selected category. If you select “Roses,” you must also select subcategories such as “Climbing Roses” and “Bouquet Roses.”
4. The welcome email skips those who have already made a purchase
A welcome email with an offer is meant to encourage a new subscriber to make their first purchase. If the customer has already made a purchase, the email is misdirected. The “Welcome (after sign-up)” trigger therefore has the “Skip if the recipient has made a purchase since signing up” option checked . If an order has been placed from the same email address since sign-up, the welcome email will not be sent.
This checkbox is enabled by default for new welcome triggers. If you already have one running, you’ll need to enable it yourself under “Configure.” It’s most effective when the welcome email is sent one day or more after sign-up.
5. Segment by opens and clicks to keep your list healthy
Recipients who never engage with your emails drag down your open rate, and email providers like Gmail look at whether recipients interact with your emails when deciding whether to deliver them to the inbox.
Here’s how: Go to Newsletter → Segments, click New Segment, and then Add Rule. Here are two new rule types: Days Since Last Open and Days Since Last Click. Two examples:
- Days Since Last Click > 180: those who have received your newsletters over the past six months without clicking. Send them a reactivation offer, and consider removing those who still don’t respond.
- Days since last open < 30: your most engaged readers, ideal for a sneak peek at the sale.
New subscribers are not included in a “haven’t clicked” segment. Only recipients who have been subscribed for the entire period and have received at least one newsletter during that time are counted.
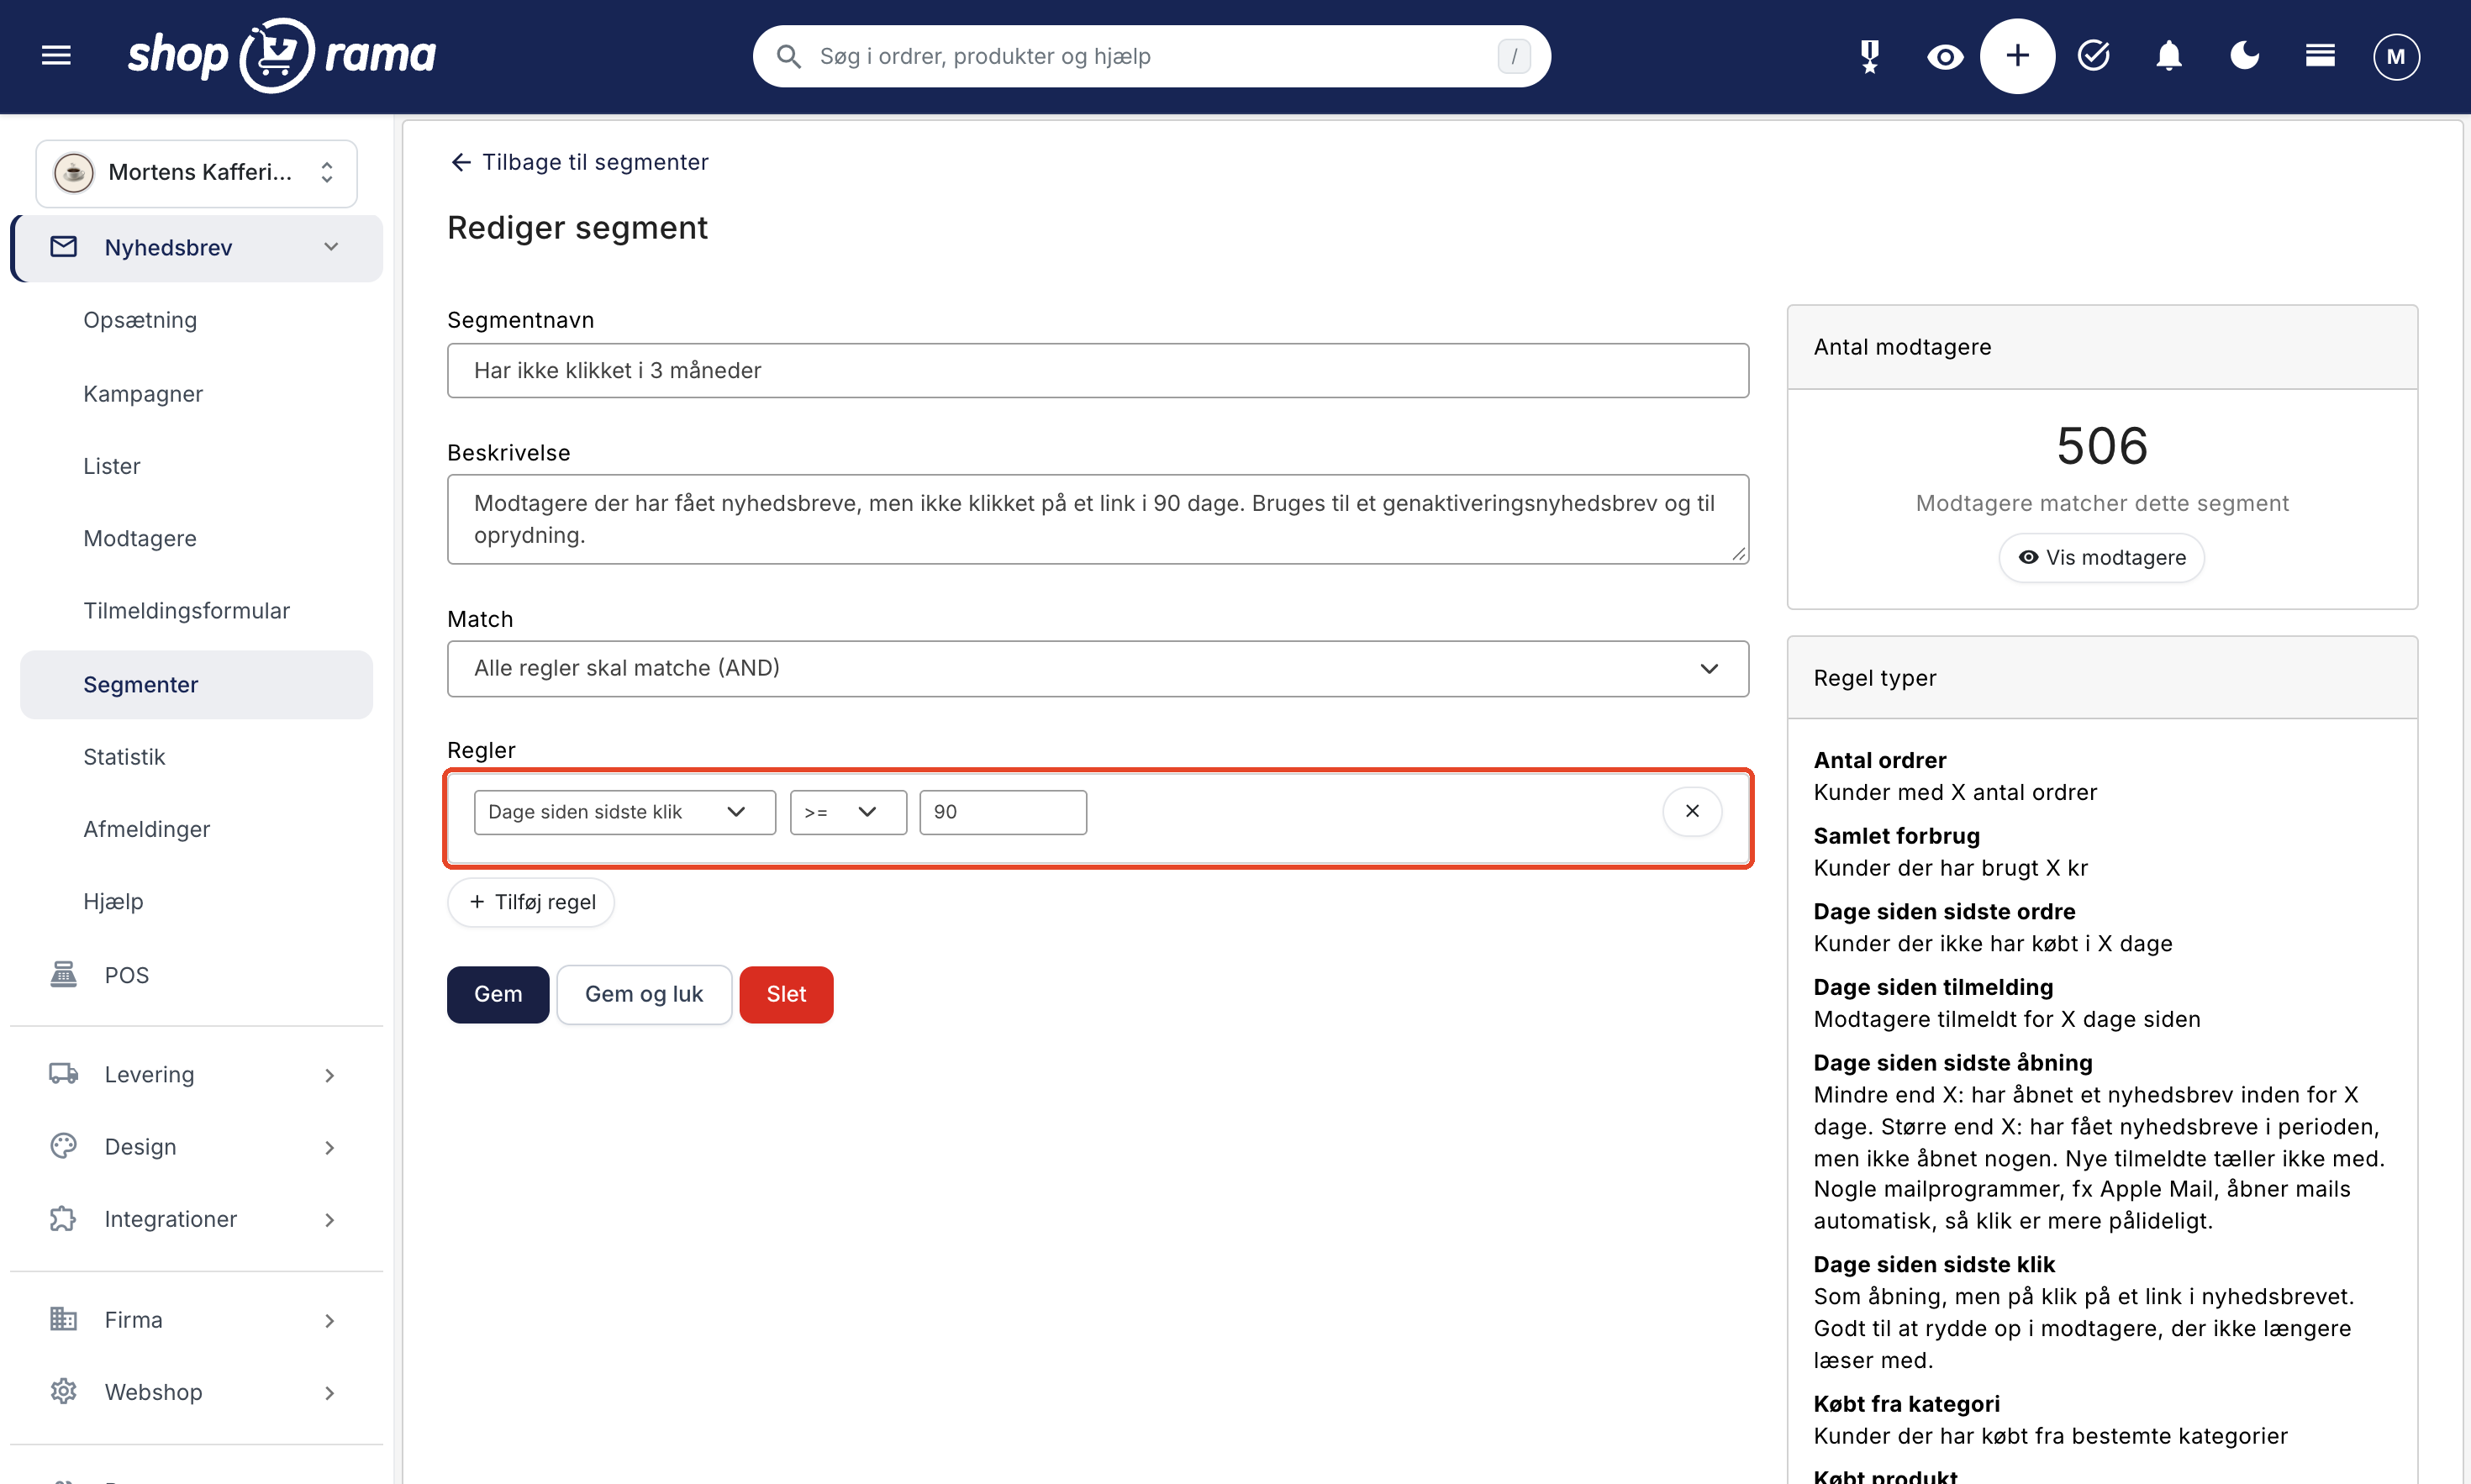
Why clicks are more reliable than opens: An open is recorded when the email program loads an invisible image in the email. Apple Mail can load images automatically, even if the email is never read. Conversely, opens aren’t counted for those who block images. A click requires a person to have clicked on a link. If you need to clean up your data, use clicks.
6. Clicks per link in the statistics
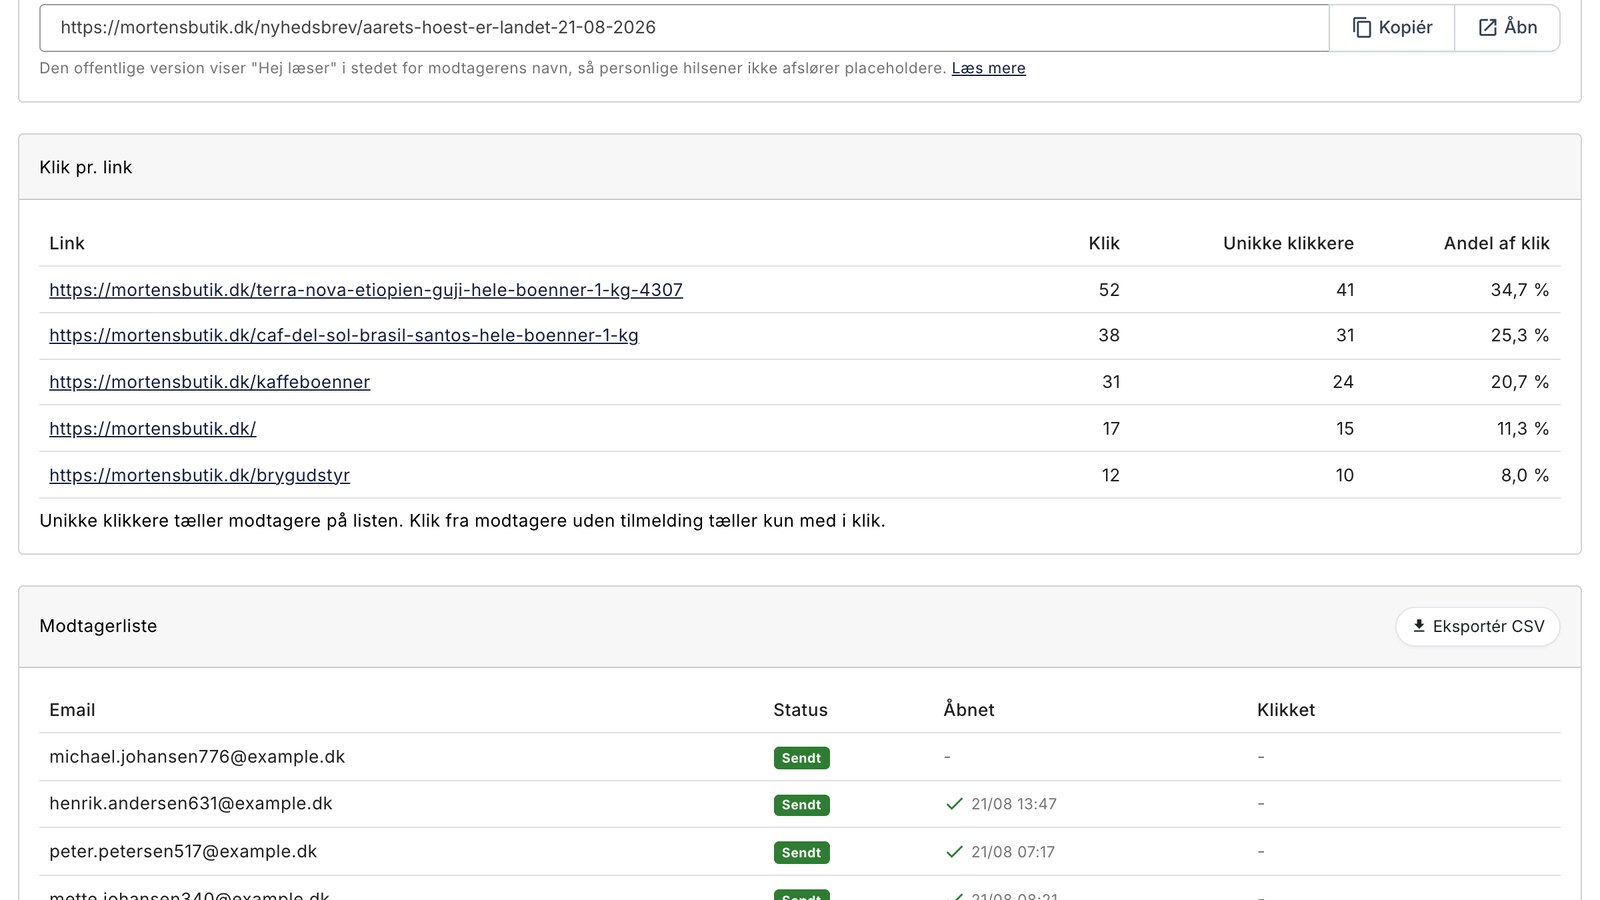
Previously, you could see how many people clicked, but not what they clicked on. Now, the campaign’s statistics include the “Clicks per Link” card with the columns “Link,” “Clicks,” “Unique Clickers,” and “Percentage of Clicks.” That way, you’ll know whether it was the offer at the top or the products further down that worked.
Here’s how: Go to Newsletter → Campaigns and click the statistics icon next to the campaign. This also applies to automated emails. The card appears when the campaign receives clicks after the update, so campaigns sent before the update won’t have it.
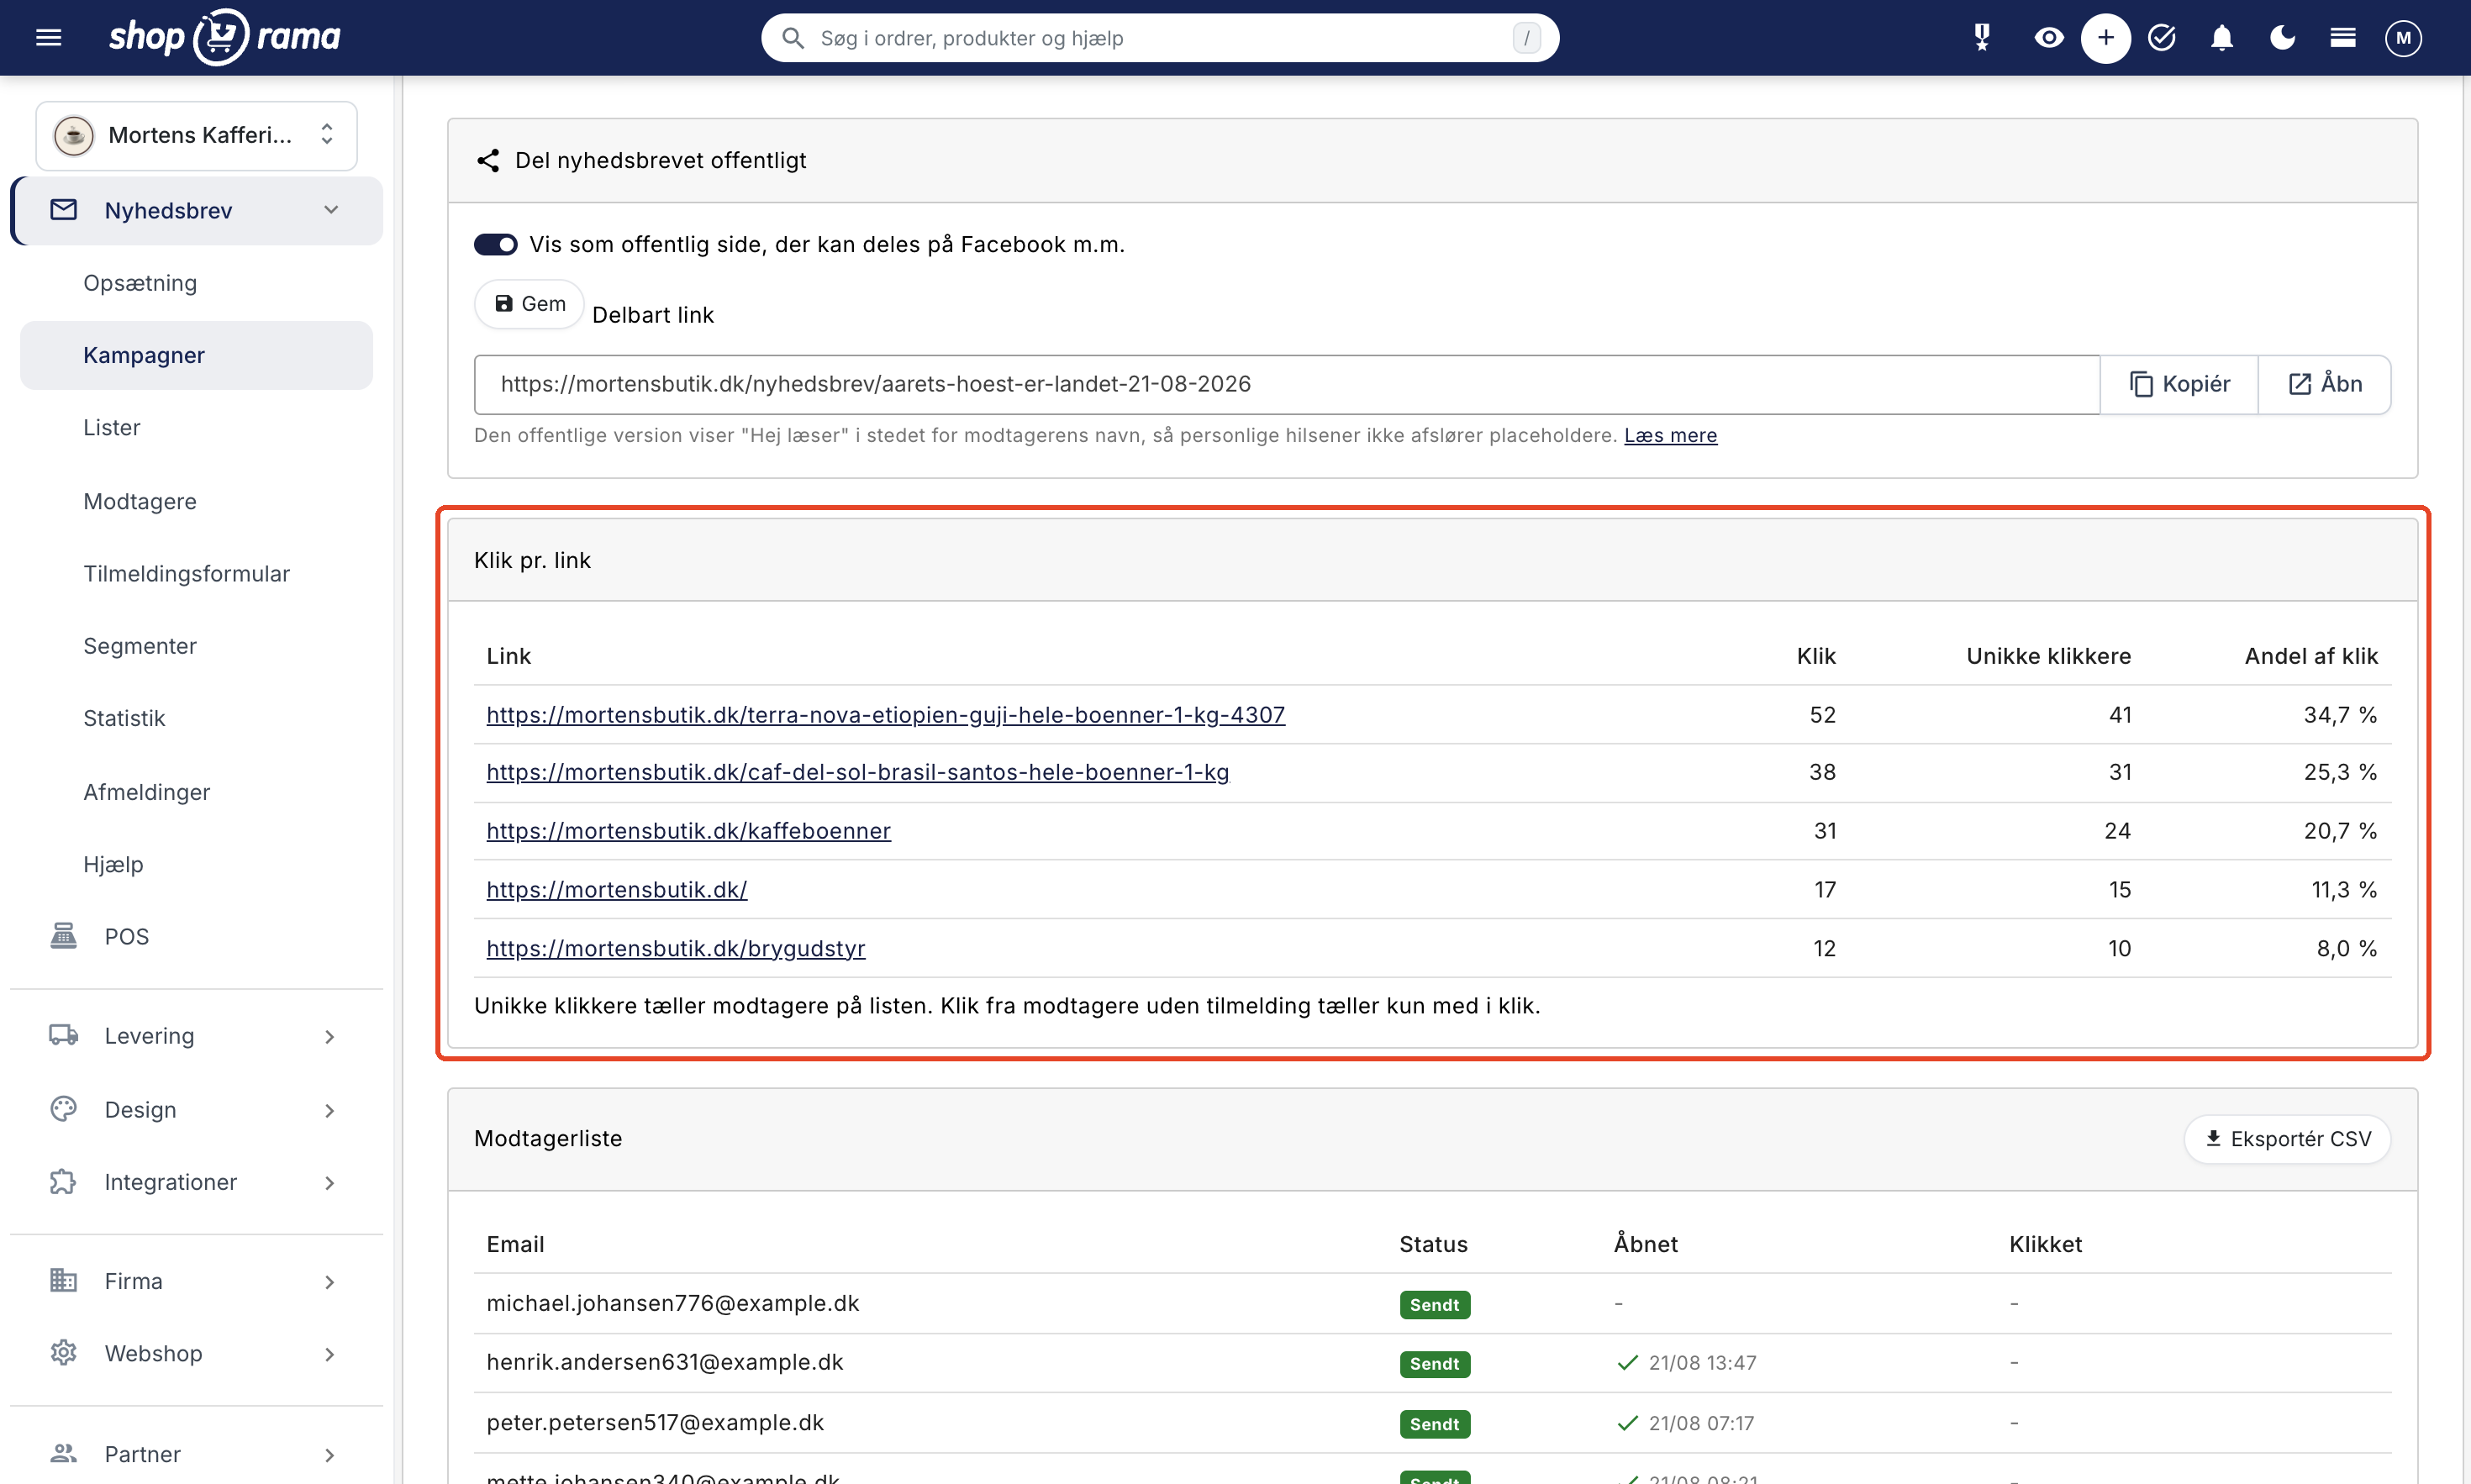
Clicks on the same URL are counted together, even when the link appears on both the image and the button.
And a few minor fixes
Links with parameters in the address now work correctly in the newsletter, and “mailto” and “tel” links no longer send the recipient to the homepage. The “Inactive Customer” trigger now displays the “Minimum Number of Orders” field, which is the one it actually uses.
Before you switch
Each automatic trigger sends a single email, so there are no email series like in Klaviyo, and there are no emails sent to those who have viewed a product without purchasing it. If you primarily send newsletters, welcome emails, and post-purchase emails, the built-in features will serve you well.
If you haven’t used the newsletter feature before, you’ll first need to enable “Use internal newsletter list ” under Newsletter → Setup. Learn more about the newsletter module, recipients and imports, unsubscriptions, and customer groups and segmentation. If you have any questions, please email us at support@shoporama.dk.
Related articles
The newsletter module
Complete guide to Shoporama's built-in newsletter module. Learn how to create campaigns, segment recipients, use A/B testing, set up automatic...
Newsletter Subscribers: Manage Your List
Under "Newsletter" > "Subscribers," you can search for, edit, import, and export your newsletter subscribers. See what the columns mean and...
Unsubscriptions: How Shoporama Handles Unsubscriptions
The Unsubscribes page shows who has unsubscribed from your newsletter, when, and which campaign they received most recently. See how the...
Customer groups and segmentation
How to create customer groups and segments in Shoporama for targeted marketing and newsletters.
More from the blog
New Free App Sends Online Store Orders to Business Central
If you use Microsoft Dynamics 365 Business Central, Shoporama can now transfer orders from your online store as sales invoices or sales orders....
31. oktober 2026
New free Billy app replaces the built-in integration
Shoporama has a new, free app for Billy, now called Shine Accounting. It replaces the built-in Billy integration: customer information is reused,...
31. oktober 2026
New free Dinero app replaces the old integration
Shoporama has a new, free Dinero app that replaces the built-in Dinero integration. Your login is valid for one year at a time, errors appear...
30. oktober 2026