Newsletter Subscribers: Manage Your List
Under "Newsletter" > "Subscribers," you can search for, edit, import, and export your newsletter subscribers. See what the columns mean and exactly what the CSV file should contain.
Your newsletter list is the only channel you own. Facebook can change its algorithm, and Google can change its prices, but no one can take away the list of people who have agreed to hear from you.
This guide focuses exclusively on the Recipients page: how to find people, edit their information, move multiple people at once between lists, import a list from an external source, and export the entire database as a spreadsheet. If you want an overview of the entire module, including campaigns, the block editor, and segments, start with the guide to the newsletter module.
Where to Find Recipients
In your online store’s admin panel, go to Newsletter and then Recipients. The page is called “Recipients,” and in the top-right corner, you’ll find three buttons:
- Import imports a CSV file containing subscribers you already have
- Export downloads your active subscribers as a CSV file
- Add creates a single subscriber manually
This page is part of Shoporama’s own newsletter system, which you enable by checking the box “Use internal newsletter list” under Newsletter, Setup. If you use an external provider instead, your subscribers are stored with them and not here.
How to Read the Overview
The table displays one row per recipient with five columns, a checkbox on the left, and an edit icon on the right:

- The “Email” field also serves as a link to the recipient’s profile page
- Name consists of the first name and last name combined. If the field is empty, we only have the address
- "Lists " displays, as labels, the lists the person is on. It’s perfectly possible to be on multiple lists at once
- Source indicates where the sign-up came from
- Subscribed is the date the person subscribed. For imported recipients, this is the date from the import file, if one was provided, or otherwise the date of the import
An important detail that many overlook: the overview shows only active subscribers. People who have unsubscribed and people who have not yet confirmed their subscription via double opt-in do not appear in the table. You can find unsubscribers under Newsletter, Unsubscriptions, where you can also filter by date.
What the “Source” column means
The “Source” column is technical in nature, but it’s worth its weight in gold when assessing the quality of your list:
- signup_form indicates a signup via a signup field on your online store
- popup refers to a sign-up via a pop-up sign-up form
- purchase means the person opted in to the newsletter in connection with a purchase
- "manual " means the subscription was created manually using the "Add" button
- "import " means the subscription was added via a CSV import without a source specified in the file
If the subscription comes from the point-of-sale system or an integration, the value sent by the system is displayed, for example, “pos.” If your import file has a column specifying the source, that value is displayed instead, for example, “klaviyo.” The source is set when the person is created and cannot be changed afterward.
Search and Filter
The search field labeled "Search email/name..." searches for parts of an email address, a first name, or a last name. If you search for "@gmail," you’ll get all Gmail addresses. The drop-down list next to it starts with “All lists” and lets you select just one specific list. That selection is applied when you click Export, so you’ll only export that one list.
Three things about the search work differently than on the rest of the page:
- The search spans all lists, so a selection in the drop-down list is reset when you search
- The search also includes unsubscribed users. This is the fastest way to find out if a specific person has unsubscribed
- Search results do not have pagination. You’ll see up to the number of rows you’ve selected under “Show,” so it’s better to search more precisely than to scroll
In the lower-right corner, you can choose how many rows the page displays at a time: 25, 50, 100, or 200. This setting is saved for next time.
Add a recipient manually
Click Add in the top right corner. Fill in Email (required), First Name, and Last Name, and check the box next to Add to lists. Your default list is preset, so you can usually just click Add Recipient.
If the email address already exists, you’ll be directed to the existing recipient instead of creating a duplicate. If you enter an invalid address, you’ll see the message “Invalid email,” and nothing will be created.
Please note that a manually added recipient becomes active immediately. No confirmation email is sent, and no digital consent record—including the time and IP address—is saved, as is the case when people sign up for your store themselves. If you add someone manually, you must be able to document their consent in another way. If you have many recipients from another source, it’s better to use the import feature, where the source and sign-up date are saved as proof of consent.
Edit a Subscriber
Click the email address or the pencil icon in the table. The page is titled “Edit Recipient.” On the left, you can edit the First Name and Last Name and check the boxes for the Lists the person should be on. The email field is locked because the address is the key to identifying the recipient. If a person needs a new address, create a new recipient and delete the old one.
On the right is the "Details" tab, which shows the information you cannot edit: Status (Active or Unsubscribed), Source, Subscription Date and Time, and, if consent has been recorded, Consent Date and Time. If the person signed up for your store themselves, the IP address is also listed there. For imported recipients, “Consent” is the sign-up date from the file, and there is no IP address. If the person has unsubscribed, the time is also listed here. The consent fields serve as your documentation if anyone asks why they’re receiving emails from you.
At the bottom, you’ll find the buttons Save, Save and Edit (saves and keeps you on the page), Unsubscribe, and Delete.
If the person has already unsubscribed, the page looks different. In that case, you can’t edit the name or lists, and a warning appears stating that the recipient has unsubscribed. The only button is “Delete Recipient.”
Unsubscribe or Delete: What’s the Difference?
Unsubscribe marks the person as unsubscribed and records the time. The email address remains in the system so you can see that the person has opted out, and unsubscribed recipients will never receive campaigns. The person disappears from the overview and appears under Unsubscriptions. A later import won’t change this: if the address is in an import file, it will be skipped and remain unsubscribed. However, the person can resubscribe to your store on their own. If you don’t want them to be able to do that either, use “Never Again ” under “Newsletter,” “Unsubscriptions.”
"Delete" removes the person entirely, including their membership in lists. This cannot be undone, and the email address is no longer blocked, so a later import could reactivate them. If someone requests that their personal data be permanently deleted, unsubscribe them and then use “Anonymize” under “Newsletter,” “Unsubscriptions.” This deletes the name and email address but keeps the block in place. Use “Delete” for test runs and cleanup, and “Unsubscribe” in all other cases.
Bulk Actions: Edit Many at Once
Check the boxes on the left, or use the checkbox at the top of the table to select all rows on the page. Below the table, the page counts how many you’ve selected, and four buttons become active:
- Add to List adds the selected items to a list you choose from the drop-down menu
- "Remove from List " removes them from the list. They are not deleted, only removed from that specific list
- Unsubscribe unsubscribes all selected items, with a confirmation dialog box first
- "Delete " permanently deletes them, also with a confirmation dialog box first
"Select All" selects only the rows on the page you’re currently viewing. If you need to manage many thousands of entries, set "Show" to 200 per page, or use the import method below. If you delete many at a time, the cleanup runs in the background, and your campaign statistics are preserved.
Import: Upload an existing list
If you’re coming from another provider, such as Klaviyo, or if you have a list from a trade show, you can import it under “Import.” The page is called “Import Recipients.” The import feature is designed for people who have already opted in to your newsletter. Therefore, you must confirm their consent before you can import, and as a result, anyone who has unsubscribed from your list will not be re-subscribed.
The file format, to be precise
This is where most imports go wrong, so here are the rules:
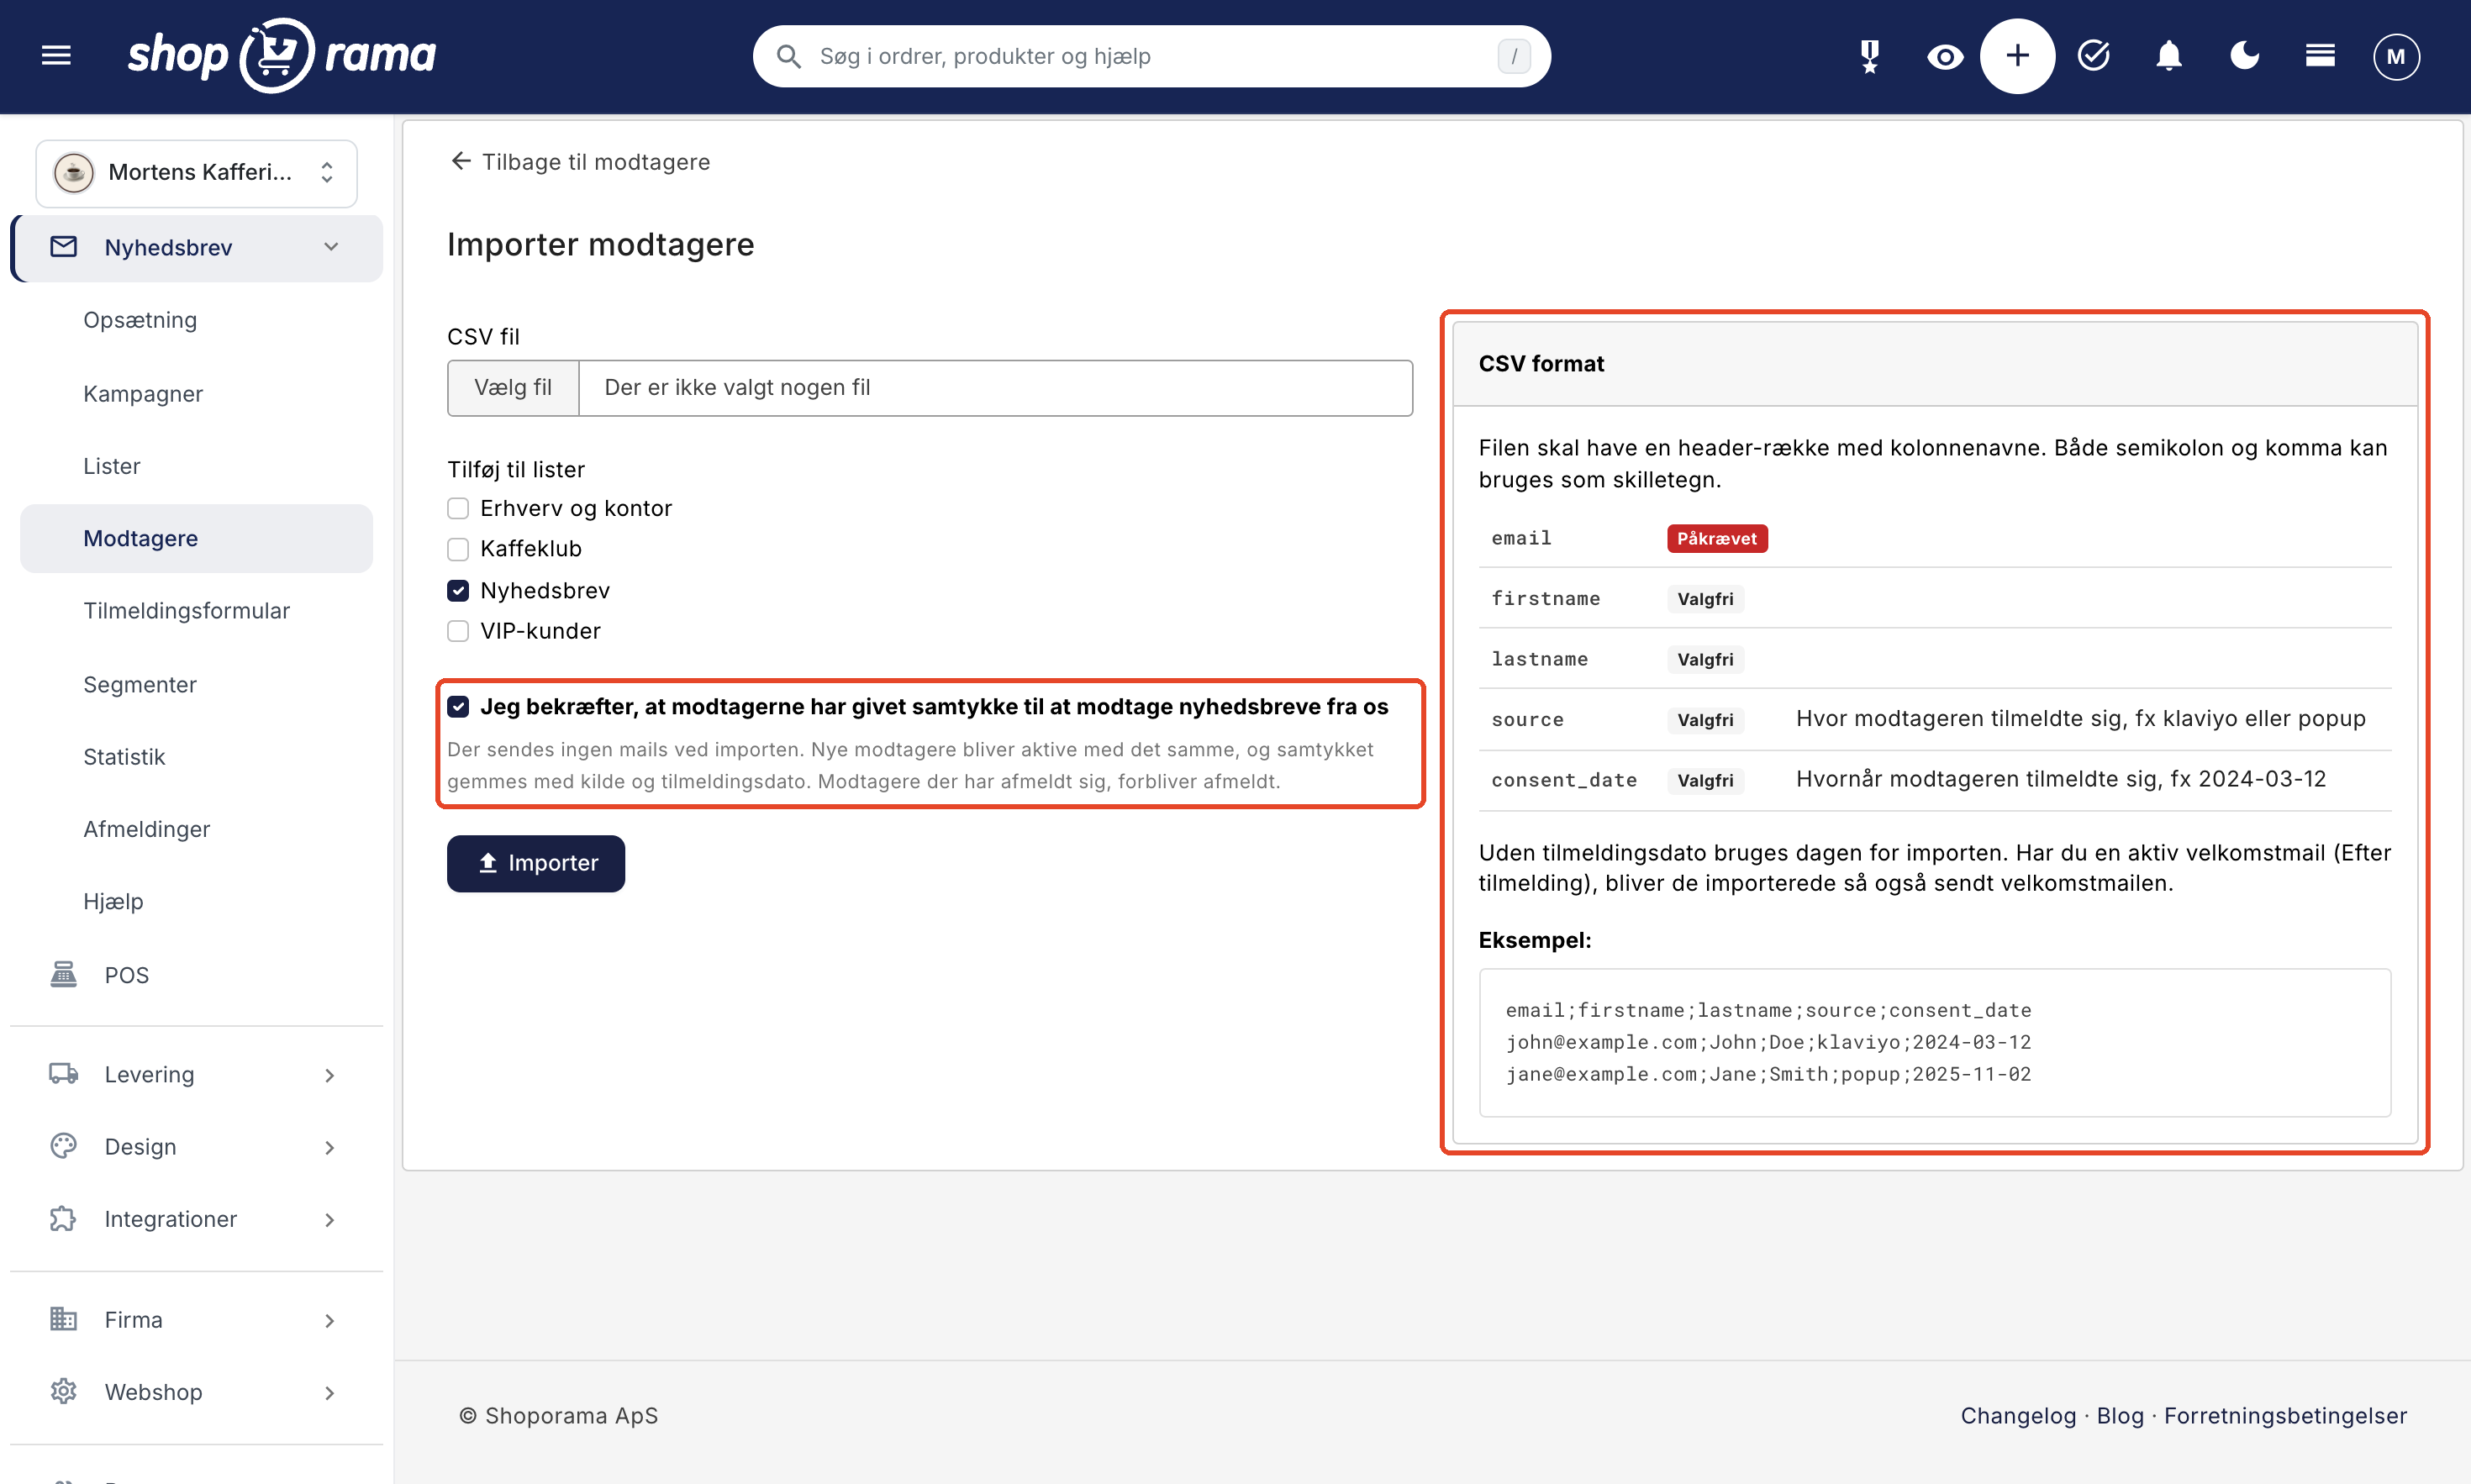
- The file must be a CSV file using a semicolon (;) or comma (,) as the delimiter. Shoporama automatically detects which one your file uses from the first row
- The first line must be a header row with the column names. Without it, Shoporama cannot find the email addresses, and all rows will be skipped as invalid
- An email address is required. Rows without a valid email address will be skipped
- "firstname "and " lastname "are optional and can be omitted entirely
- "source "is optional and indicates where the recipient originally signed up, for example, " klaviyo " or " popup." The value becomes the recipient’s "Source." Without this column, it will show as " import"
- `consent_date` is optional and is the date the recipient subscribed, for example, 2024-03-12. The time may be included. The date becomes the recipient’s sign-up date. If it cannot be read or is in the future, the date of the import is used instead. Enter it as year-month-day to avoid any confusion about the day and month
- The order does not matter, nor does the use of uppercase or lowercase letters in the header row. EMAIL, Email, and email all work, and spaces around the name will be removed
- Column names from other systems and in Danish also work. First Name and Fornavn are read as firstname, Last Name and Efternavn as lastname, E-mail and Email Address as email, Kilde as source, and Tilmeldt and Created as consent_date. An export from, for example, Klaviyo with the columns “Email,” “First Name,” and “Last Name” can therefore be used as is
- Extra columns are ignored, so you don’t need to clean up an export from another provider to remove fields you don’t use. This also applies to a “status” column, so Shoporama cannot tell if anyone has unsubscribed in your old system
- Feel free to save the file as UTF-8. A standard CSV file from Excel on Windows will also be read correctly, so characters like æ, ø, and å will be included in the names
Here’s what a valid file looks like:
email;firstname;lastname;source;consent_date
john@example.com;John;Doe;klaviyo;2024-03-12
jane@example.com;Jane;Smith;popup;2025-11-02
Only the email column is required, so a file containing just email, first name, and last name will still work. The same file with commas instead of semicolons will also work.
How to Import
- Go to Newsletter, Recipients, and click Import
- Select your file under CSV File
- Check the box next to “Add to Lists ” for the lists you want to add the recipients to. Your default list is selected by default
- Check the box next to “I confirm that the recipients have consented to receive newsletters from us.” Without this checkmark, nothing will be imported
- Click Import
Afterward, you’ll receive a confirmation. The “Imported” count includes the rows that were successfully imported, both new and existing recipients. The “Skipped” count includes the rest. If some of them had already unsubscribed from your list or appeared multiple times in the file, the numbers are listed separately under “Of these, unsubscribed or rejected, who remain unsubscribed” and “Of these, duplicates in the file.” Under “Errors,” each invalid or blocked address is listed so you can correct the file and run the import again.
Consent: the checkbox and what is stored
When people sign up on your store, Shoporama automatically saves the time and IP address as proof, and if you’ve enabled double opt-in, they must confirm their sign-up via email. With an import, the sign-up took place elsewhere. Therefore, you are responsible for the consent indicated by the checkbox, and as a result, the import does not send any emails—not even a confirmation email—even if you have enabled double opt-in. New subscribers become active immediately. Double opt-in still applies to everyone who subscribes through your store.
For each new subscriber, Shoporama saves a consent record that includes the source and sign-up date from the file, the time of the import, and which user performed the import. The record is included in the file under Customers, Downloads, when you click Download Newsletter Subscriptions. Here, the sign-up date from the file is listed as the time, while the IP address, browser, and referral fields are empty because they are not known during an import. The import itself is also recorded in the activity log.
The record only shows what your file contains. Therefore, be sure to also save the documentation from your old system—for example, an export with the sign-up times—so you can demonstrate where the consent originated.
Please note the following
- Known addresses are updated, not recreated. The name is updated, and the person is added to the selected lists. An empty name cell in the file does not delete a name that the recipient already has. Source, sign-up date, and status are not changed, so a recipient who has yet to confirm their sign-up remains pending. You will never get duplicates from running the same file twice
- Duplicates in the file are counted only once. If the same address appears multiple times—even with different capitalization—it is imported only once
- Unsubscribers remain unsubscribed. If a person has unsubscribed from your newsletter, she will be skipped, even if she appears in the file. Addresses you’ve blocked with “Never Again” or anonymized will also not be imported
- Unsubscribes from your old system are not included. The import sets all new addresses as active. If anyone unsubscribed in the old system, you must remove them from the file yourself before importing
- Be careful with the welcome email. If you have an automated campaign with the “Welcome (after sign-up)” trigger, it calculates the date based on the sign-up date. If the file is missing the `consent_date` field, the import date becomes the sign-up date, and the imported contacts will receive the welcome email. If their actual sign-up date is in the file and it’s earlier than the number of days after sign-up that the welcome email is set to be sent, they won’t receive it. The welcome email under “Newsletter,” “Setup” is not sent during import.
Export: Download the list as a spreadsheet
The Export button starts a download immediately, without any settings to configure along the way. The file is named “subscribers-” followed by today’s date and is a semicolon-separated UTF-8 file with this header row:
email;firstname;lastname;source;created
The rows are sorted by email address, and the file contains only active subscribers. If you selected a list from the drop-down menu before clicking “Export,” only that list will be included. The columns match the import format, where “created” is interpreted as the sign-up date, so you can import the file again—even into a different Shoporama store—and retain the source and sign-up date.
The export is useful for more than just backup: creating audiences on ad platforms, switching to another provider, or determining how many subscribers came from purchases versus contests. The “source” column reveals this. If you’d rather target people who have purchased a specific product, that feature is available in the export of customers who have purchased a specific product.
Four habits that keep your list healthy
- Export before you do anything major. It takes five seconds and serves as your “undo” button when you’re about to delete or import thousands of rows
- Use multiple lists instead of one big one. People who only want to hear about sales shouldn’t receive product updates. Fewer irrelevant emails mean fewer unsubscribes and longer customer retention
- Keep an eye on the “Source” column. If the list is growing solely through contests, the numbers may look good, but revenue rarely follows. Sign-ups from purchases and from the sign-up form are usually the most valuable
- Clean out the inactive subscribers. Under “Newsletter,” “Segments,” use the rule “Days since last click” with, for example, “greater than 180” to identify recipients who have received newsletters during that period without clicking on anything. Send them an email asking if they still want to hear from you, or send your regular newsletters to a segment of engaged subscribers—for example, those with “Days since last open” set to less than 30. Clicks are more reliable than opens because some email clients, such as Apple Mail, open emails automatically. Opens and clicks from another system aren’t included in an import, so wait to clean up imported recipients until they’ve received newsletters from Shoporama throughout the entire period.
Also, remember that all your newsletters must include an unsubscribe link. This also applies to the automated emails your store sends; you can read more about this in the article on unsubscribe links in automated emails. If you want to send newsletters to specific types of customers—such as your customer club or a customer group—read about customer groups and segmentation.
For those with a technical background
- Header names in the import are converted to lowercase and trimmed before being matched, and the alternative names listed above are translated. Columns that are not named email, firstname, lastname, source, or consent_date are ignored
- The delimiter is determined based on the first line: if it contains at least as many semicolons as commas, a semicolon is used; otherwise, a comma is used. A UTF-8 BOM is removed, and a file that is not valid UTF-8 is read as Windows-1252. There is no limit on line length, and empty lines are skipped
- The source from `source` is stored in lowercase; spaces are converted to underscores, and everything other than a–z, numbers, hyphens, and underscores is removed—including æ, ø, and å. It can be a maximum of 50 characters
- The registration date from `consent_date` is stored both as the registration date and as the consent date. Dates with slashes, such as 03/12/2024, are interpreted in the U.S. format (month/day), so please use the YYYY-MM-DD format. For addresses that already exist, `source` and `consent_date` are not used
- In the export, fields containing spaces are enclosed in quotation marks. This applies to the `created` column, which contains both the date and the time
- Campaigns are sent exclusively to recipients with “active” status, regardless of which lists the others are on
- Recipients can also be created and updated via Shoporama’s REST API. You specify the source yourself, but only when the recipient is created: if the address already exists, the API rejects the creation, and a subsequent update does not change the source. This is how sign-ups from the point-of-sale system and from your own integrations end up on the list
Frequently Asked Questions
I can’t find a recipient I know is subscribed. What should I do?
Use the search field instead of scrolling, as the overview only shows active recipients. The search also includes unsubscribed recipients and those who haven’t yet confirmed their subscription, so you’ll find the person there—but not in the list—if she’s one of them. If she isn’t there at all, she may be subscribed with a different address.
How can I tell if a recipient has unsubscribed?
Click on the recipient. At the top of the Details card, the Status is listed as Active or Unsubscribed, and for unsubscribed recipients, the date and time are also shown. If you want to see all unsubscriptions together, they’re located under Newsletter, Unsubscriptions, where you can filter by date.
My file is comma-separated. Can I still import it?
Yes. The import tool automatically checks the first line to see whether the file uses semicolons or commas. Just make sure the first line is a header row with the column names, and that the characters “æ,” “ø,” and “å” appear correctly in the names that follow.
I have 40,000 recipients. Can I move them all to a new list at once?
Not using the checkboxes, because “Select All” only selects the page you’re on, and it displays a maximum of 200 at a time. The quickest way is to export the list, check the box for the new list and the consent option under “Import,” and then import the file again. Known addresses aren’t recreated; they’re simply added to the list, and their source and sign-up date remain unchanged.
Do the imported recipients receive a welcome email?
That depends on the sign-up date. The import process itself does not send any emails, and the welcome email under “Setup” will not be sent. However, if you have an automated campaign with the “Welcome (after sign-up)” trigger, and your file is missing the `consent_date` column, the import date will be treated as the sign-up date, and they will receive it. Include their actual, earlier sign-up date in the file to avoid this.
Why don’t the imported subscribers receive a confirmation email?
Because by checking the box on the import page, you’re confirming that they’ve already agreed to receive your newsletter. That’s why they become active immediately, even if you’ve enabled double opt-in. Double opt-in still applies to everyone who signs up through your store. If you want to welcome the imported subscribers, send a campaign to the list you imported them into.
Can I bring my unsubscribers over from the old system?
No. The import doesn’t read the status from your old system, and all new addresses in the file are created as active. Therefore, only include recipients who are still subscribed. People who have already unsubscribed from you in Shoporama are skipped and remain unsubscribed.
I’m switching from Klaviyo. Will opens and clicks carry over?
No. The import includes email address, name, source, and sign-up date. Opens and clicks are only tracked for the newsletters you send from Shoporama. Therefore, wait to use the segment rules “Days Since Last Open” and “Days Since Last Click” to clean up the imported list until they’ve received newsletters from Shoporama for the entire period covered by the rule.
Where do I document consent in the event of an audit?
For recipients who have signed up on your online store themselves, the time of consent and IP address are listed in the “Details” card. For imported subscribers, the source and sign-up date are listed from the file, but no IP address is provided. If you need this information in a consolidated format, download a CSV file containing all newsletter sign-ups and their consent details under “Customers,” “Downloads.” Manually created subscribers and subscribers imported before the consent checkbox was added to the import page have no record, so be sure to keep your own documentation as well.
A customer requests to be completely deleted. Should I select “Unsubscribe” or “Delete”?
If the customer simply asks not to receive any more newsletters, select “Unsubscribe.” If the customer explicitly asks to have their data deleted, first unsubscribe the customer, and then use “Anonymize” next to the customer’s name under “Newsletter,” “Unsubscriptions.” The name and email address will be deleted, but the address will remain blocked so that the person isn’t re-added during a later import. “Delete,” on the other hand, also removes the block.
Can I exclude a single recipient from a specific mailing?
No. Recipients are selected either from a list or via a segment, and a segment is purely rule-based, so there is no “Remove this person” button on the campaign itself. If you want to avoid sending to a specific person, you can either change the segment’s rules so she is excluded, send to a regular list without her, or mark her as Unsubscribed. However, “Unsubscribed” applies to all future mailings, not just this one.
What happens to my statistics if I delete recipients?
The numbers for previous mailings are retained. Opens, clicks, and orders continue to be counted in the campaign statistics, but the link to the individual person is removed. Deletion cannot be undone, so always export first if you have even the slightest doubt.
Can I use the export for audiences in Facebook or Google Ads?
Yes. The export contains the email addresses that the ad platforms use for customer audiences and lookalikes. Remember that you may only use the addresses within the scope of the consent people have given, and that the file contains personal data.
Do I need to import my customer club as a list to send to it?
No. Instead, create a segment under Newsletter, Segments using the rule “Has Customer Profile” or “Customer Group,” and select the segment in the campaign. A segment selects only those who are already actively subscribed and identifies the customer profile via the email address. An import, on the other hand, subscribes all new addresses in the file—including those who have never opted in to your newsletter—and you must confirm that they have all given their consent. Read more in the article about customer groups and segmentation.
Related articles
The newsletter module
Complete guide to Shoporama's built-in newsletter module. Learn how to create campaigns, segment recipients, use A/B testing, set up automatic...
Export customers who have purchased a specific product
Guide to export a list of customers who have purchased a specific product and send them an email.
Unsubscribe links in automatic emails
Give your customers the option to unsubscribe from automatic follow-up emails after purchases and product reviews - with a simple link in the email.
Customer groups and segmentation
How to create customer groups and segments in Shoporama for targeted marketing and newsletters.
REST API
Complete guide to Shoporama's REST API: authentication, all endpoints, examples and Swagger documentation.
Downloads: Download your customers and newsletter subscribers as a CSV file
Under "Customers," "Downloads," you can download two spreadsheets: one listing all customers who have made purchases from you, including the number...
Import Customers via CSV
How to import customers into your online store using a CSV file: which columns Shoporama reads, how duplicates are handled via email, and what to...
Customer Overview: Find and Manage Your Registered Customers
The Customer Overview lists all customers with profiles. Learn what the columns mean, how to search and sort, create orders, log in as a customer,...
Mailing List Integration: Connect Shoporama to Your Newsletter Provider
Automatically forward newsletter sign-up notifications from your online store to Klaviyo, Ubivox, Mailchimp, Campaign Monitor, or Brevo, and see...
Related features
Opening rate
Open rate shows what percentage of recipients open your newsletter. Learn what a good rate is, what affects it and how to improve it with A/B...
Double opt-in
With double opt-in, new newsletter subscribers must confirm their email via a link. This results in a cleaner list, better deliverability and...
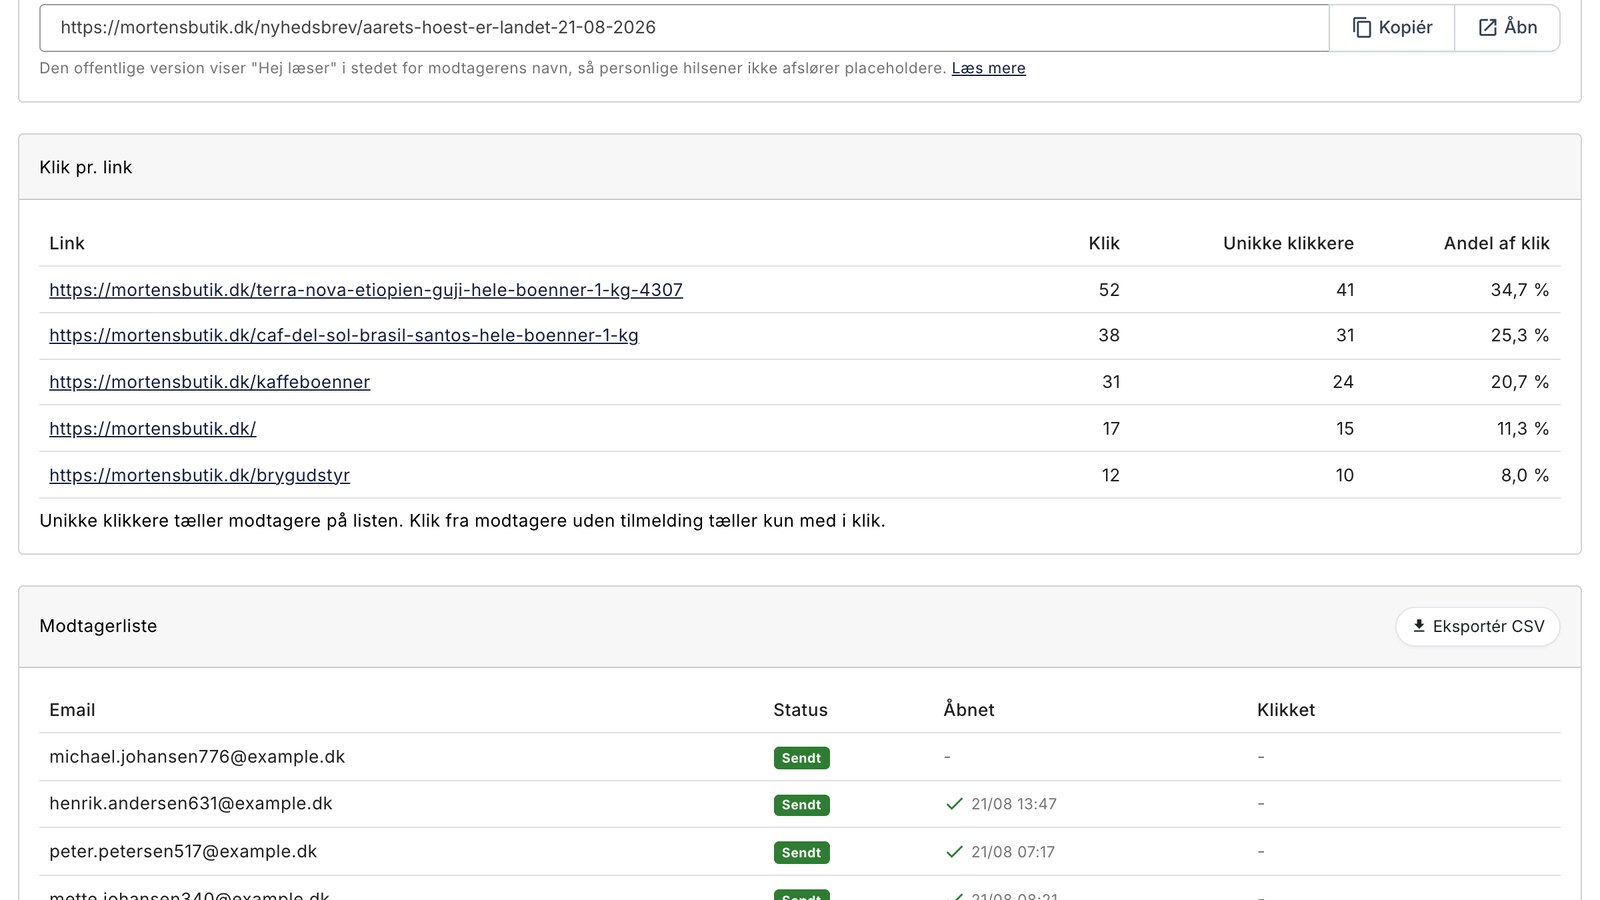
Newsletter: Move your list from Klaviyo or Mailchimp and send more targeted emails
Import recipients with their consent, without reactivating those who have unsubscribed. Send emails after the purchase of specific items, and view...
Newsletter system - send professional newsletters directly from Shoporama
Built-in newsletter system with A/B testing, segmentation, product blocks and statistics. Integrates with Brevo, Klaviyo and HeyLoyalty. Included...
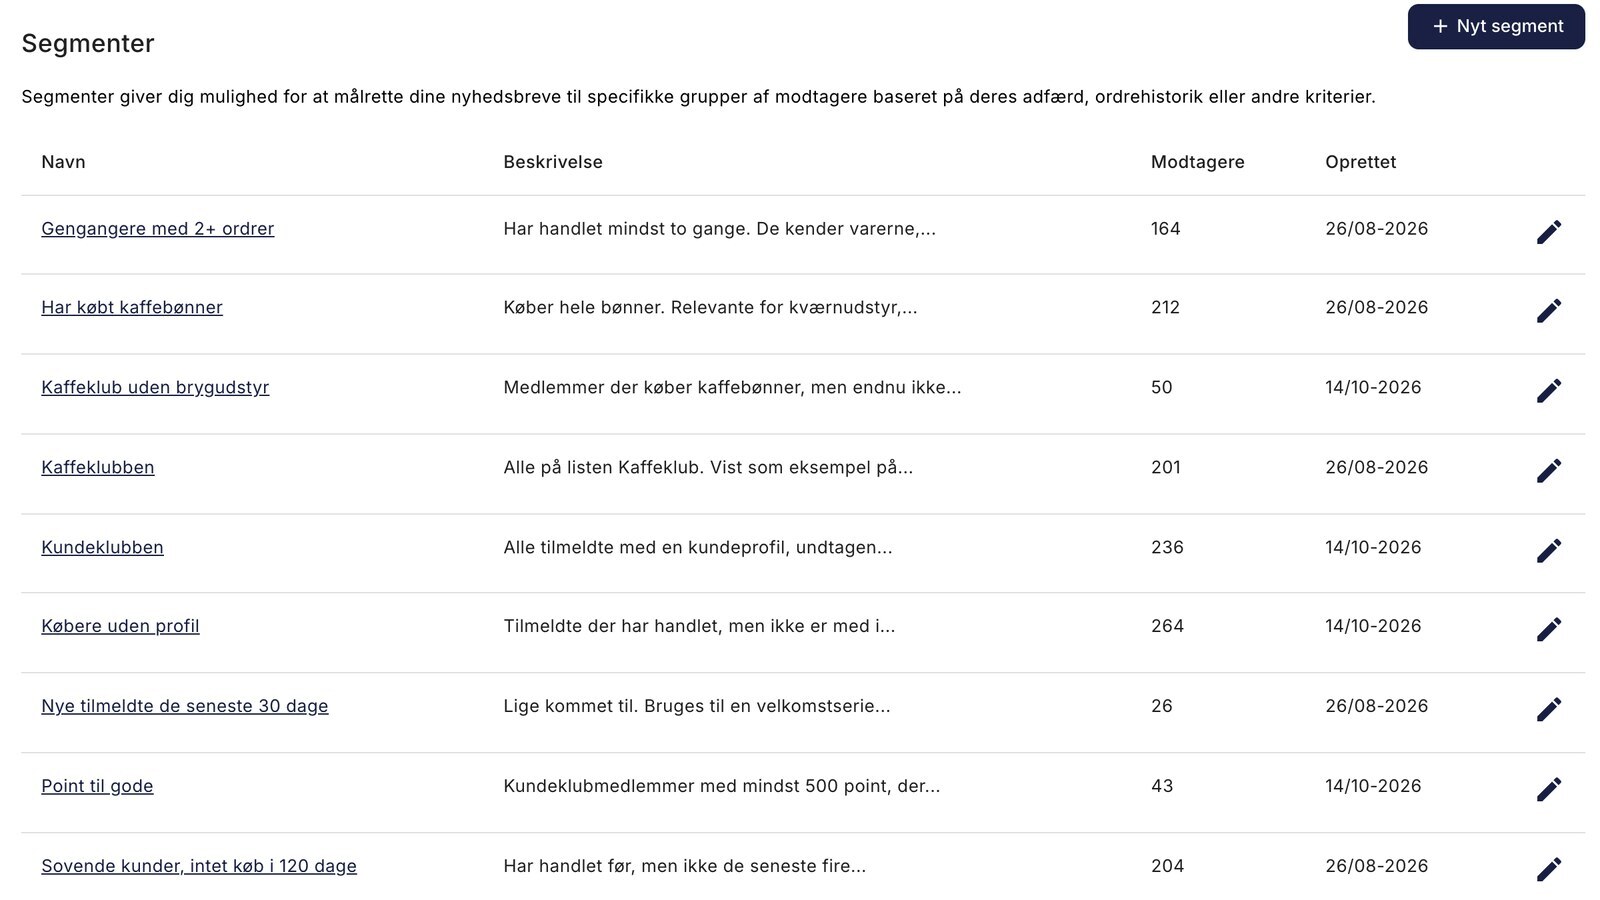
Customer Club Newsletter: Sell More to Returning Customers
Send the newsletter only to the customer club, a specific customer group, or members with points to redeem. Five segments to drive additional sales...