Business Central Integration: Transfer Orders to Microsoft Dynamics 365 Business Central
Here's how to install the free Business Central app, link it to your Microsoft account, set it up under Microsoft Entra apps, and have orders from your online store transferred as sales invoices or sales orders.
With the Business Central app, orders and credit memos from the online store are automatically transferred to Microsoft Dynamics 365 Business Central. By default, each order becomes a posted sales invoice with the customer, line items, shipping, discounts, and sales tax, and for paid orders, the payment is recorded so that the invoice is marked as paid. If you use sales orders in Business Central, the order can instead become a sales order that you fulfill and invoice there. Credit memos become sales credit notes; the online store’s own invoice can be attached as a PDF; and if something goes wrong, you can see it directly on the order in Shoporama. The app is free and developed by Shoporama.
What you’ll need
- Business Central Online. The app works with Microsoft’s cloud version of Business Central, not with Business Central on-premises or older Dynamics NAV and Navision installations.
- An administrator in your Microsoft account, such as a Global Administrator. Only an administrator can grant Shoporama permission to use Business Central.
- Administrator access to Business Central, so you can create the app under Microsoft Entra apps and set up a customer template. Your Business Central partner can also do this for you.
- A user with full access in Shoporama. Only this user can install apps.
The app logs into Business Central as a program and does not use one of your user licenses. Your own users must have a Business Central license as usual.
Step 1: Install the app
- Go to Integrations → Apps.
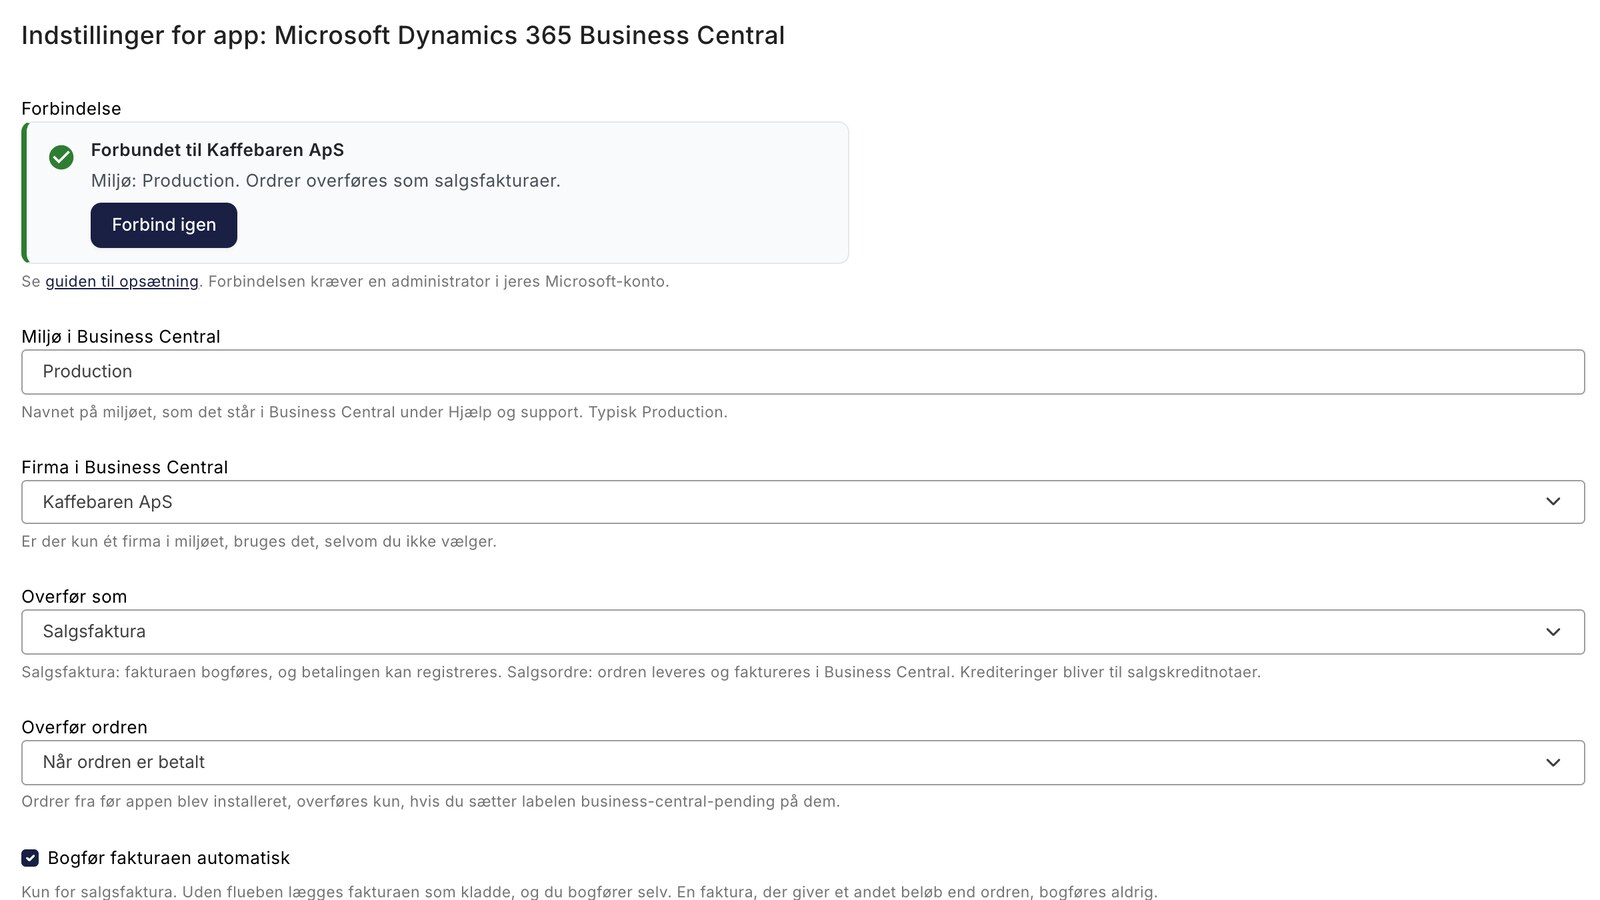
- Find Microsoft Dynamics 365 Business Central and click Install. The App Settings: Microsoft Dynamics 365 Business Central page opens. Later, you can find it by clicking the Settings button on the card under Installed Apps.
Once the app is installed, it creates three order labels in your store: business-central-ok, business-central-pending, and business-central-failed. You’ll use these to track the transfer, as described below.
Step 2: Connect the app to your Microsoft account
At the top of the app’s settings, you’ll see the “Connection” section. Before the connection is established, it will say “Not connected to Business Central” and display the “Connect to Business Central” button.
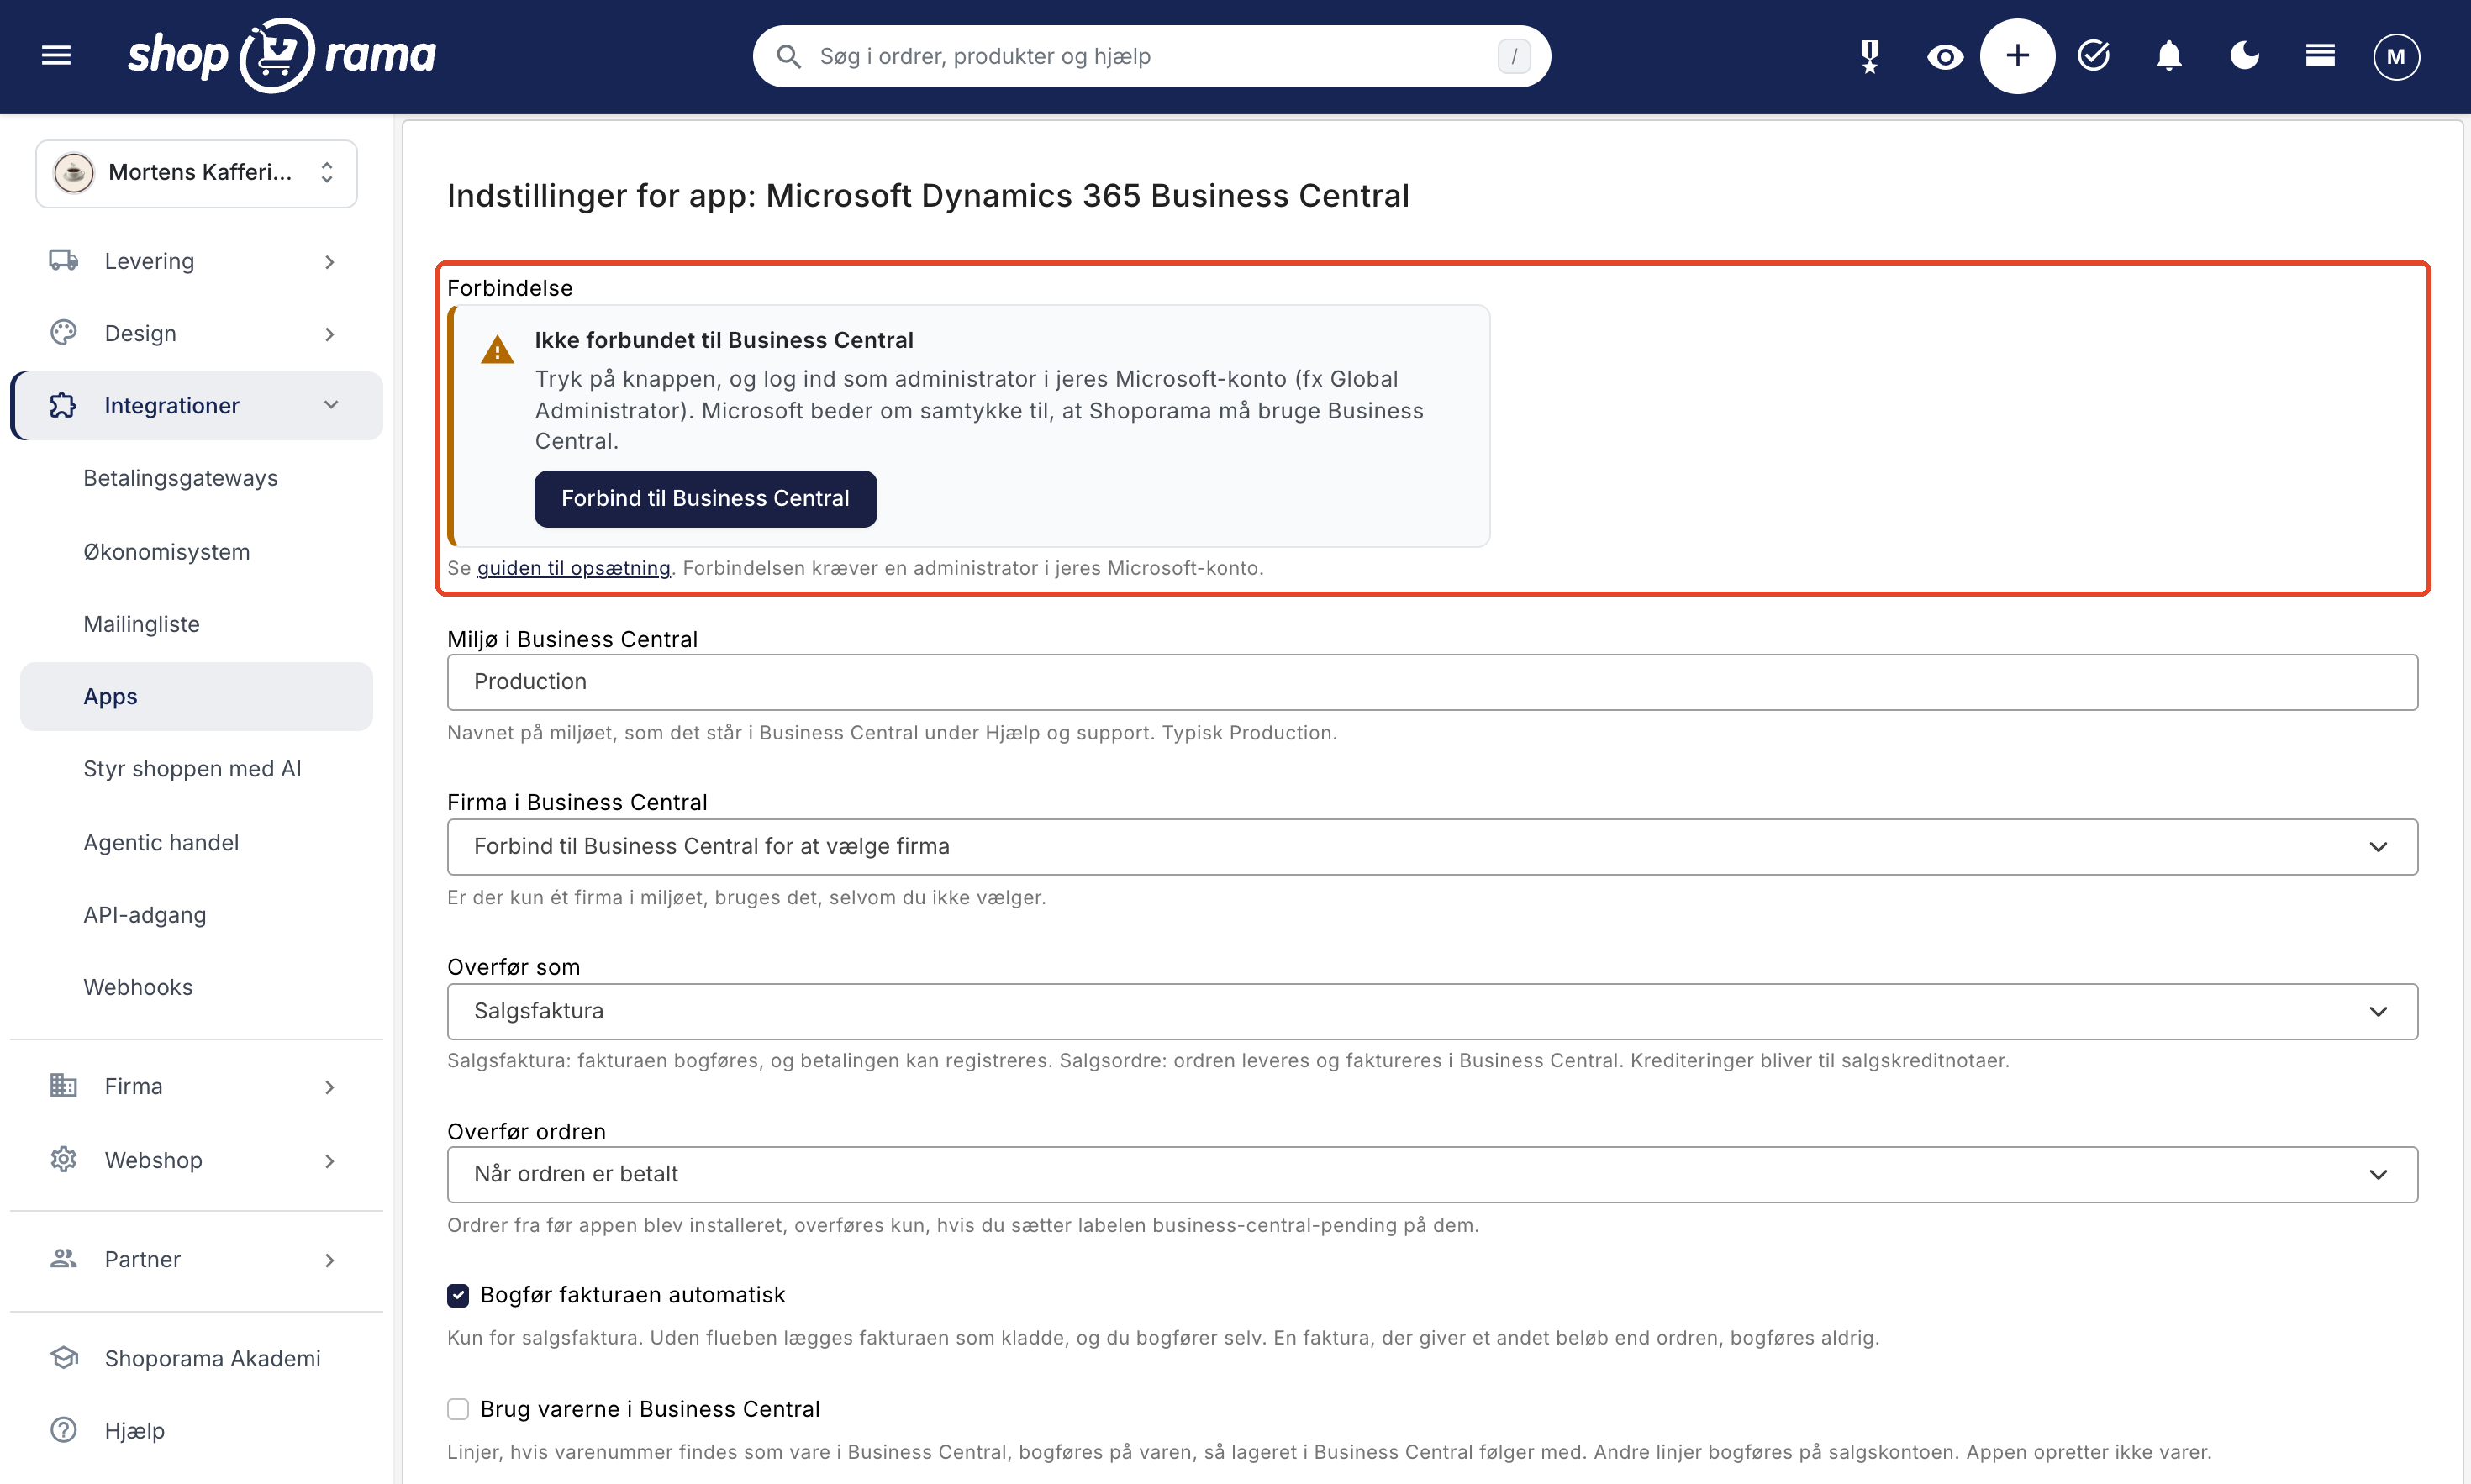
- Click “Connect to Business Central.” You’ll be redirected to Microsoft.
- Sign in as an administrator to your Microsoft account, such as a Global Administrator.
- Microsoft will ask for your consent to allow the Shoporama Business Central app to use Business Central in your organization. Grant consent.
- You’ll be returned to the app’s settings in Shoporama.
Granting consent allows Shoporama to use Business Central, but the app can’t retrieve data until it’s also been set up within Business Central. Until then, the message “Business Central doesn’t recognize the app yet” will appear in the Connection field along with the steps listed in Step 3 below.
If you are not an administrator, you cannot grant consent. Ask an administrator to click the button and log in. If it says “The link has expired” or “It took too long,” reload the app’s settings and click the button again.
Step 3: Set up the app in Business Central
In Business Central, the app must be created under Microsoft Entra apps and assigned a set of permissions. This is where you determine what Shoporama is allowed to do in Business Central.
- Sign in to Business Central, click the magnifying glass at the top, and search for “Microsoft Entra applications.” Open the page.
- Click New. The Microsoft Entra App Card opens.
- Enter c6de7aae-ae07-47b5-b5a4-68cb2fbd993d in Client ID and Shoporama in Description.
- Make sure Status is set to Disabled while you assign the permission set. Under User Permission Sets, select D365 BUS FULL ACCESS in the Permission Set column. Use New Row if there isn’t an empty row.
- Set Status to Enabled.
- Go back to the app’s settings in Shoporama and click Save. The Connection field now shows Connected to and the name of the company. If you have multiple companies, it will say Connected to Business Central and Select the company below, then save.
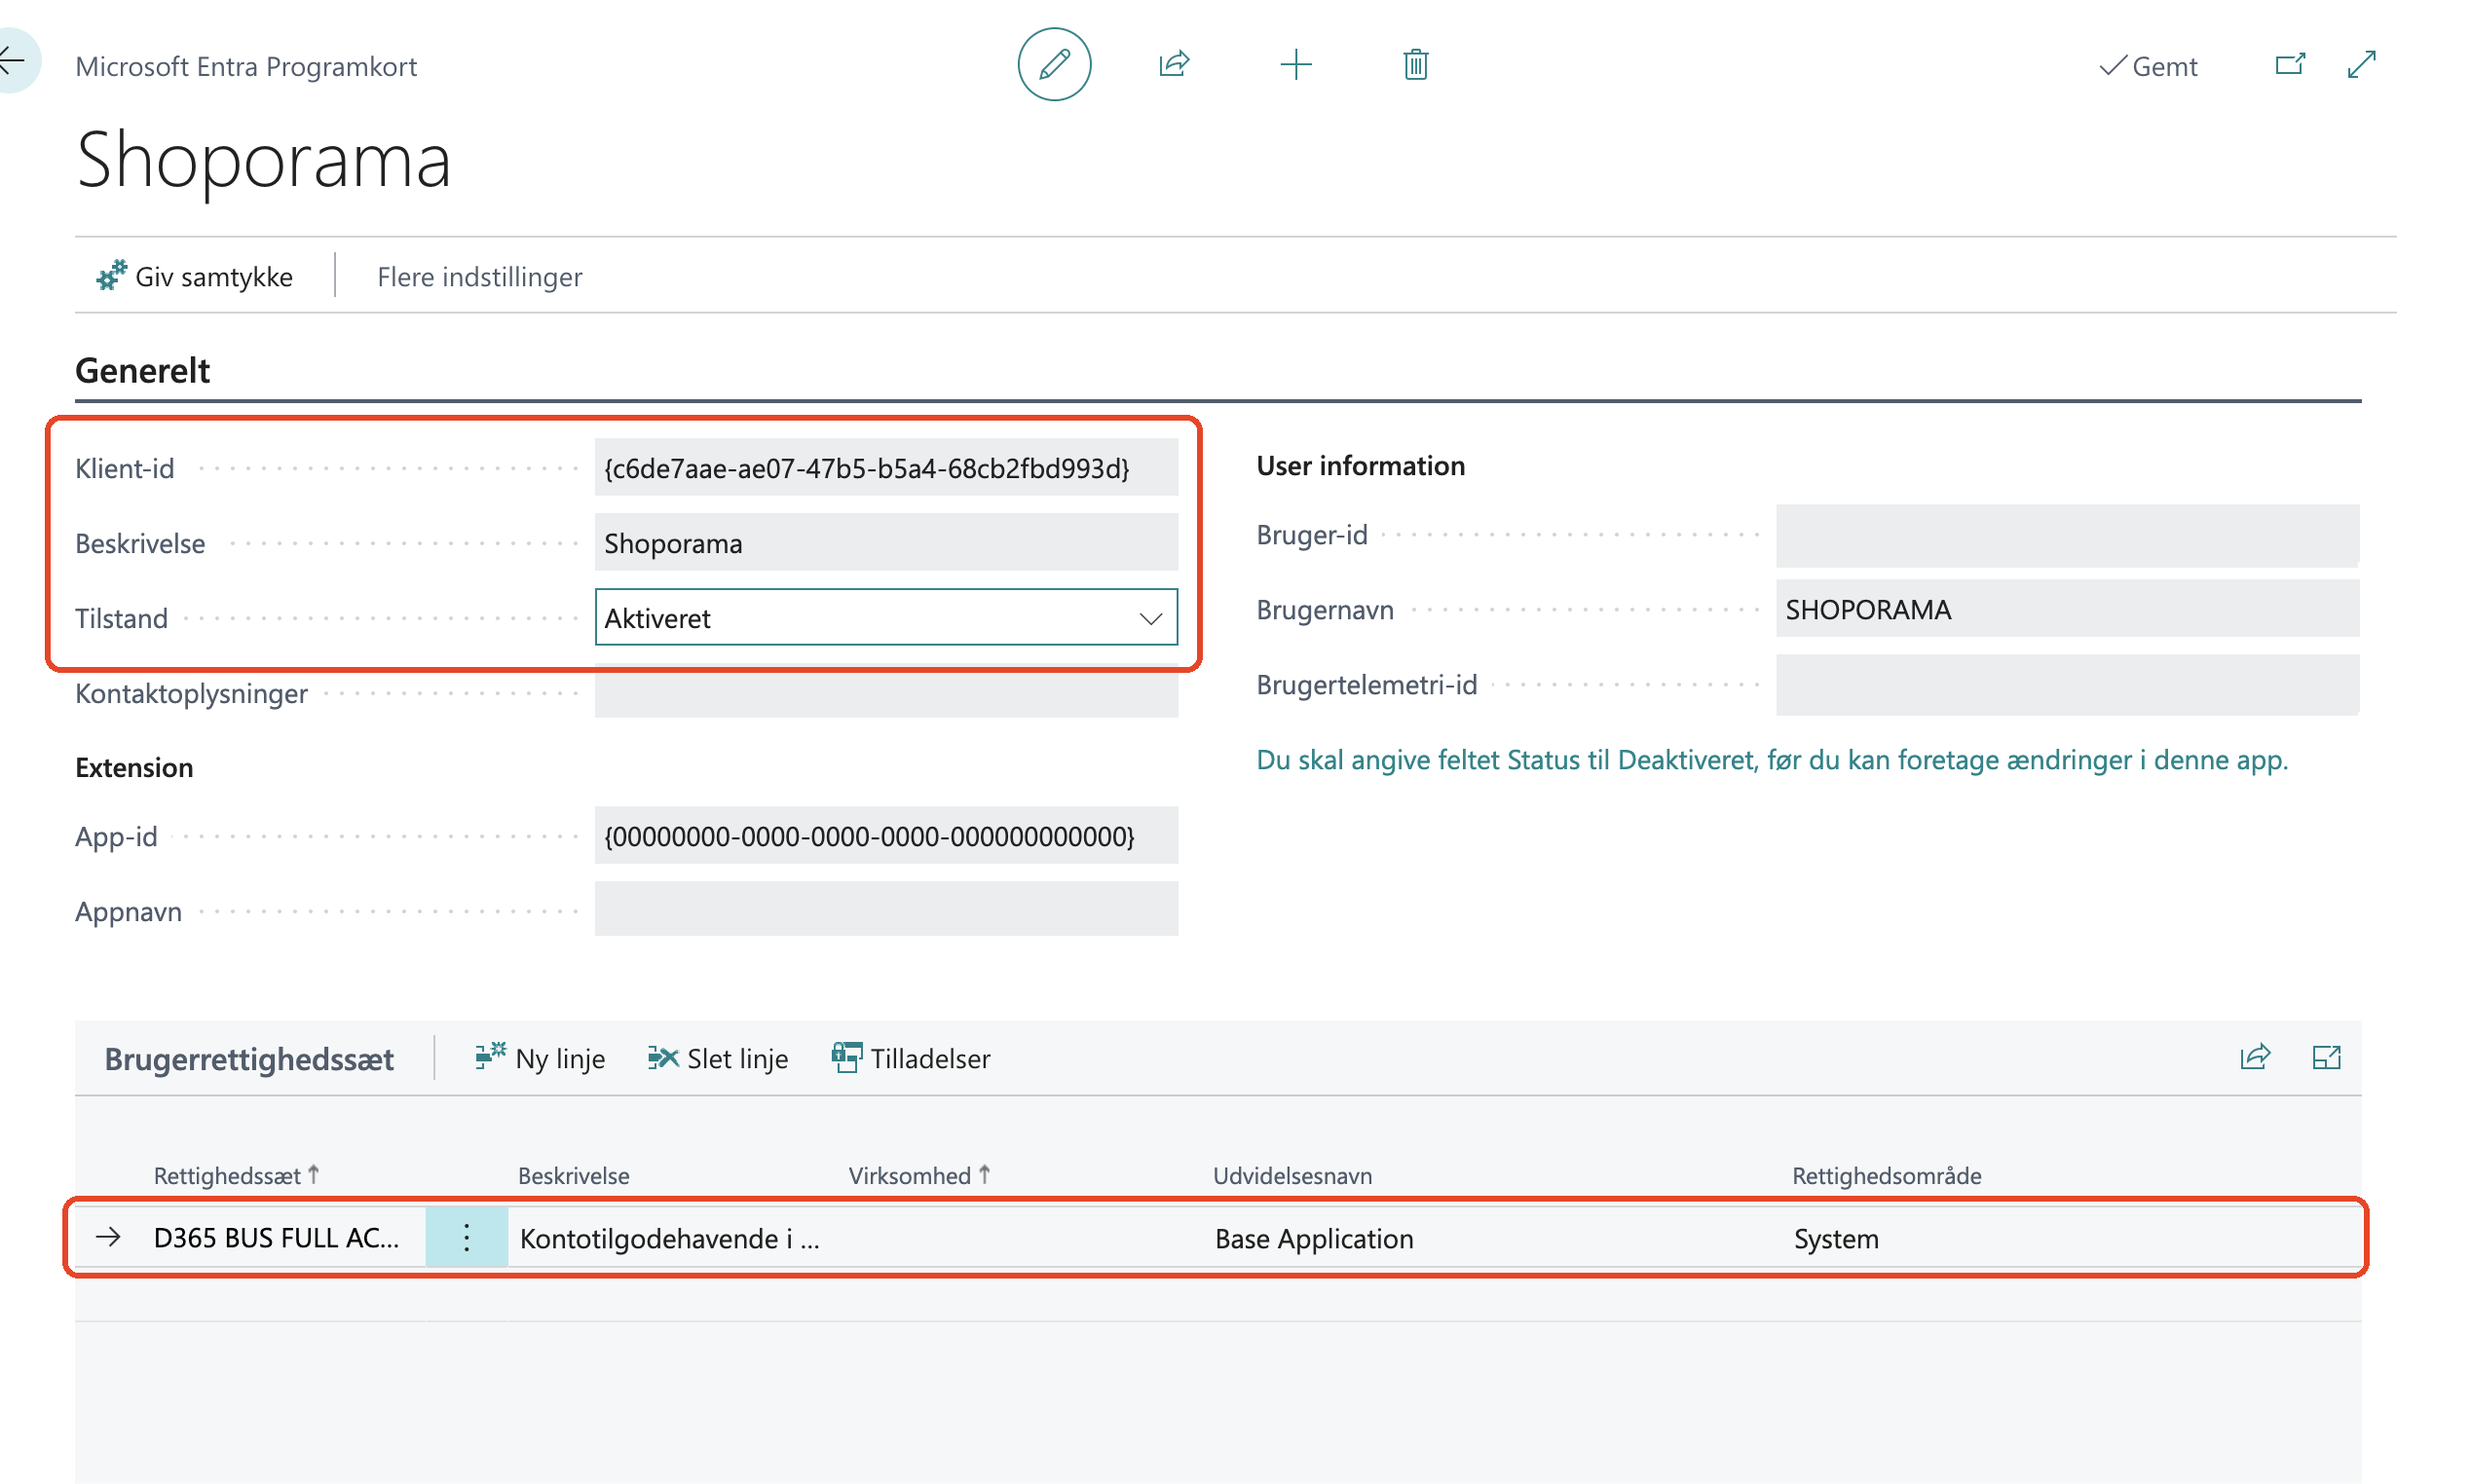
The permission set must be D365 BUS FULL ACCESS
With, for example, D365 AUTOMATION, the app cannot read customers, products, and invoices, and the "Connection" field will display " The app lacks permissions in Business Central." If you want to change the permission set later, the Status must first be set to Disabled. Otherwise, Business Central will display the message: “You must set the Status field to Disabled before you can make changes in this app.” Remember to set the Status back to Enabled afterward.
Do not use the “Give Consent” button on the card. Consent is given via the “Connect to Business Central ” button in step 2.
Step 4: Select Environment and Company
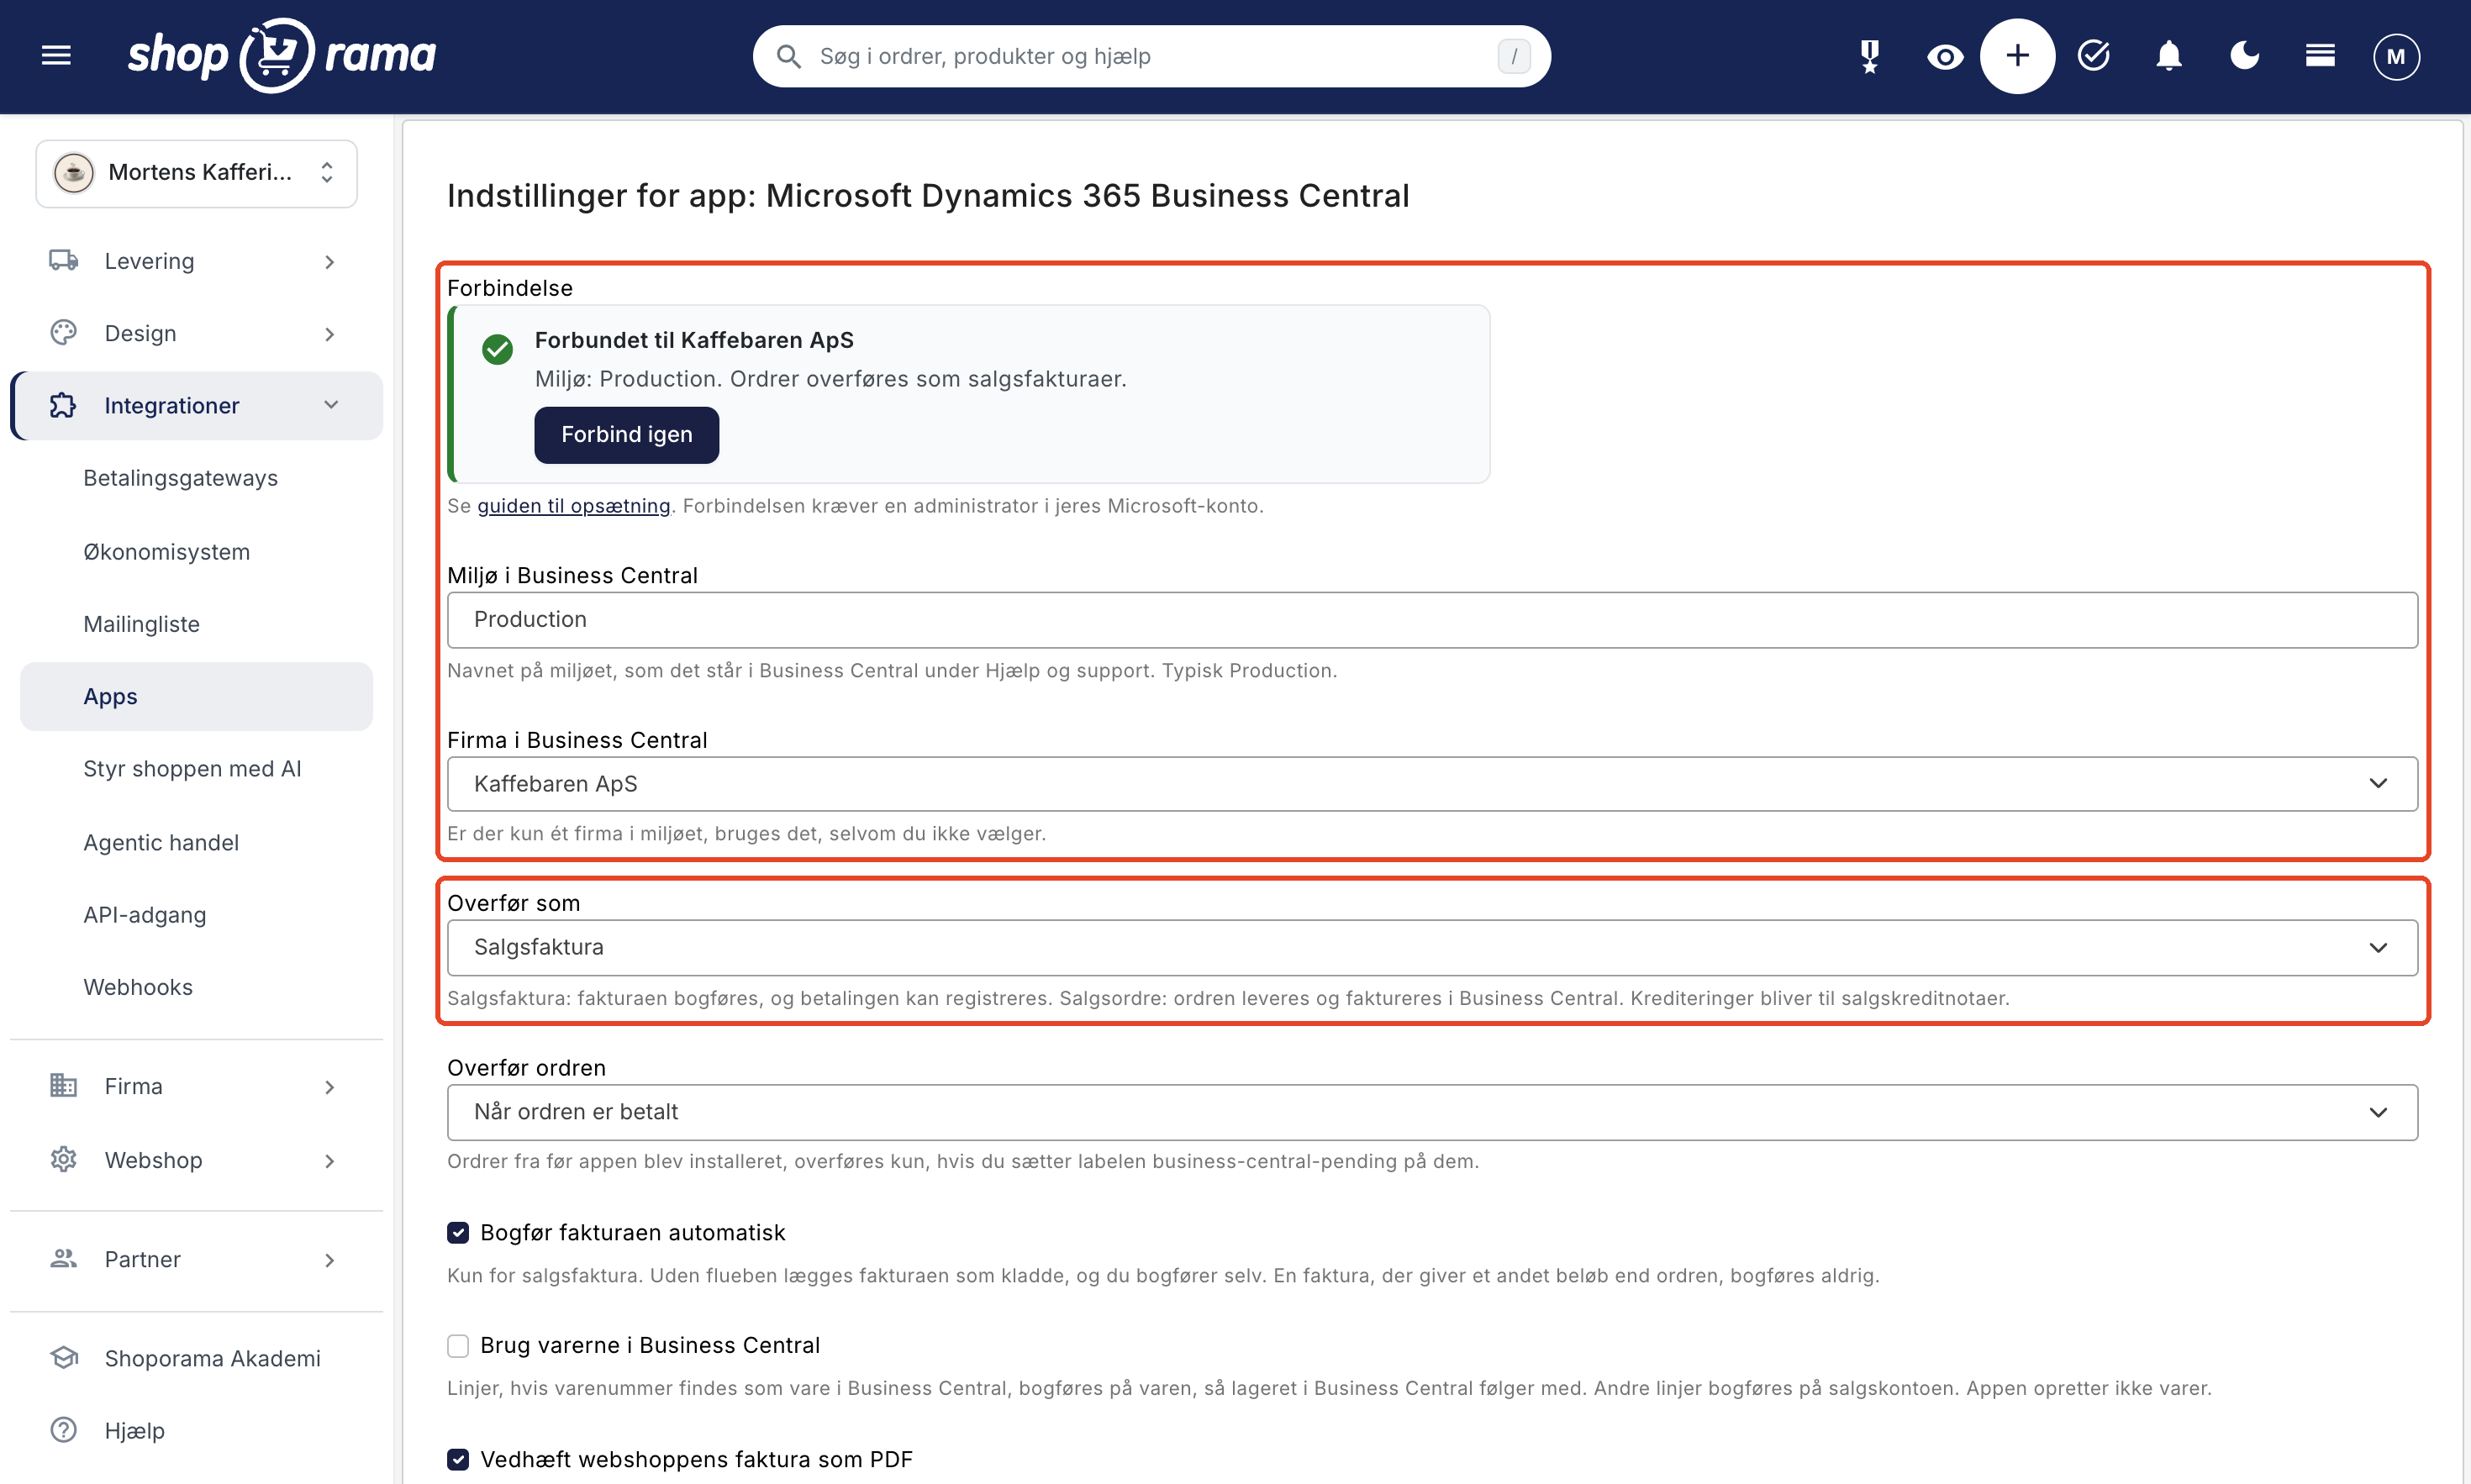
- Environment in Business Central (default: Production): the name of the environment as it appears in Business Central under Help and Support. Typically, this is Production.
- Company in Business Central: The list shows the companies in the environment. If there is only one, it is used automatically, even if you do not select it. If you have multiple companies, select the one to which the orders should be posted.
Click Save. Only after the company has been selected and saved—or if there is only one—will the app retrieve the chart of accounts, tax groups, and tax regions from the company. Until then, the text “Select company and save” will appear to view the list in the lists. Once everything is set up, the “Connection” field will display “Connected to” followed by the company name, and below that, for example, “Environment: Production.” Orders are transferred as sales invoices.
Step 5: Choose how and when the order is transferred
- Transfer as: Sales Invoice (default) or Sales Order. The difference is explained under “Sales Invoice or Sales Order? ” below.
- Transfer the order: When the order is paid (default), When the order is shipped, or When the order is created. With “When the order is shipped,” only orders that are marked as “Shipped” are transferred. “When the order is created” is best suited for sales orders: the order is transferred immediately, even before it’s paid, and the payment isn’t recorded. The transfer occurs automatically shortly afterward. With the default option, an order where the customer pays later (e.g., invoice or EAN) is not transferred until you mark it as paid in Shoporama. If you sell a lot on an invoice basis, select “When the order is shipped.” Orders from before you installed the app are only transferred if you apply the “business-central-pending” label to them.
- Post the invoice automatically: enabled by default and applies only to sales invoices. If unchecked, the invoice is saved as a draft in Business Central, and you post it yourself. Credit memos are also saved as drafts. The app does not record payments for drafts, so you must do this in Business Central. An invoice with an amount different from the order is never posted.
- Attach the online store’s invoice as a PDF: enabled by default. The online store’s own invoice is attached to the sales invoice or credit memo in Business Central and is included when it is posted. Sales orders do not receive a PDF.
- Prefix for external document number: The online store’s order number appears in the “External Document No.” field on the document in Business Central, e.g., 4792. With the prefix “WEB-,” it becomes “WEB-4792.” Use a prefix if multiple online stores are transferring data to the same company.
- Use items in Business Central: disabled by default. See “Items in Business Central” below.
Step 6: Choose how customers become accounts receivable
Under “Customers,” select how customers are transferred to Business Central:
- Create and reuse one customer account per customer (default): The app searches for a customer account with the customer’s email address in Business Central and uses it if it exists and is not blocked. The app also recognizes a company by its CVR number if it has encountered the company before, such as when a colleague places an order using a different email address. Otherwise, the app creates a new customer with name, address, phone number, email, CVR number (for companies), and VAT region.
- Group private customers under a single customer account: all private customers are posted to a single customer account that you create yourself in Business Central, such as “Webshop Customers.” Companies still each have their own customer account.
A customer is considered a business if the order includes a CVR or VAT number, an EAN number, or a company name. Business Central cannot search by CVR number, so a business that existed in Business Central before you started using the app is recognized only by its email address.
The EAN number is not transferred to Business Central. If you sell to customers with an EAN number, enter the GLN number for the customer in Business Central. If you create the customer using the email address the customer uses in the online store before the customer makes their first purchase, the app will use that email address.
Create a customer template in Business Central
Business Central does not assign accounting groups to new customers when they are created externally, and without these groups, Business Central will reject the invoice. Therefore, you must create a customer template once, from which new customers will inherit their groups. This is necessary as soon as the app creates customers, and companies always get their own customer record, even when private customers are grouped under a single customer record.
- Find the groups that the online store’s customers should have: open an existing customer and look under “Invoicing” for “Company Posting Group” and “Customer Posting Group” (e.g., DOMESTIC).
- Search for Configuration Templates and click New. Enter a code (e.g., WEBDEBITOR) and a description, and enter 18 in Table ID. The table name will then be Customer.
- Under Lines, create two lines. Select the field in Field Name from the list labeled in English: Gen. Bus. Posting Group (Company Posting Group) and Customer Posting Group (Customer Posting Group). Enter the group from the first step in Default Value.
- Search for API Setup and click New. Enter 30009 in Page ID (the customer API, APIV2 - Customers), and select your template in Template Code. Leave Conditions blank.
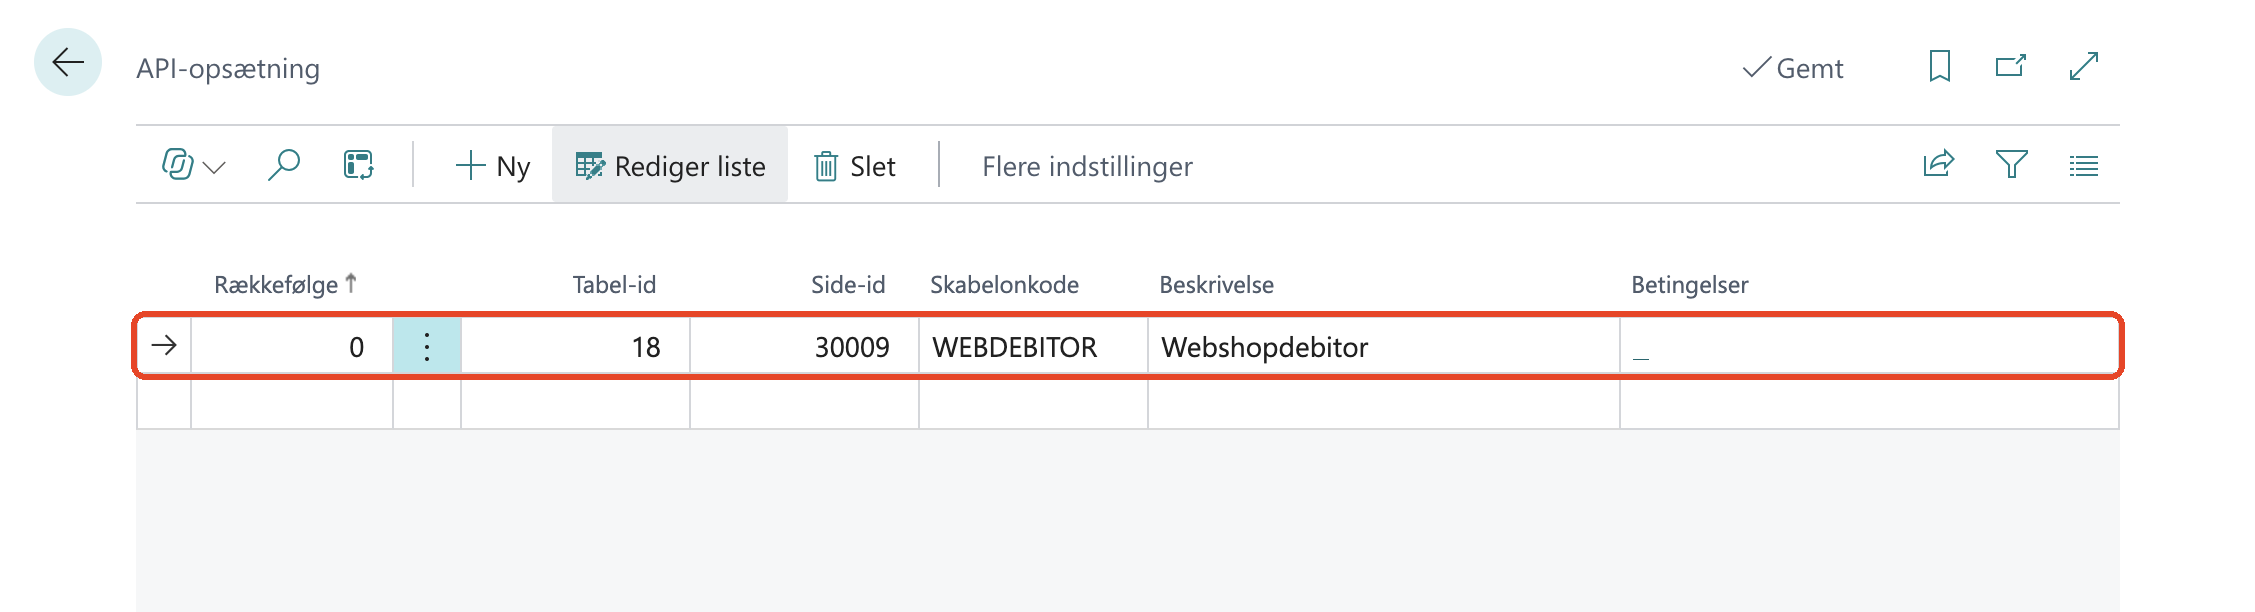
If the template is missing, the app will delete the customer again, and the order will be labeled “business-central-failed” with a note explaining what you need to do. Ask your accountant or Business Central partner if you’re unsure which groups the online store’s customers should be assigned to.
Permanent customer for private customers
- Permanent customer for private customers: the customer number in Business Central. The name on the invoice is the customer’s, e.g., “Webshop Customers,” while the customer’s address, shipping address, email, and phone number appear on the invoice.
- Permanent customer for private customers outside the EU: The customer must be assigned the VAT area for exports. If you leave the field blank, customers outside the EU will each be assigned their own customer, and the customer template must be set up accordingly.
Step 7: Select accounts, VAT groups, and VAT regions
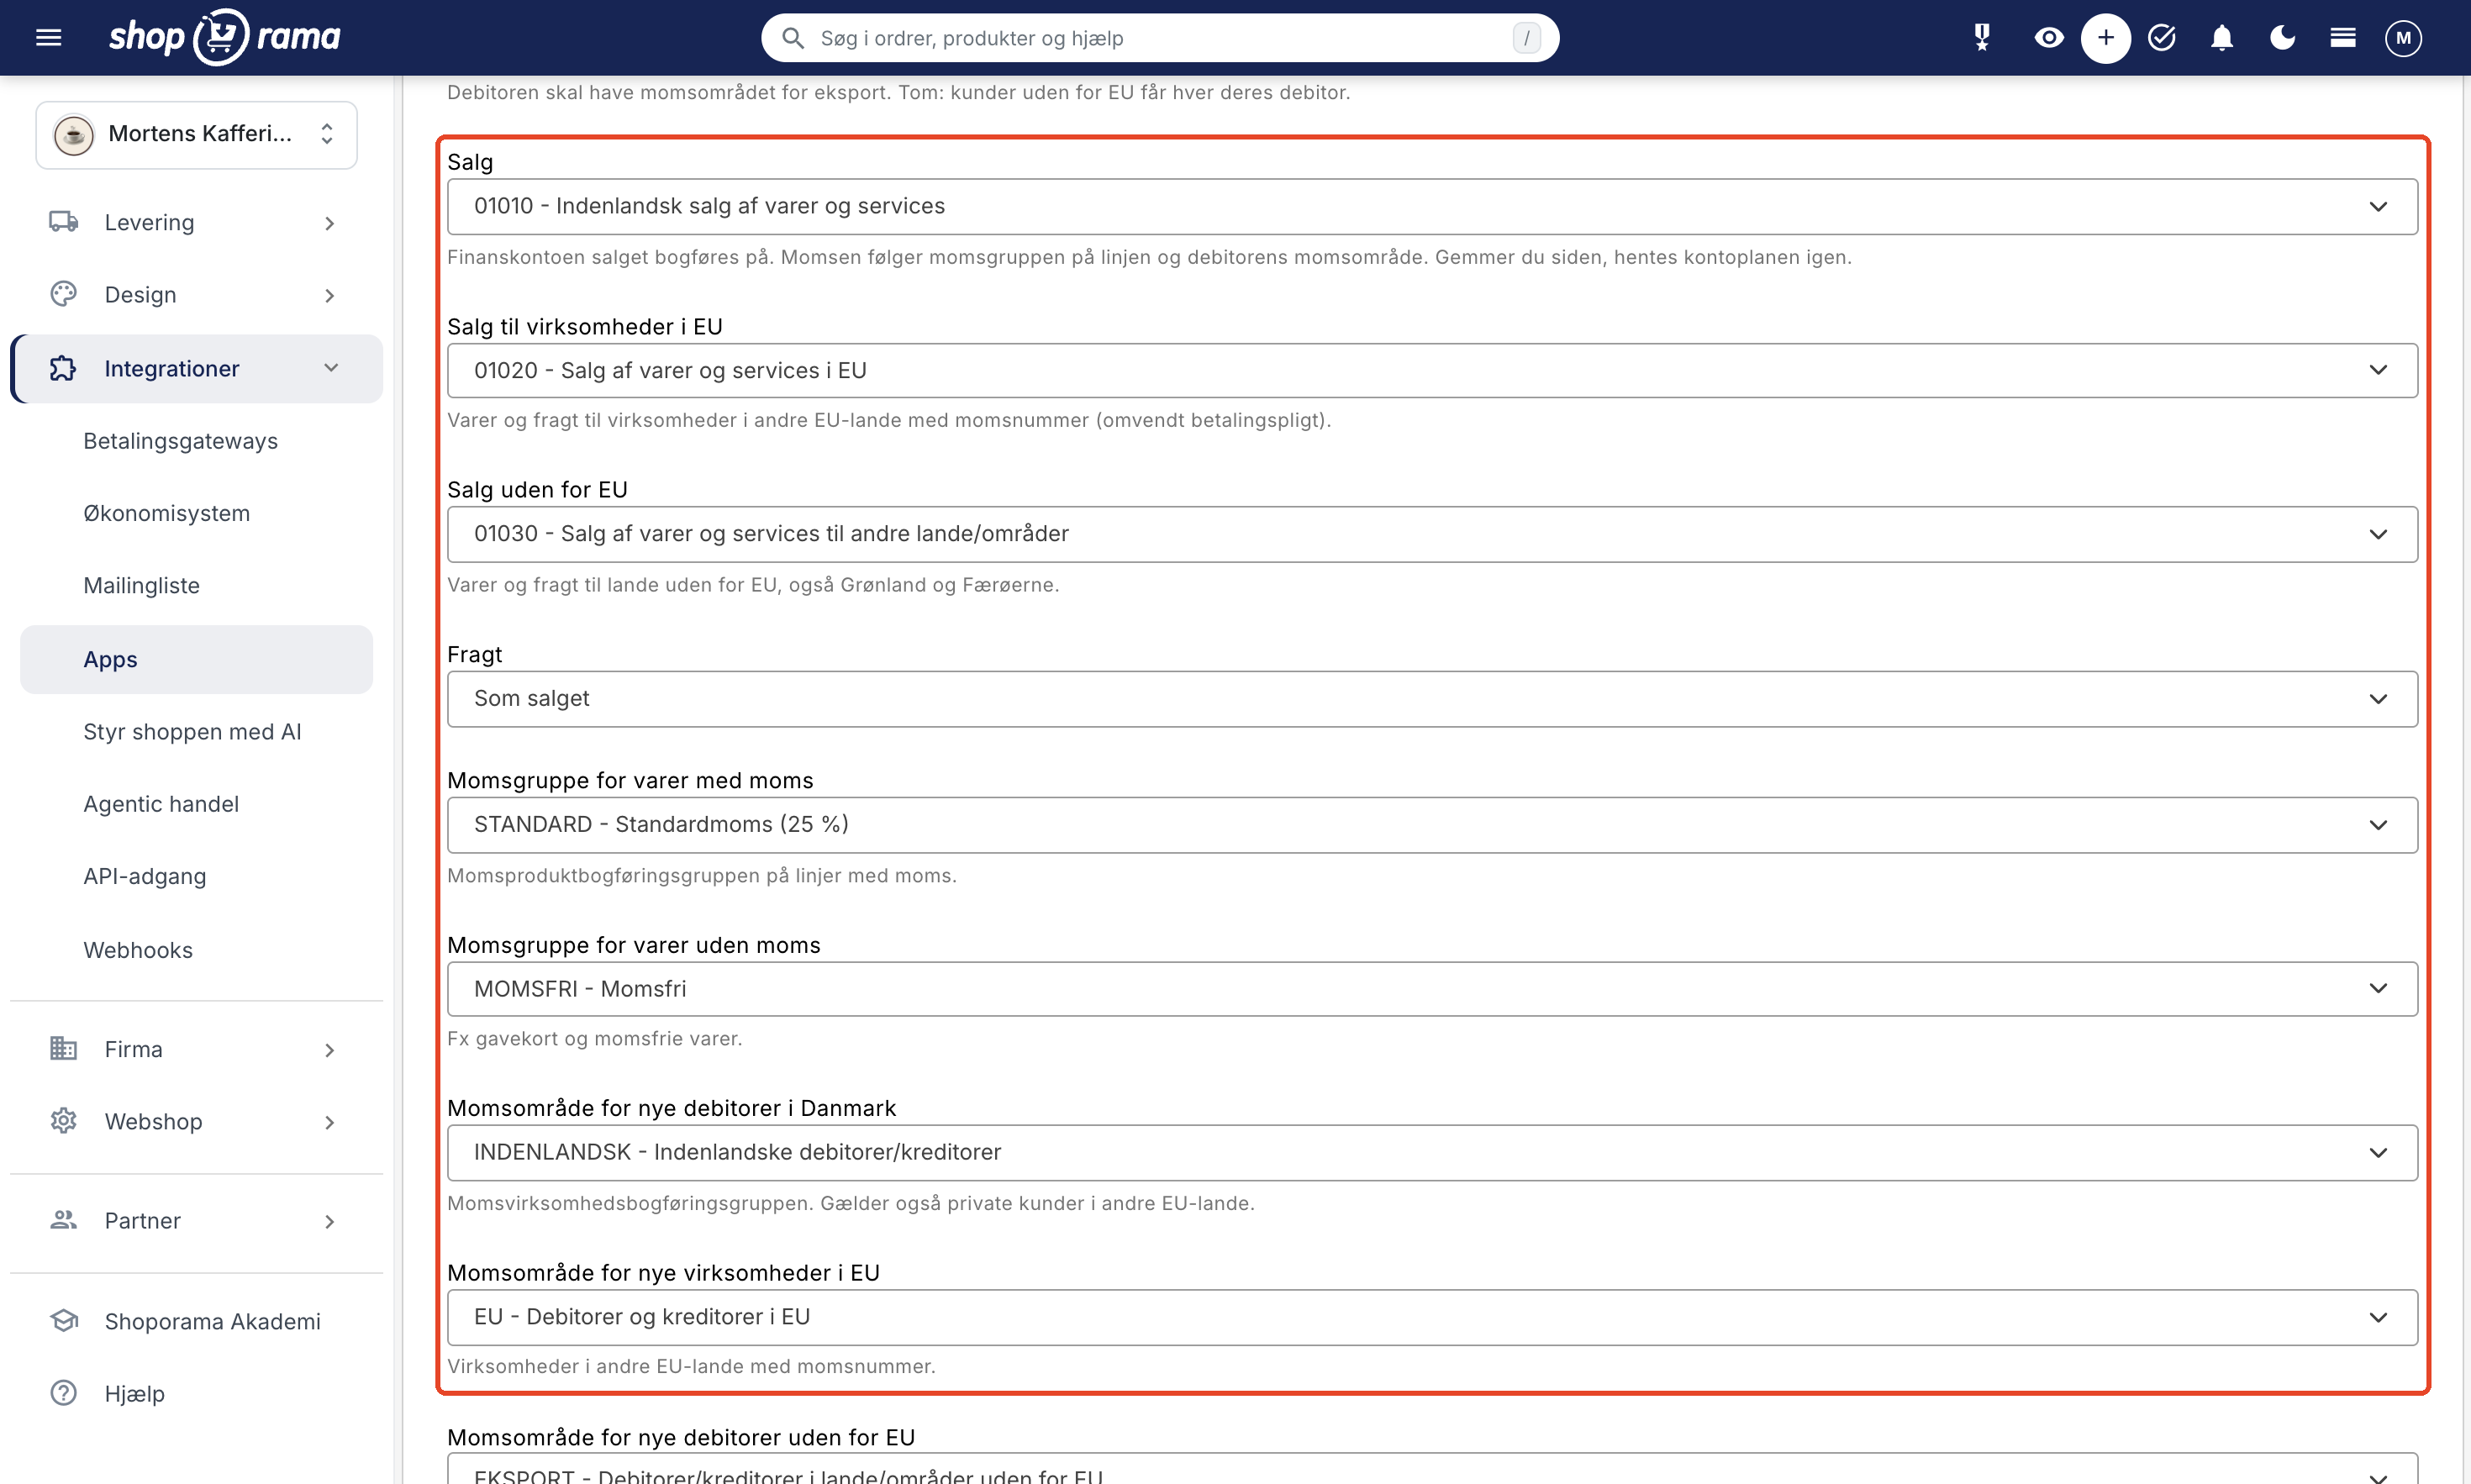
The account lists show the revenue accounts in the company’s chart of accounts that can be posted to directly, along with their numbers and names. The VAT groups and VAT zones are also retrieved from the company.
Accounts
- Sales: the financial account to which sales are posted. Discounts are deducted from the same account. This field must be filled in; otherwise, no orders will be transferred.
- Sales to businesses in the EU (default : As sales): goods and shipping without VAT to businesses in other EU countries with a VAT number (reverse charge). See Reverse charge and VIES validation.
- Sales outside the EU (default : As sales): goods and shipping without VAT to countries outside the EU, including Greenland and the Faroe Islands.
- Shipping (default : Same as sale): Shipping costs are posted to the same account as the sale on the order, unless you select a shipping account.
An order with VAT is always posted to Sales, even when the item is shipped abroad.
VAT Groups and VAT Areas
- VAT group for items with VAT (default STANDARD): the VAT accounting group for items, shipping, and discounts that normally include Danish VAT. It is also used when the item is sold without VAT to businesses within or outside the EU. See VAT, EU, and Export.
- VAT group for items without VAT (default MOMSFRI): items that are not subject to VAT in Denmark, such as gift cards, items with a 0% VAT rate, and items in the VAT-exempt category. See VAT Categories.
- VAT region for new customers in Denmark (default: DOMESTIC): Also applies to private customers in other EU countries who pay Danish VAT.
- VAT region for new businesses in the EU (default: EU): businesses in other EU countries with a VAT number.
- VAT area for new customers outside the EU (default: EXPORT).
The VAT area is the customer’s VAT accounting group. Business Central automatically calculates the VAT based on the VAT group on the line item and the customer’s VAT area according to the company’s VAT accounting setup, and the app then compares the amounts and VAT with the order. VAT regions are used only for customers created by the app. An existing customer retains its VAT region.
If a selected account or group does not exist in the company, this is indicated in the “Connection” field, e.g., “Sales outside the EU: Account 1120 does not exist in the chart of accounts (or cannot be posted directly).” Select another one and save. If you’ve just created an account in Business Central, click Save in the app. The lists will then be reloaded, and the new account can be selected.
Step 8: Select contra accounts for the payments
The “Record Payment” feature is enabled by default and applies only to sales invoices. When a paid order is posted as an invoice, the app records the payment and offsets it against the invoice, so the invoice appears as paid in Business Central.
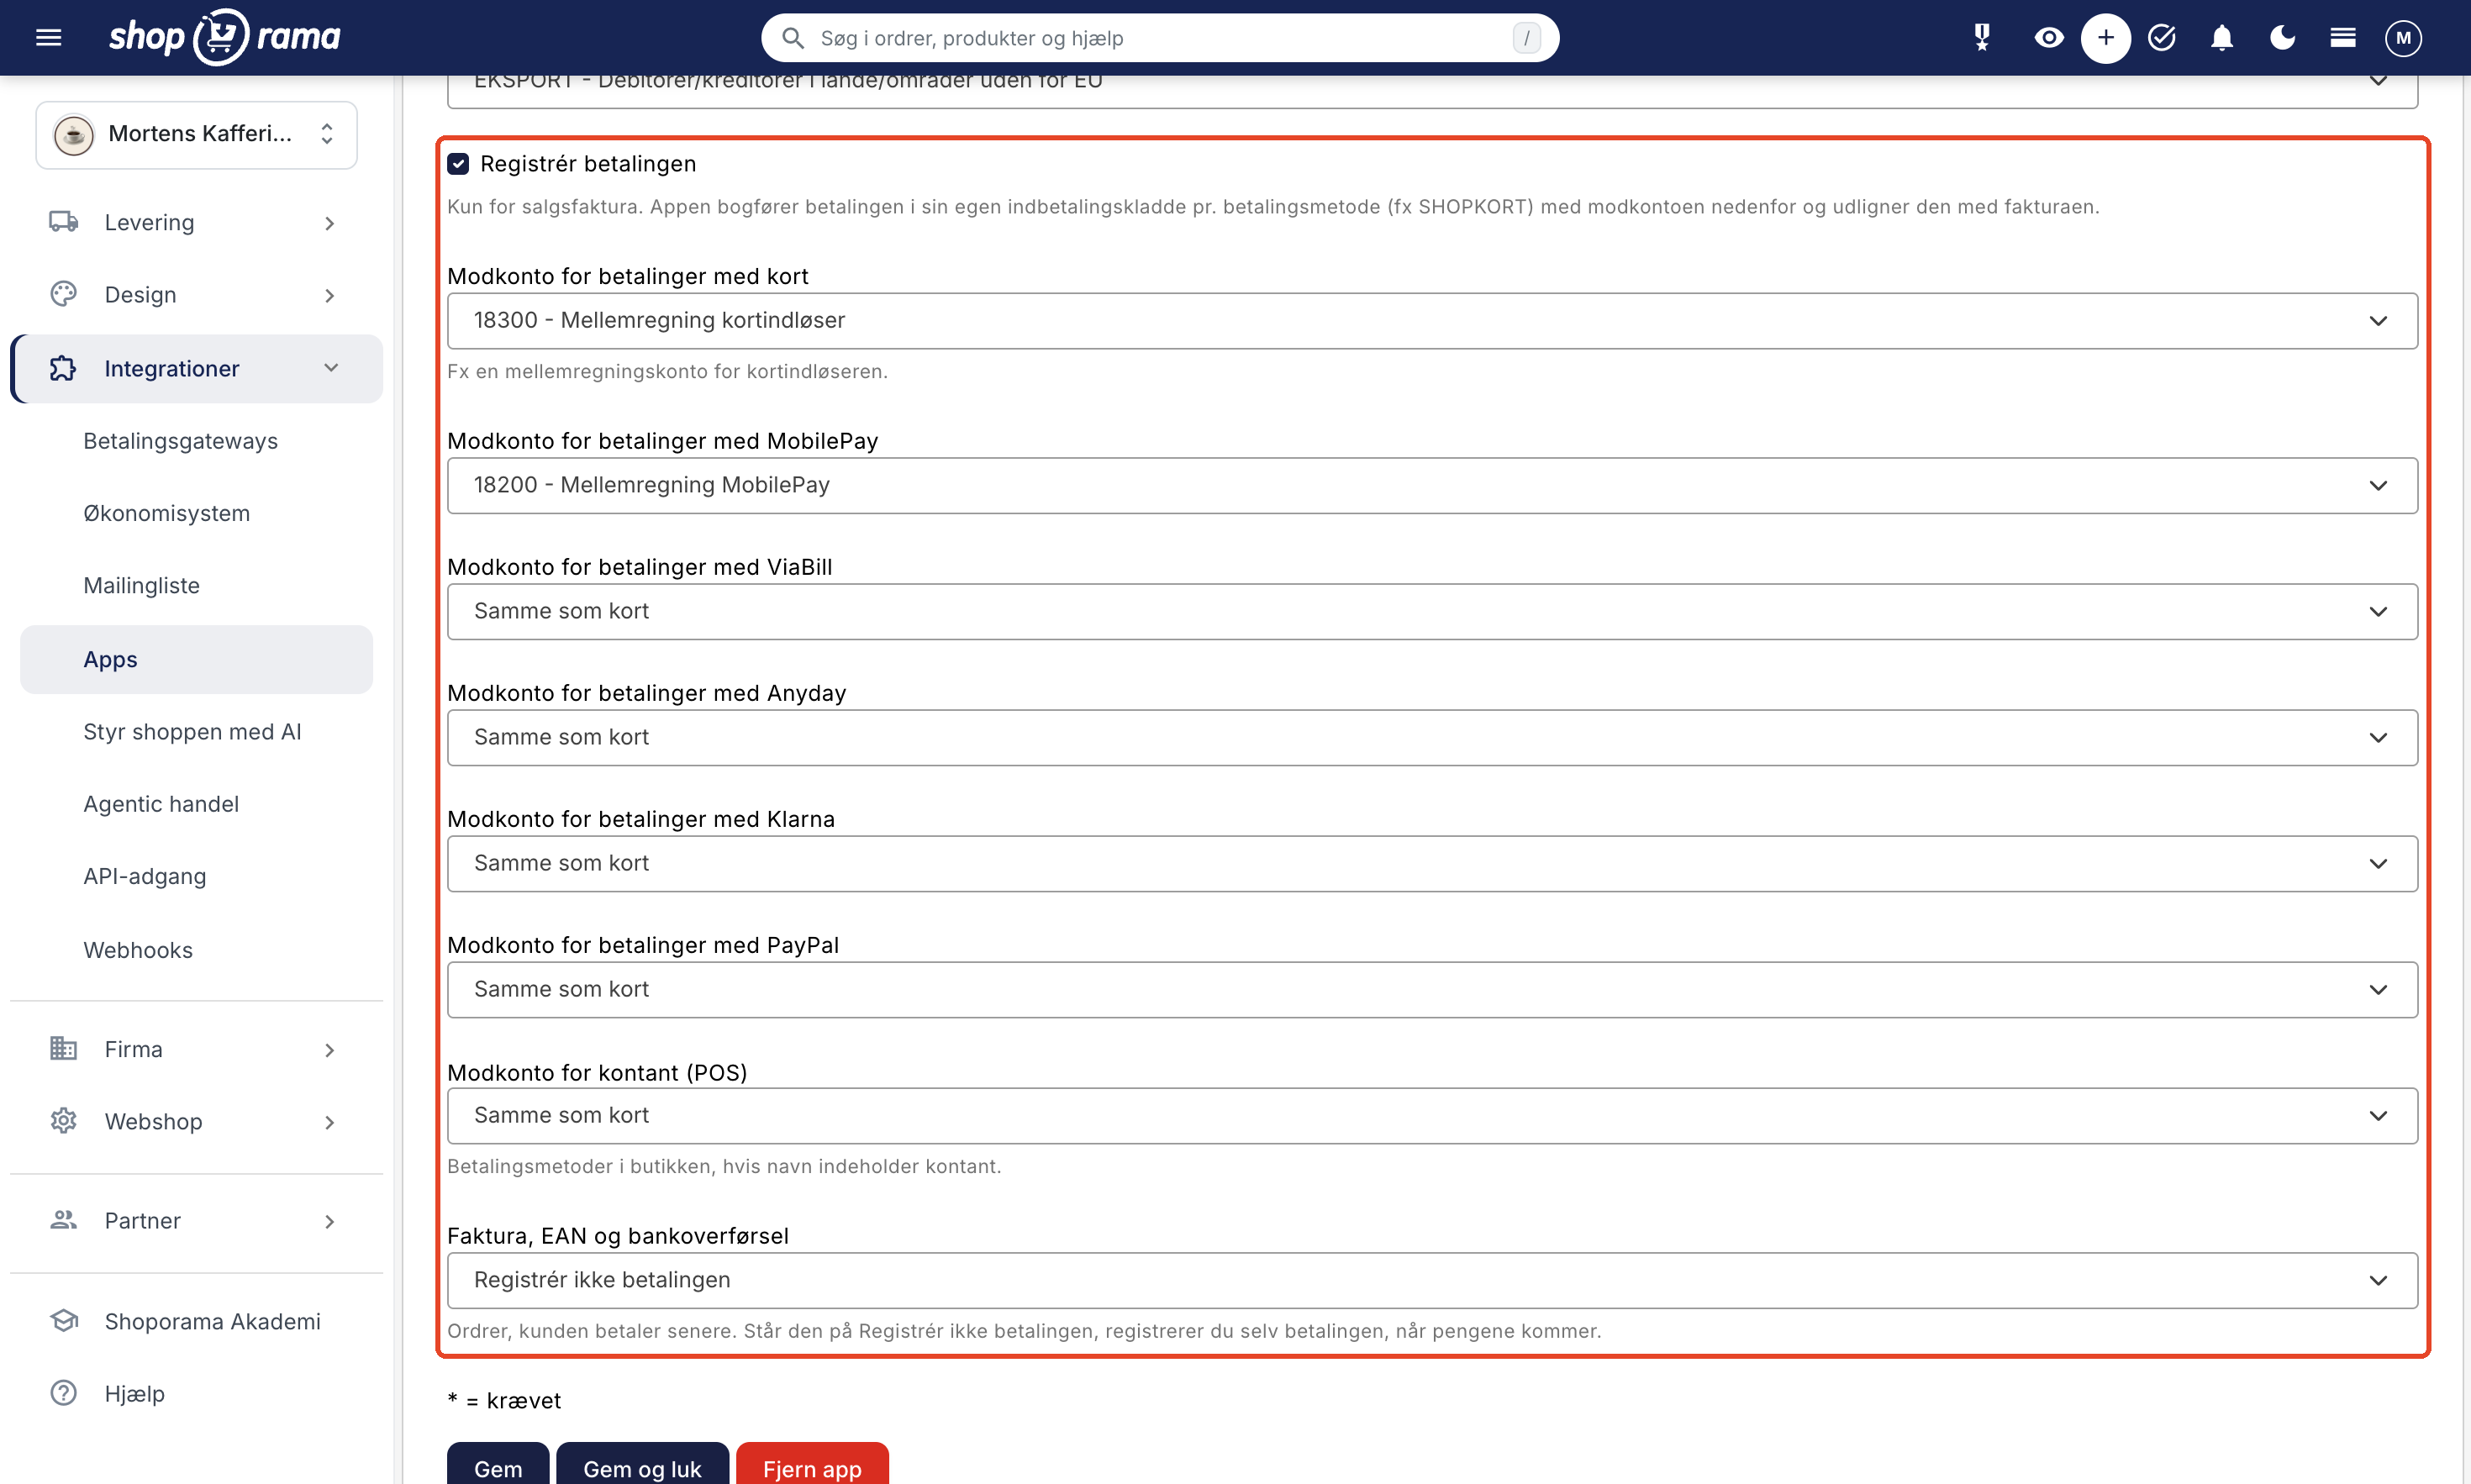
The app uses its own payment journals in Business Central—one per payment method—and creates them automatically the first time they are used: SHOPKORT, SHOPMOBPAY, SHOPVIABIL, SHOPANYDAY, SHOPKLARNA, SHOPPAYPAL, SHOPKONTAN, and SHOPFAKTUR, with names such as Shoporama: Card and Shoporama: MobilePay. The payment is posted to the journal using the contra account specified in the app’s settings and today’s date. Do not use the journals for your own entries. If there are lines in one of them that the app did not create itself, the app will not post the journal entry but will record it on the order.
- Contra account for card payments: e.g., a clearing account for the card acquirer. It’s also used for payment methods that don’t fall under the other fields. If you select none, payments won’t be recorded, and the “Connection” field will remind you of this.
- MobilePay, ViaBill, Anyday, Klarna, and PayPal (default : Same as Card): The app recognizes them based on the payment provider, card type, and the payment method’s name in the store. Vipps falls under MobilePay. You can also select “Do not record the payment.”
- Cash (POS) contra account (default: Same as card): your own payment methods whose names include “cash,” such as in-store payments.
- Invoice, EAN, and Bank Transfer (default: Do not record the payment): Orders with an EAN number and your own payment methods, such as invoice and bank transfer. The invoice remains open in Business Central until you manually record the payment when the funds are received.
The contra account lists show status accounts—such as bank, cash, and suspense accounts—to which entries can be posted directly. The payment is recorded with the invoice amount.
Consider using one suspense account per payment provider
The payment provider deducts its fees before the funds are deposited into your bank account. If you make a sale of 249 DKK, you might only receive 241 DKK. With a clearing account for each provider—for example, one for cards and one for MobilePay—you can post the payment to the bank and the fee as an expense, so the account balances to zero. Ask your accountant if you’re unsure how to proceed.
Click Save or Save and Close once all fields are filled out. From now on, new orders will be transferred automatically.
How to see what has happened with an order
The app uses three order labels:
- business-central-ok (green): The order has been transferred. This also applies when it’s saved as a draft or a sales order.
- business-central-failed (red): The order has not been transferred, or something went wrong along the way. The note on the order explains what happened.
- business-central-pending (yellow): You set this yourself when an order needs to be transferred, for example, after an error.
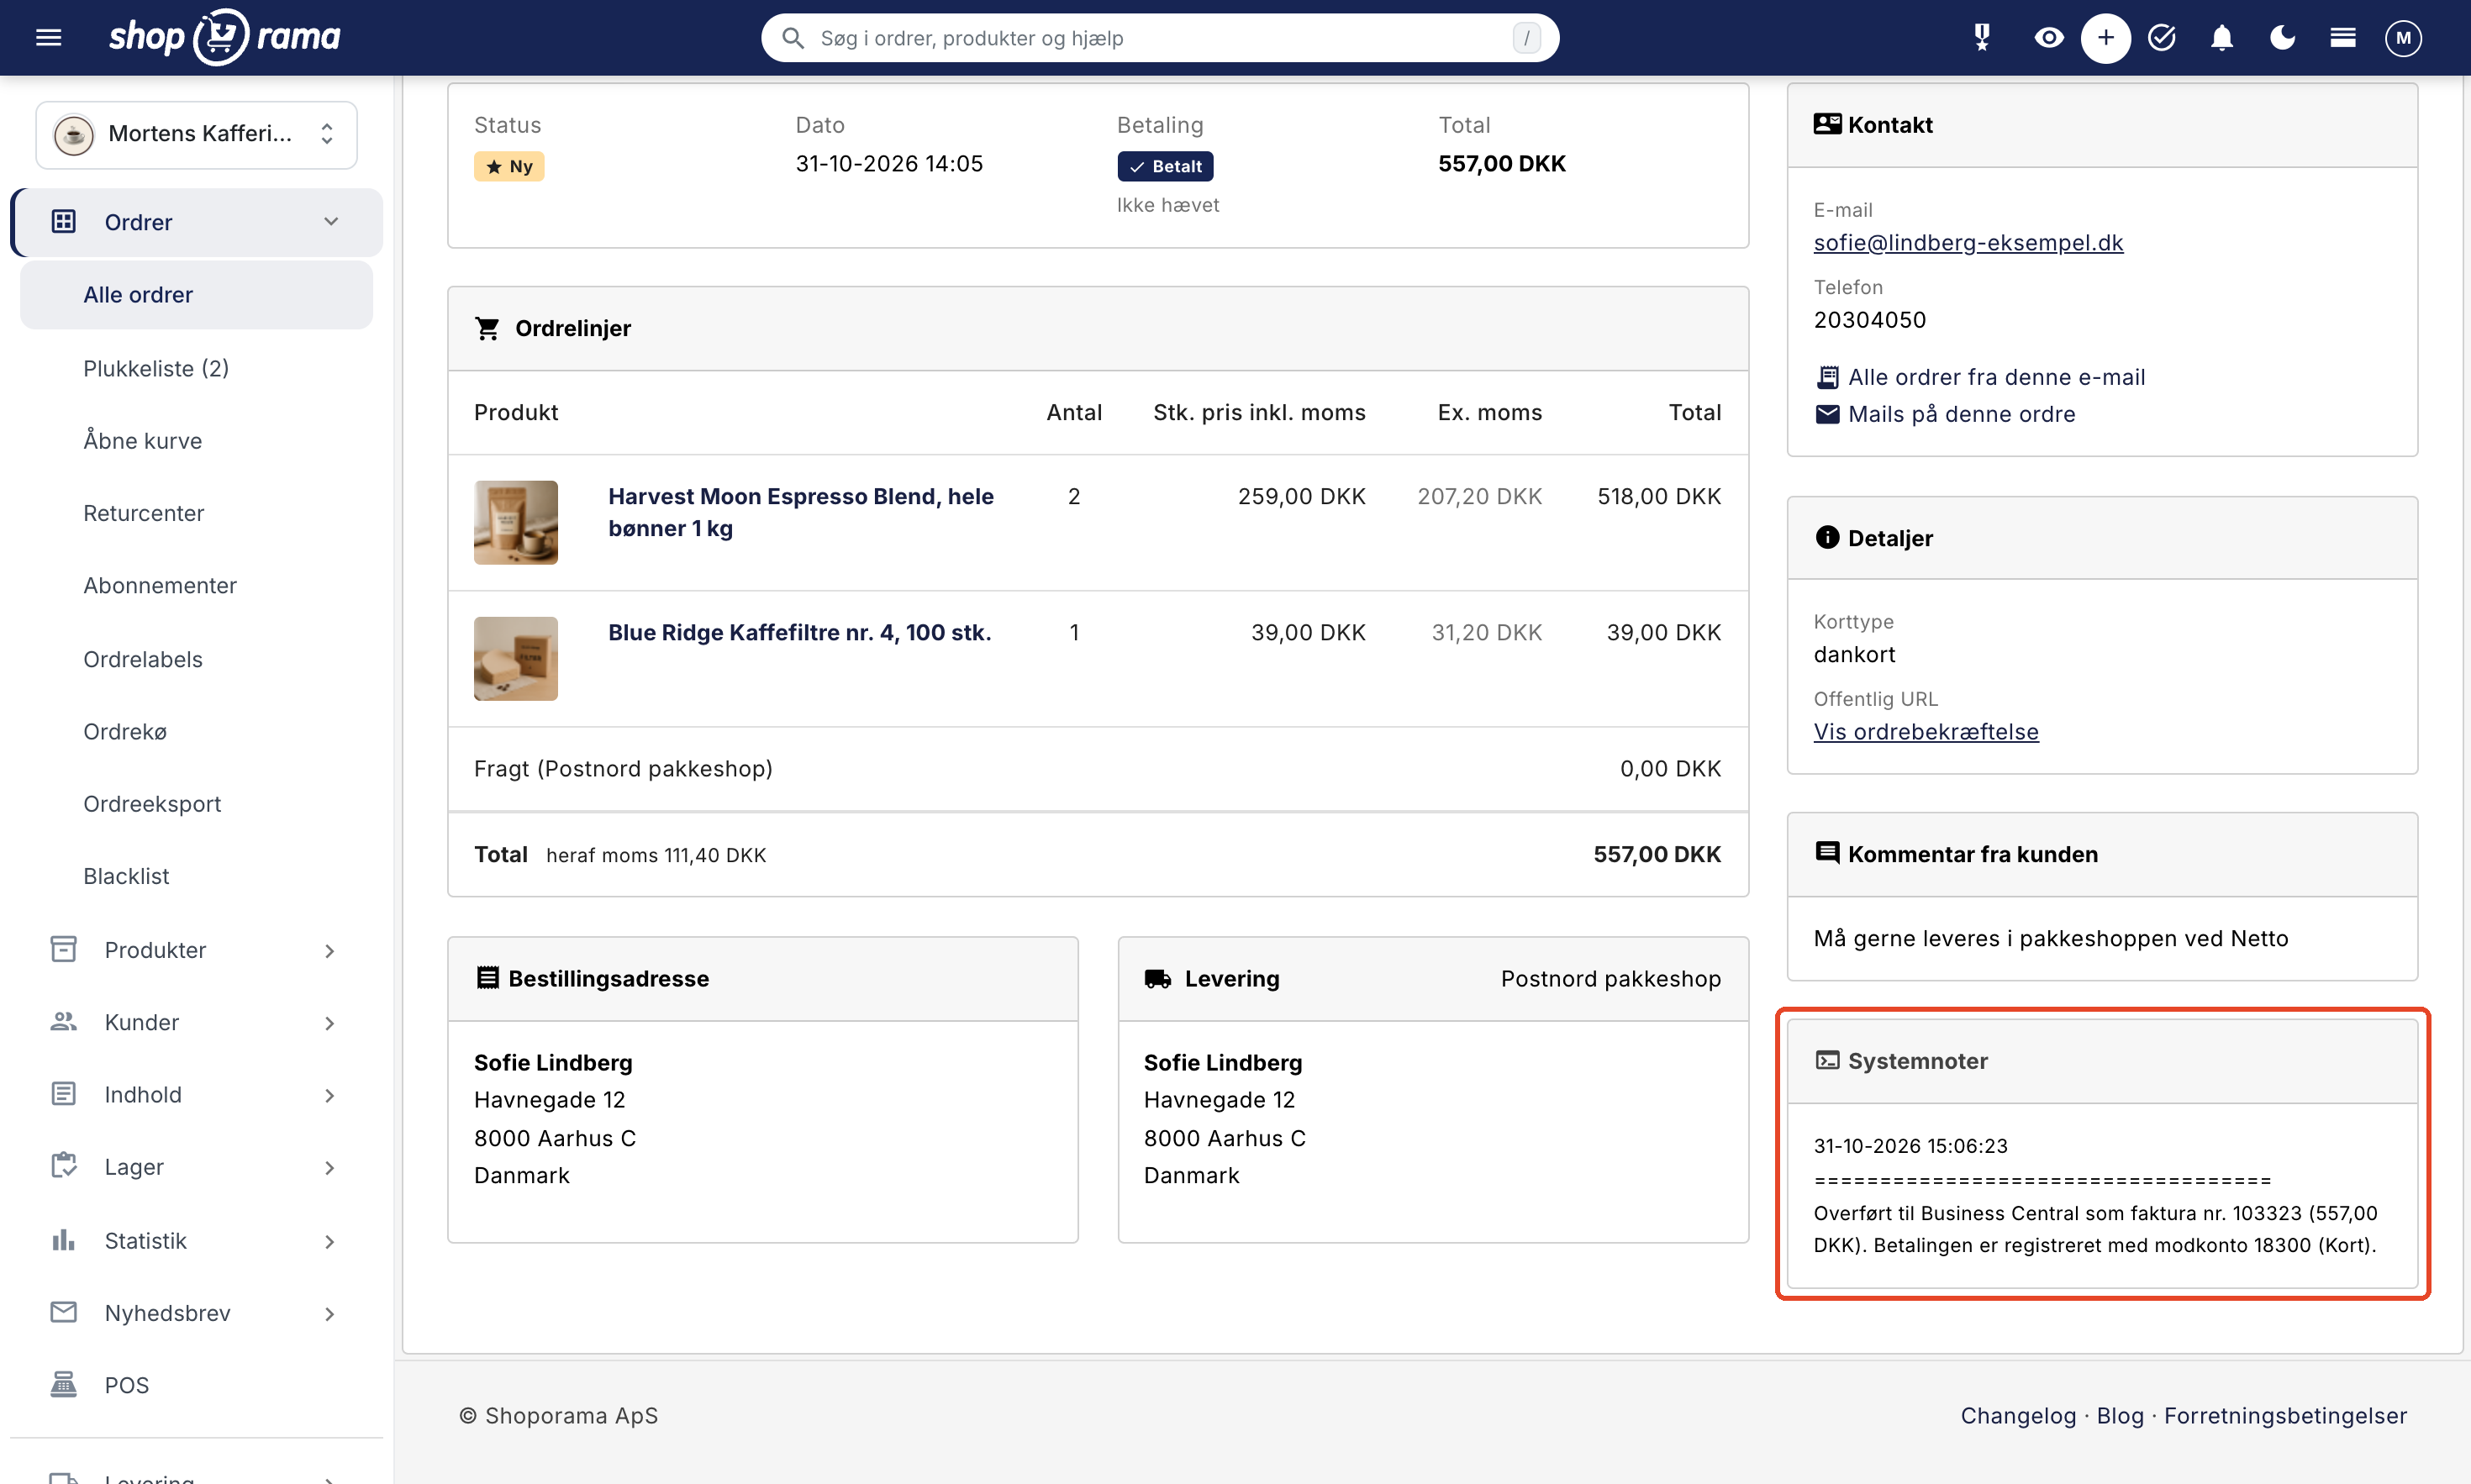
Open the order and click System Notes to expand the note. Here you’ll find the Business Central number, the amount, and whether the payment has been recorded—for example, “Transferred to Business Central as invoice no. 103323 (557.00 DKK).” The payment is recorded with contra account 18300 (Card).
The “Connection” field in the app also counts the orders that failed in the last 7 days, e.g., 2 orders failed in the last 7 days. See the “business-central-failed” label in the order list.
This is transferred to Business Central
Sales Invoice
- The “External Document No.” is the prefix followed by the online store’s order number, e.g., WEB-4792. The invoice number itself comes from Business Central’s own numbering series.
- The line items show the item name with variants and the item number in parentheses, the shipping cost with the shipping method name, and the discounts as “Discount” with the discount code, “Promotional Discount,” and “Points Discount.” If the order contains items with different VAT rates, the discount is distributed across the rates. Deposits and gift cards are also included.
- The shipping address, email, and phone number are listed on the invoice. The name is that of the customer.
- The online store’s invoice is attached as a PDF when “Attach online store invoice as PDF” is enabled.
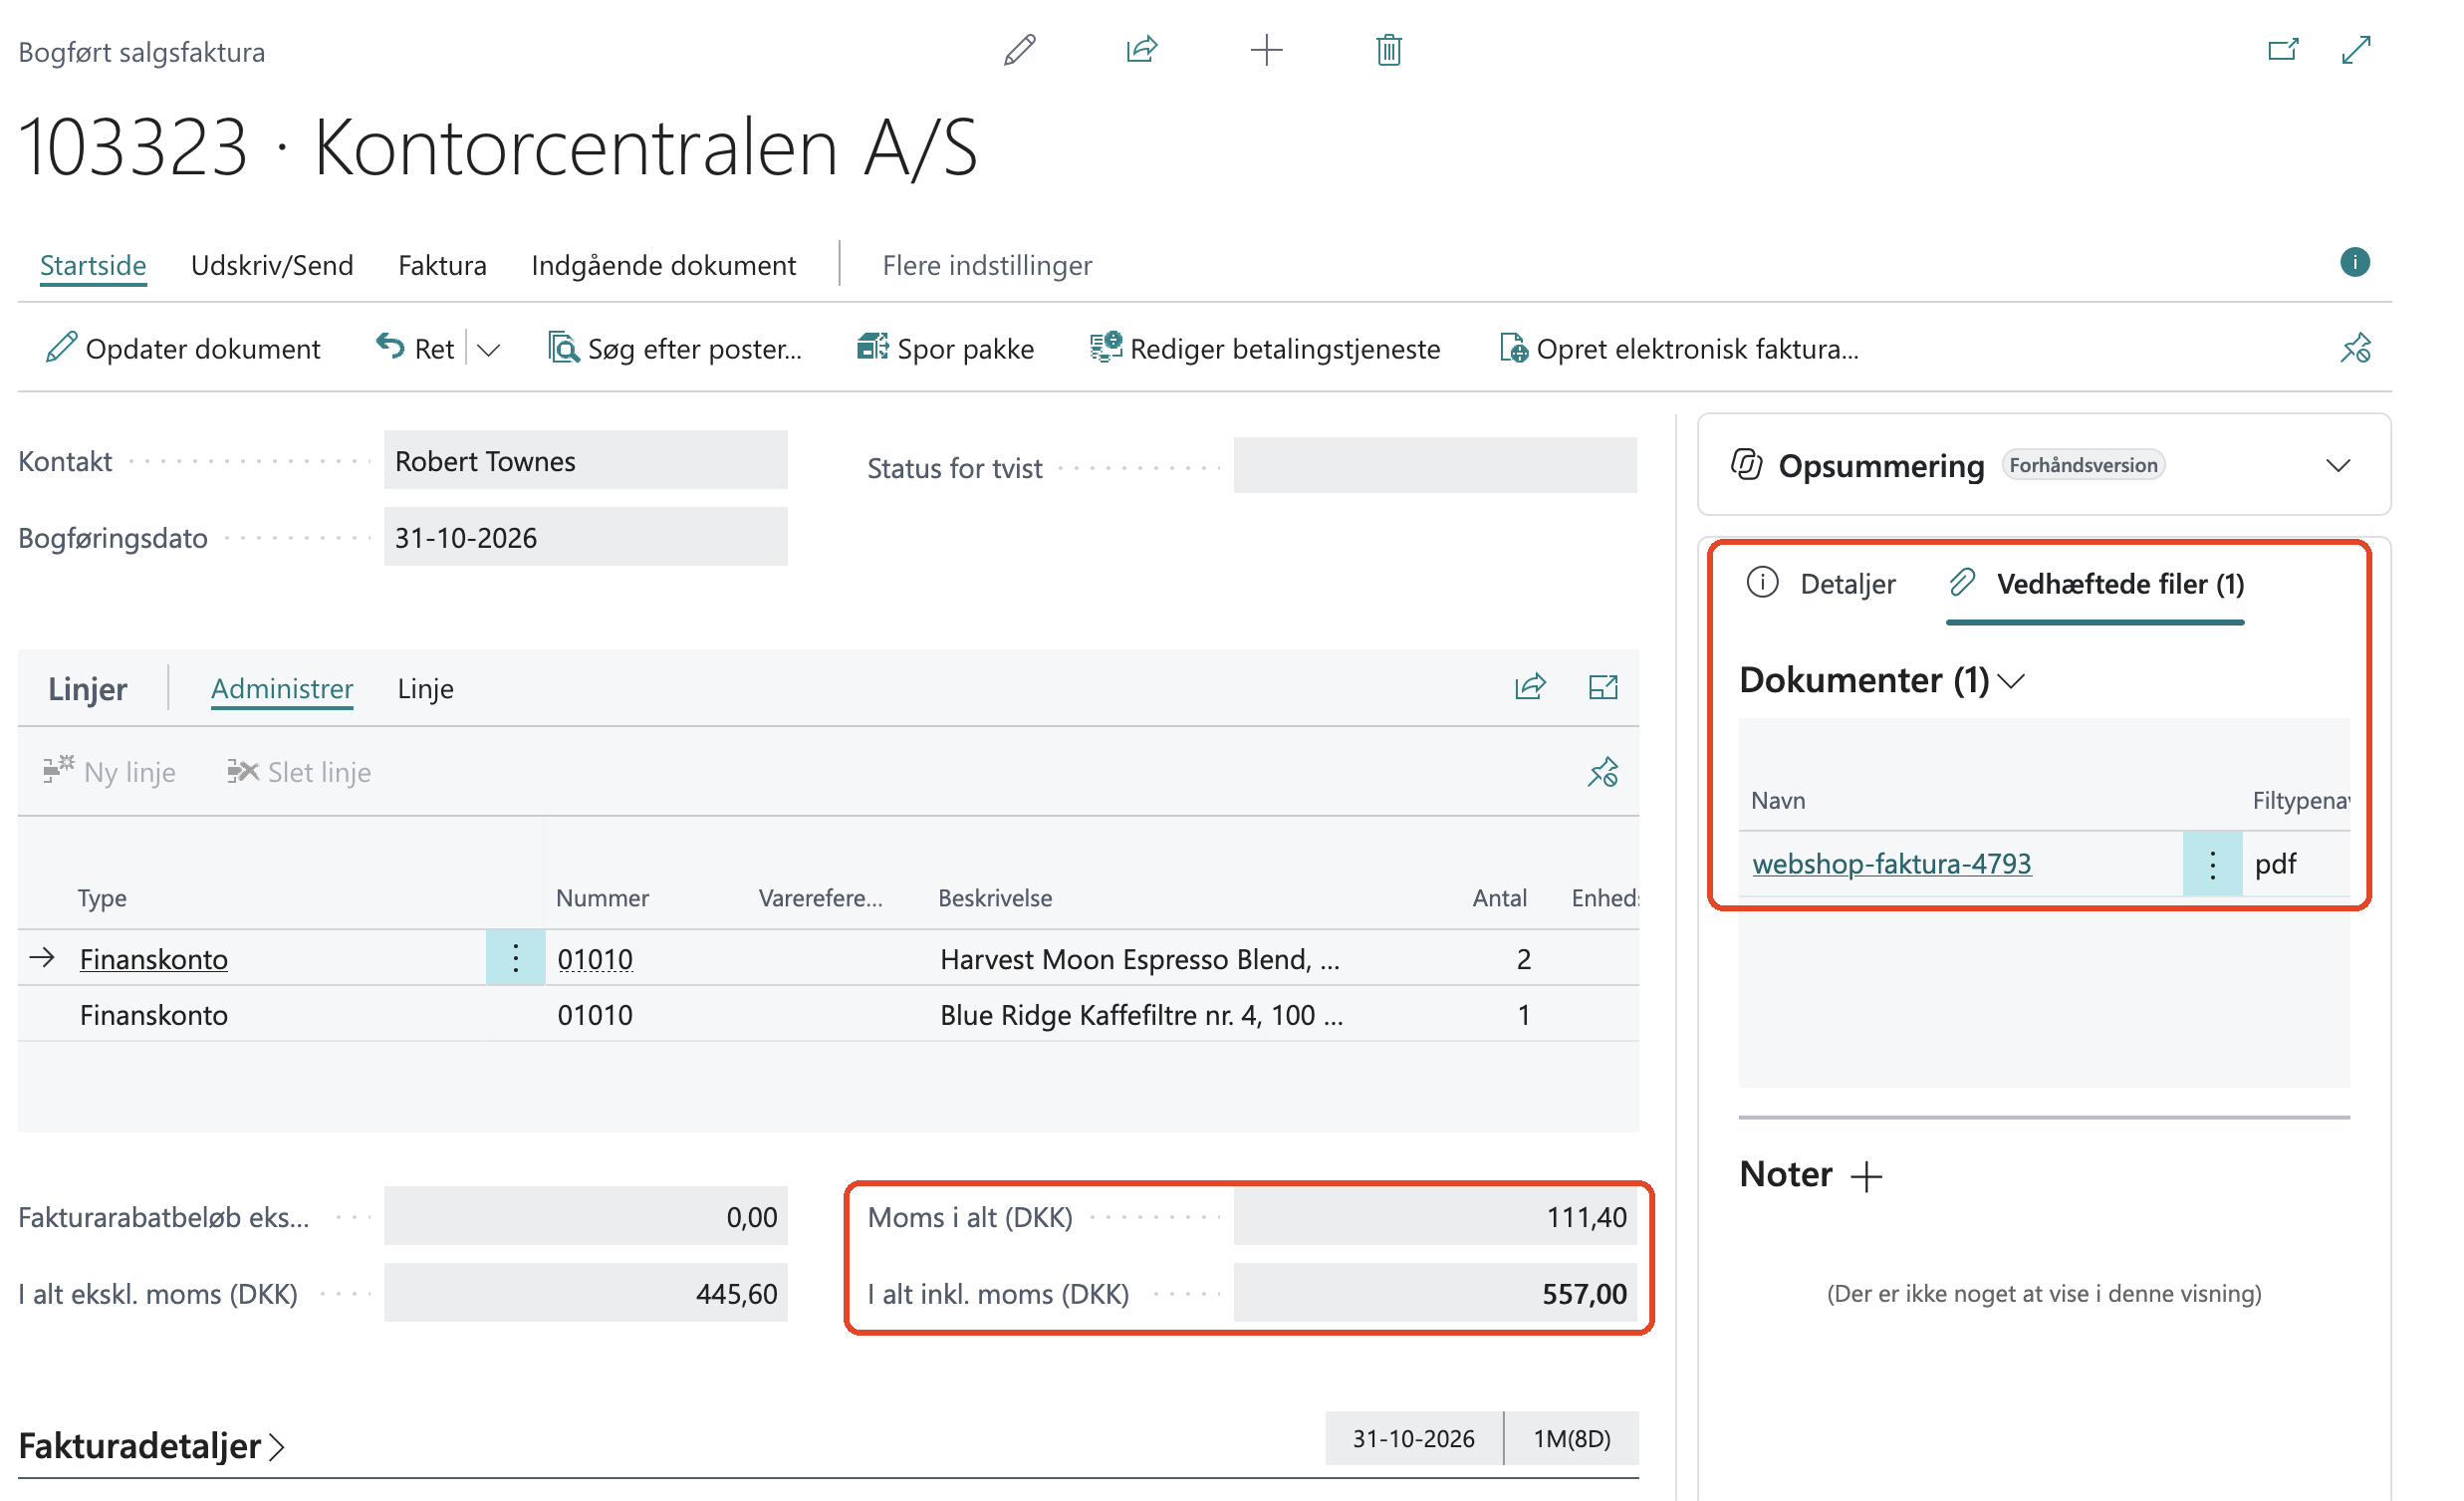
Before the invoice is posted, the app compares the amount and sales tax in Business Central with the order. If they match, the invoice is posted. If they differ by more than a few øre, the invoice remains as a draft, and the order is marked as “Business Central failed” with both amounts noted in the comment. See “When Something Goes Wrong.”
VAT, the EU, and Exports
- Denmark: Danish VAT. Private customers in other EU countries who pay Danish VAT are treated as Danish customers.
- Businesses in other EU countries with a VAT number and no VAT on the order are assigned the VAT category “EU” (0%, reverse charge) and the account “Sales to Businesses in the EU.”
- Exports outside the EU without VAT are assigned the VAT area for exports and the “Sales Outside the EU” account.
- The VAT group on the line items— for businesses in the EU and outside the EU—means that an item that normally has Danish VAT is still assigned the “VAT Group for Items with VAT.” The customer’s VAT area is then set to 0%, and Business Central places the sale in the correct fields on the VAT return (EU sales and exports). Items with their own 0% VAT rate or the VAT category “VAT-Exempt” are assigned the “VAT Group for VAT-Exempt Items.”
- If the online store has charged VAT on an order shipped abroad—for example, because the VAT number was invalid—the customer is treated as a Danish customer, so Business Central applies the same VAT rate as the order.
OSS: Sales with VAT Rates from Other EU Countries
If you sell to private customers in other EU countries using the buyer’s country’s VAT rate (OSS), Business Central requires VAT accounting groups by country, which the app does not recognize. An order with a VAT rate other than 25%, such as German VAT at 19%, is therefore created as a draft, and the order is marked as “business-central-failed” with an explanation. Select the VAT accounting groups for that country on the draft in Business Central, and post it there. Then set the order to “business-central-pending.” The app will then find the invoice again using the “External Document No.” and register the payment.
The app can only see the rate. It cannot distinguish an OSS sale to a country with a 25% VAT rate—such as Sweden or Croatia—from Danish VAT, so it is posted with Danish VAT. If you sell to those countries using OSS, you must correct those invoices in Business Central.
Foreign Currency
An order in another country’s currency, such as euros, becomes an invoice in that currency. Business Central converts to Danish kroner using its own exchange rates, not the rate from the purchase, so the currency must be set up with exchange rates in Business Central. Payments are not recorded on invoices in foreign currencies, and the note states , for example , “The payment has not been recorded because the invoice is in EUR.” Record it in Business Central. Read more in “Sell in Multiple Countries and in Multiple Languages.”
Credits and Exchanges
- A credit memo in Shoporama—for example, from Returned Goods on the order, the returns center, or an exchange—becomes a sales credit memo in Business Central for the same customer. The external document number is prefixed with “-K.” Read more in “Credit Memos and Refunds.”
- If the original invoice is still open (unpaid), the credit memo is offset against it. If the invoice has been paid, the credit memo is posted without offset.
- The refund is not recorded. You must record it in Business Central.
- If you credit an order that was transferred as a sales order, the credit memo is created as a draft so you can post it once the goods have been returned. Business Central cannot create return orders from external sources.
- In the case of an exchange, a credit memo is created for the original order and a new invoice is created for the exchange order.
- If the original order has not yet been transferred, the credit memo will be marked as “business-central-failed” with an explanation. Post the original order first, and then set the credit memo to “business-central-pending.” If the order is from before you installed the app, create the credit memo in Business Central or set the credit memo to “business-central-pending.” The app will then post it without linking it to an invoice.
Cancelled and Old Orders
- Canceled orders are never transferred, even if you mark them as “business-central-pending.” If you cancel an order that has already been transferred, nothing happens in Business Central. Instead, credit the order in Shoporama, and the app will create a credit memo.
- Orders from before you installed the app are transferred only if you mark them as “business-central-pending.”
- The app never transfers the same order twice. If you set an order to “business-central-pending” after it has already been transferred, you’ll instead receive a note stating that it won’t be transferred again.
Sales Invoice or Sales Order?
Under “Transfer as,” you choose what the order will become in Business Central:
- Sales Invoice (default): The order becomes a sales invoice that is posted immediately. The payment is recorded, and the online store’s invoice is attached as a PDF. This works for most online stores where the item is shipped directly from the online store.
- Sales Order: The order becomes a sales order that is not posted. You fulfill and invoice it in Business Central, just as you do with your other sales orders—for example, when inventory and shipping are managed in Business Central. The app does not record any payment and does not attach a PDF. If you select “When the order is created” under “Transfer the order,” the sales order is transferred as soon as the customer places the order.
If you change this setting, it applies to orders transferred thereafter.
Items in Business Central
When the “Use items in Business Central” checkbox is selected, a line item for the product is posted in Business Central when the product number in Shoporama matches the product number in Business Central. This ensures that inventory in Business Central is updated with the sale. Item lines are posted according to the item’s posting setup in Business Central, not to the Sales account. Lines for which the item number does not exist are posted to the Sales account, and the note on the order states, for example, “Item number 1896-S does not exist in Business Central, so the line has been posted to the Sales account.”
- Variants: The item number can consist of the item number and the variant code separated by a hyphen, e.g., SP-SCM1006-WHITE for the WHITE variant of item SP-SCM1006.
- Uppercase and lowercase letters are not distinguished, and blocked items are not used.
- The app remembers for 24 hours whether an item number exists. If you create an item in Business Central, it may take up to 24 hours before the app uses it.
- The app never creates products in Business Central and does not retrieve products, inventory, or prices for Shoporama.
When Something Goes Wrong
If a transfer fails, the order is labeled " business-central-failed " and a note is added under System Notes with an explanation. The note ends with “Fix the error and apply the ‘business-central-pending’ label to the order to try again.” The app does not retry automatically. Here’s how to resubmit the order:
- Read the note on the order and correct the error in the app or in Business Central.
- Go to the order list, click the “Assign/Remove Labels ” icon next to the order, and select “business-central-pending.”
- Shortly afterward, the label will change to “business-central-ok.” If it fails again, the order will be marked “business-central-failed ” and a new note will be added.
If an invoice has already been created in Business Central, the app will use the same invoice when you try again. If you’ve deleted it in Business Central, the app will create a new one, and the “External Document No.” will have a -1 appended to it.
Connection error
- Business Central does not recognize the app yet: create the app under Microsoft Entra apps, as described in step 3, and click Save in the app.
- The app lacks permissions in Business Central: grant the app the D365 BUS FULL ACCESS permission set under Microsoft Entra apps. Set Status to Disabled first, then to Enabled.
- The environment does not exist: correct the name in Environment in Business Central, and click Save.
- The company no longer exists in Business Central: select the company again under Company in Business Central, and click Save.
- Microsoft is not granting the app access to your Business Central: consent has been revoked, or the app has been removed from Microsoft. Click Connect again and have an administrator grant consent.
- Microsoft denied Shoporama access: this is an issue on Shoporama’s end. Contact support@shoporama.dk.
If an order is paid while the app is not connected, or while the company or sales account is missing, it will be marked as “business-central-failed” with a note to that effect. Correct the setup and set the order to “business-central-pending.”
The customer lacks posting groups
The note states: “The customer was created in Business Central without accounting groups and has been deleted.” Create the customer template and API setup as described under “Create a Customer Template in Business Central,” and set the order to “business-central-pending.” If it is a private customer, you can also group private customers under a fixed customer in the app. If it says “Fixed customer 10000 for private customers does not exist in Business Central,” correct the number in “Fixed customer for private customers” and click Save.
The invoice is saved as a draft because the amount differs
If the amount or the sales tax in Business Central differs from the order, the invoice remains as a draft, and the note says, for example , “Invoice 1042 is a draft in Business Central because the amounts differ for both items .” This typically happens when the VAT accounting setup in Business Central does not use the same rate as the online store for the customer’s and line item’s VAT groups. You have two options:
- Correct and post the draft in Business Central, and set the order to “business-central-pending.” The app will then find the invoice again using the “External Document No.”, register the payment, and mark the order as “business-central-ok.” In this case, the online store’s invoice will not be attached as a PDF.
- Correct the setup in the app or in Business Central, delete the draft in Business Central, and set the order to “business-central-pending.” The app will then generate a new invoice.
An order with VAT from another EU country is also saved as a draft. See OSS: Sales with VAT from other EU countries.
Business Central was unable to post the invoice
If Business Central rejects the posting, the invoice remains as a draft, and Business Central’s own explanation is listed in the note—for example, that the posting setup is missing for a combination of posting groups. Correct the setup in Business Central and set the order to “business-central-pending.” The app will then post the same draft.
The payment could not be recorded
The note states that the order has been transferred but that the payment could not be recorded, and explains why. If it says “The SHOPKORT payment draft contains lines that the app did not create,” post or delete those lines in Business Central. If the contra account does not exist, select another one in the app and click Save. Then set the order to “business-central-pending.” The app will then record the payment on the invoice that has already been posted.
The app does not do the following
- It does not create items in Business Central and does not retrieve items, inventory, or prices for Shoporama.
- Does not retrieve any data from Business Central. If you correct or record anything in Business Central, it will not be visible in Shoporama.
- Doesnot record refunds or create return orders.
- Does not automaticallypost OSS sales with VAT rates from other EU countries. Sales with a rate other than 25% are saved as drafts, and sales to countries with a 25% VAT rate are posted with Danish VAT, so you’ll need to correct those in Business Central.
- Does not record payments on invoices in foreign currencies, on sales orders, or on drafts.
- Does not reconcile payments and fees from payment providers.
- Does not work with Business Central on-premises or Dynamics NAV.
Frequently Asked Questions
I am not an administrator on our Microsoft account. Can I still set up the app?
You can install the app and configure the settings, but consent from Microsoft must be granted by an administrator, such as your IT manager. Ask them to click “Connect to Business Central” in the app’s settings and sign in. The app must also be set up under Microsoft Entra applications, and your Business Central partner can help with that.
Can our accountant see which online store order an invoice is from?
Yes. The online store’s order number appears in the “External Document No.” field on the invoice and credit memo, and the online store’s own invoice is attached as a PDF when “Attach online store invoice as PDF” is enabled. The note on the order in Shoporama displays the invoice number in Business Central.
Does the online store or Business Central calculate the sales tax?
It’s Business Central, based on your VAT accounting setup. The app sends the VAT group for each line item and the customer’s VAT region, and then compares the amounts and VAT with the order. If they don’t match, the invoice remains as a draft so the app doesn’t post an amount that differs from the order.
So far, we’ve been posting the online store’s orders manually. Will the old orders be imported twice?
No. Only orders created after installation are transferred automatically. An older order will only be transferred if you mark it as “Business Central pending.” Therefore, post the orders from before installation as you normally would, including those that are paid or shipped later.
Does the customer receive an email from Business Central when the order is transferred?
No. The app does not send any emails, and the customer is unaware of Business Central. The customer receives the same emails and the same invoice from the online store as before.
Our business customers are already listed as accounts receivable in Business Central. Will they be used?
Yes, if the customer has the same email address as the one they use in the online store and is not blocked. Business Central cannot search by CVR number, so customers who existed before the app are identified solely by email. If no one is found with that email address, the app creates a new customer, and the customer template must be set up. Once the app has found or created the customer, it will recognize the company by its CVR number—for example, when a colleague places an order using a different email address.
Are the items deducted from inventory in Business Central?
Only if “Use Items in Business Central” is enabled and the item number exists in Business Central. On a sales invoice, this happens when the invoice is posted. On a sales order, this happens when you fulfill the order in Business Central. The inventory in Shoporama is not updated from Business Central.
We have multiple online stores that post transactions to the same company. What should we be aware of?
Give each store its own prefix for external document numbers, such as “A-” and “B-,” so the numbers can be distinguished. Each store installs the app and clicks “Connect to Business Central” separately. Customers are identified by email, so a customer who shops at both stores uses the same customer record.
Can I test this in a sandbox environment before we go live in Production?
Yes. Enter the sandbox name in Environment in Business Central, and also create the app under Microsoft Entra apps in the sandbox. Use test orders, because an order that has been transferred to the sandbox will not be transferred again when you switch to Production. When you switch environments or companies, the app forgets the customers, items, and drafts it has found.
What happens if I remove the app?
No more orders will be transferred, and the settings and connection will be deleted in Shoporama. Invoices and customers in Business Central will remain, as will labels and notes on the orders. If you reinstall the app, you’ll need to reconnect it and select the settings again. The app remembers which orders it has transferred so they aren’t transferred twice.
Read more
- Business Central in the glossary
- Accounting software you can use with Shoporama
- Order labels
- Credit notes and refunds
- B2B sales in Shoporama
- OSS (One Stop Shop) in the glossary
Do you need help with the Business Central app? Email us at support@shoporama.dk.
Related articles
B2B sales in Shoporama
How to sell to businesses (B2B) and public institutions (B2G) in Shoporama with CVR, EAN and differentiated VAT.
Billy Integration: Transfer Orders to Billy (Shine Accounting)
Here's how to install the free Billy app, connect it to an API token from Billy (Shine Accounting), select sales and payment accounts, and have...
Credit notes and refunds
Complete guide to credit notes and refunds in Shoporama, including partial refunds, full credit notes and transfer to accounting systems.
VAT Categories: The Correct VAT Rates for Books, Food, and Other Goods
Here's how to apply the correct VAT rate to books, newspapers, food, and other items in each country using VAT categories, and how to allocate...
Create EAN payment as a payment method
Guide to setting up EAN payment (invoice payment for businesses) on your Shoporama online store.
Set up Dinero integration
Here's how to install and connect the free Dinero app, select accounts, VAT, and payment accounts, and have your online store's orders imported as...
Set up E-conomic integration
Step-by-step guide to install Shoporama's e-conomic app from the App Store and set up automatic transfer of orders.
Set Up Uniconta Integration
Here's how to install the Uniconta app, create a user in Uniconta, and have orders from your online store transferred as sales orders, including...
Order labels
Guide to order labels in Shoporama. Create color-coded labels to organize and categorize your orders and set up automatic allocation based on...
Reverse charge og VIES-validering: sælg uden moms til erhverv i EU
Sell in multiple countries and in multiple languages
Here's how to sell in other countries in your customers' languages and currencies using "Countries": Add a country, set up the address, language,...
Related features
Business Central Integration
Shoporama's free app transfers orders to Business Central as posted sales invoices or sales orders, records payments, and displays errors on the...
Accounting programs
Automatically transfer orders from your online store to e-conomic, Dinero, Uniconta, Billy, or Business Central. Free apps for sales tax,...
Online Store with Business Central
Connect your online store to Microsoft Dynamics 365 Business Central using Shoporama's free app. Orders are posted as sales invoices with sales...
Business Central
Business Central is Microsoft's ERP system and the successor to Navision. Find out what it's used for and how orders from the online store are...
Navision Web Store: Connect the Web Store to Business Central
Do you use Navision or Dynamics NAV? Learn about the differences between Navision and Business Central, and how online store orders are posted in...
New Free App Sends Online Store Orders to Business Central
New on Shoporama: A free app sends orders from the online store to Business Central as posted sales invoices, including customer information, VAT,...
e-conomic vs. Dinero: Which One Is Best for Your Online Store?
e-conomic or Dinero for your online store? See the differences in VAT, OSS, payments, credit memos, and customers when orders are posted...
B2B Online Store with Business Central
Sell to businesses and have the orders imported into Business Central as sales invoices or sales orders with a CVR number, open items for invoice...